 | |||
|

| Home > Astronomy > Wide Field Camera > INT/WFC Operation Manual |
|
| |||
|
| Home > Astronomy > Wide Field Camera > INT/WFC Operation Manual |
INT/WFC Operation ManualContents
1. Introduction
In this guide, the following syntax will be used:
2. Areas of the telescope
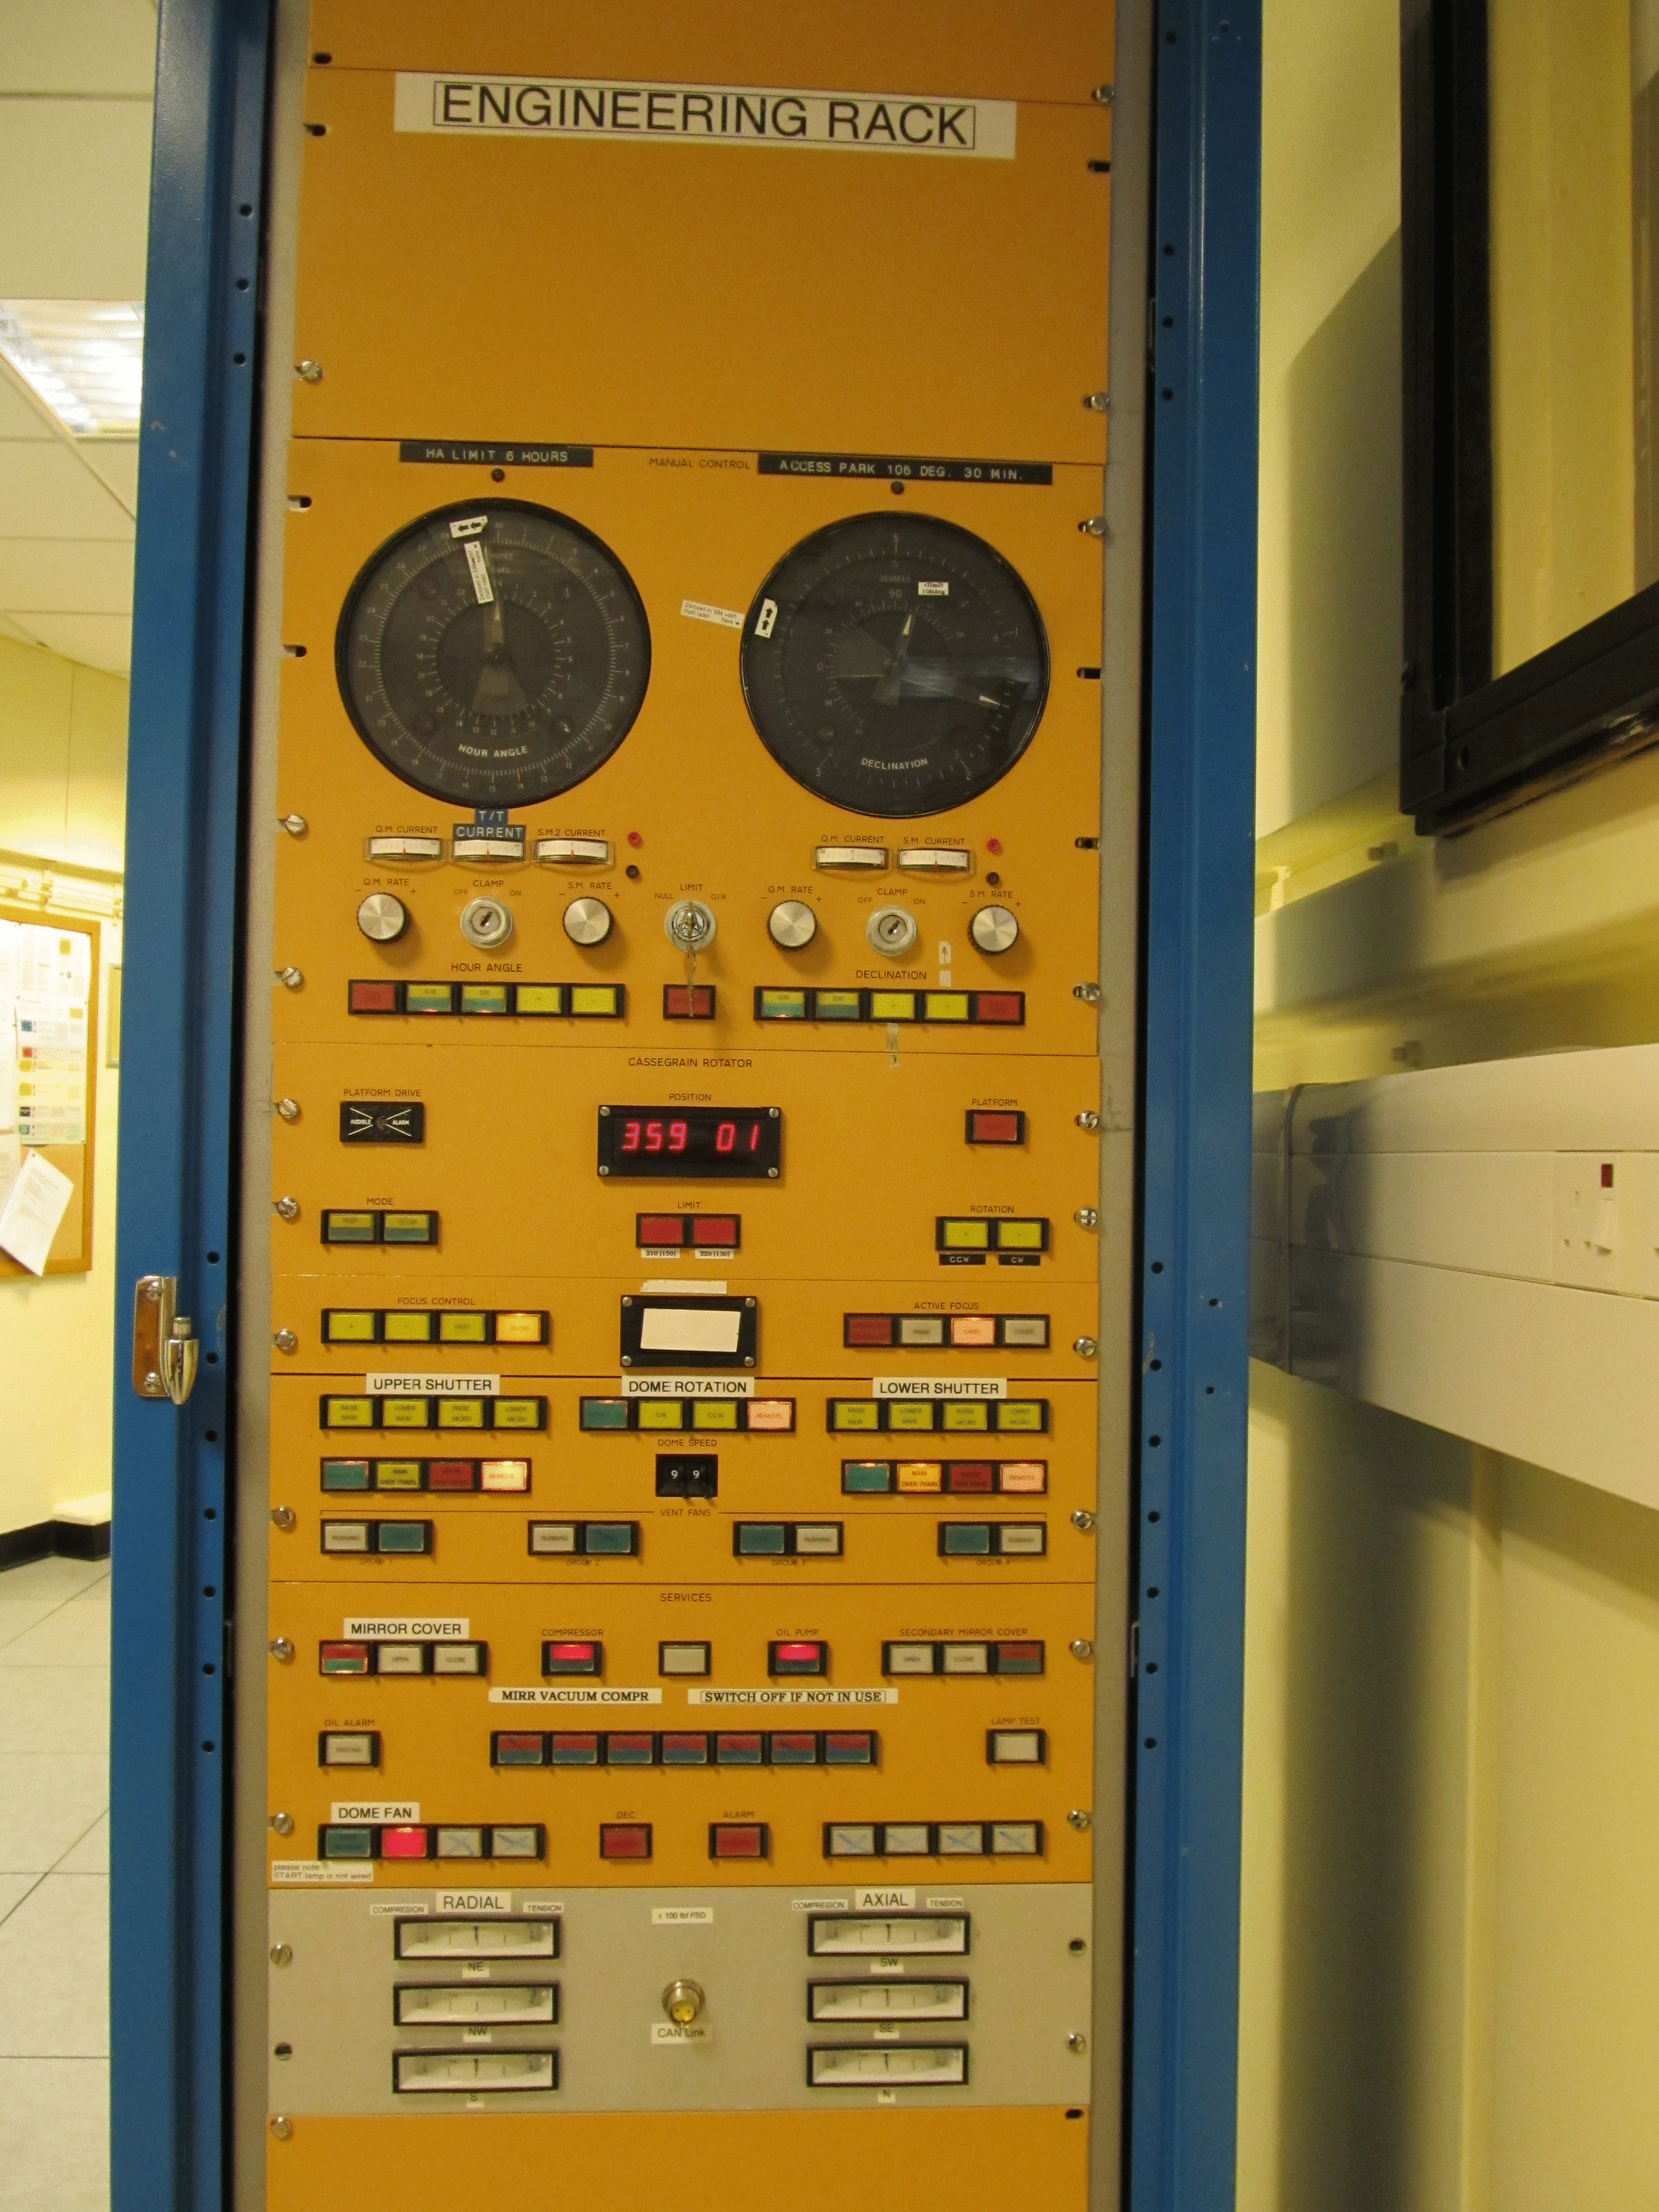
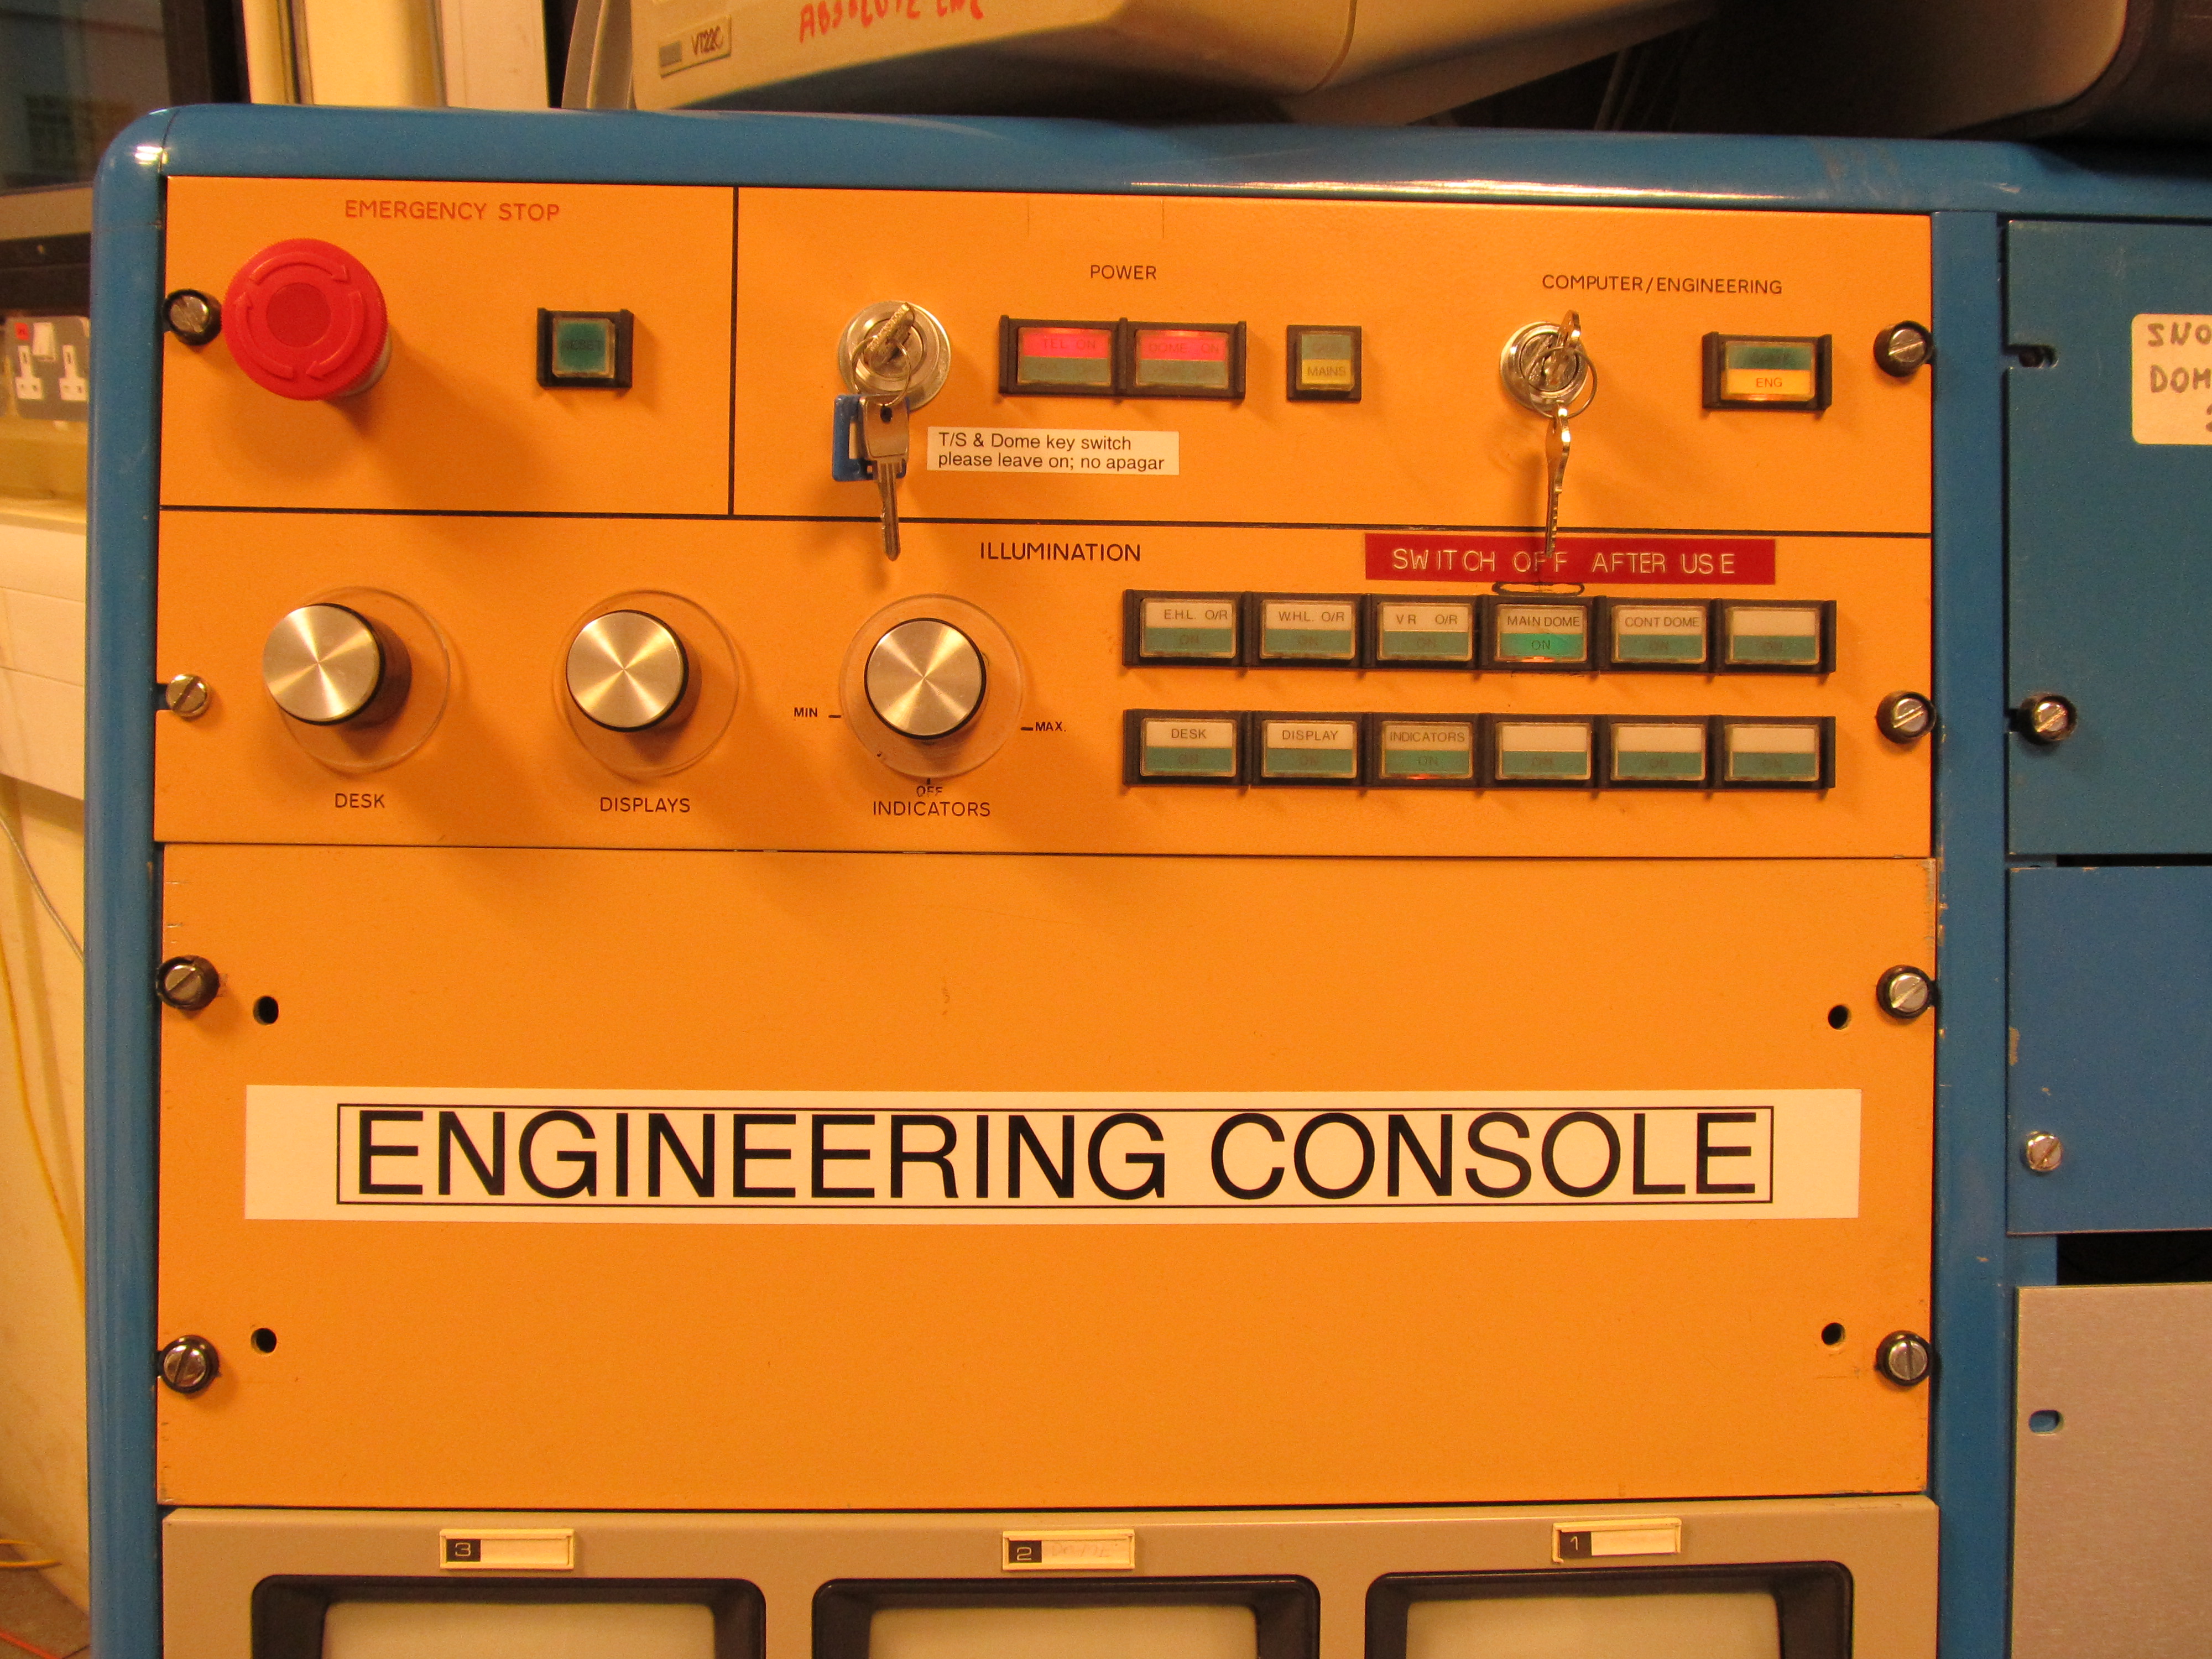
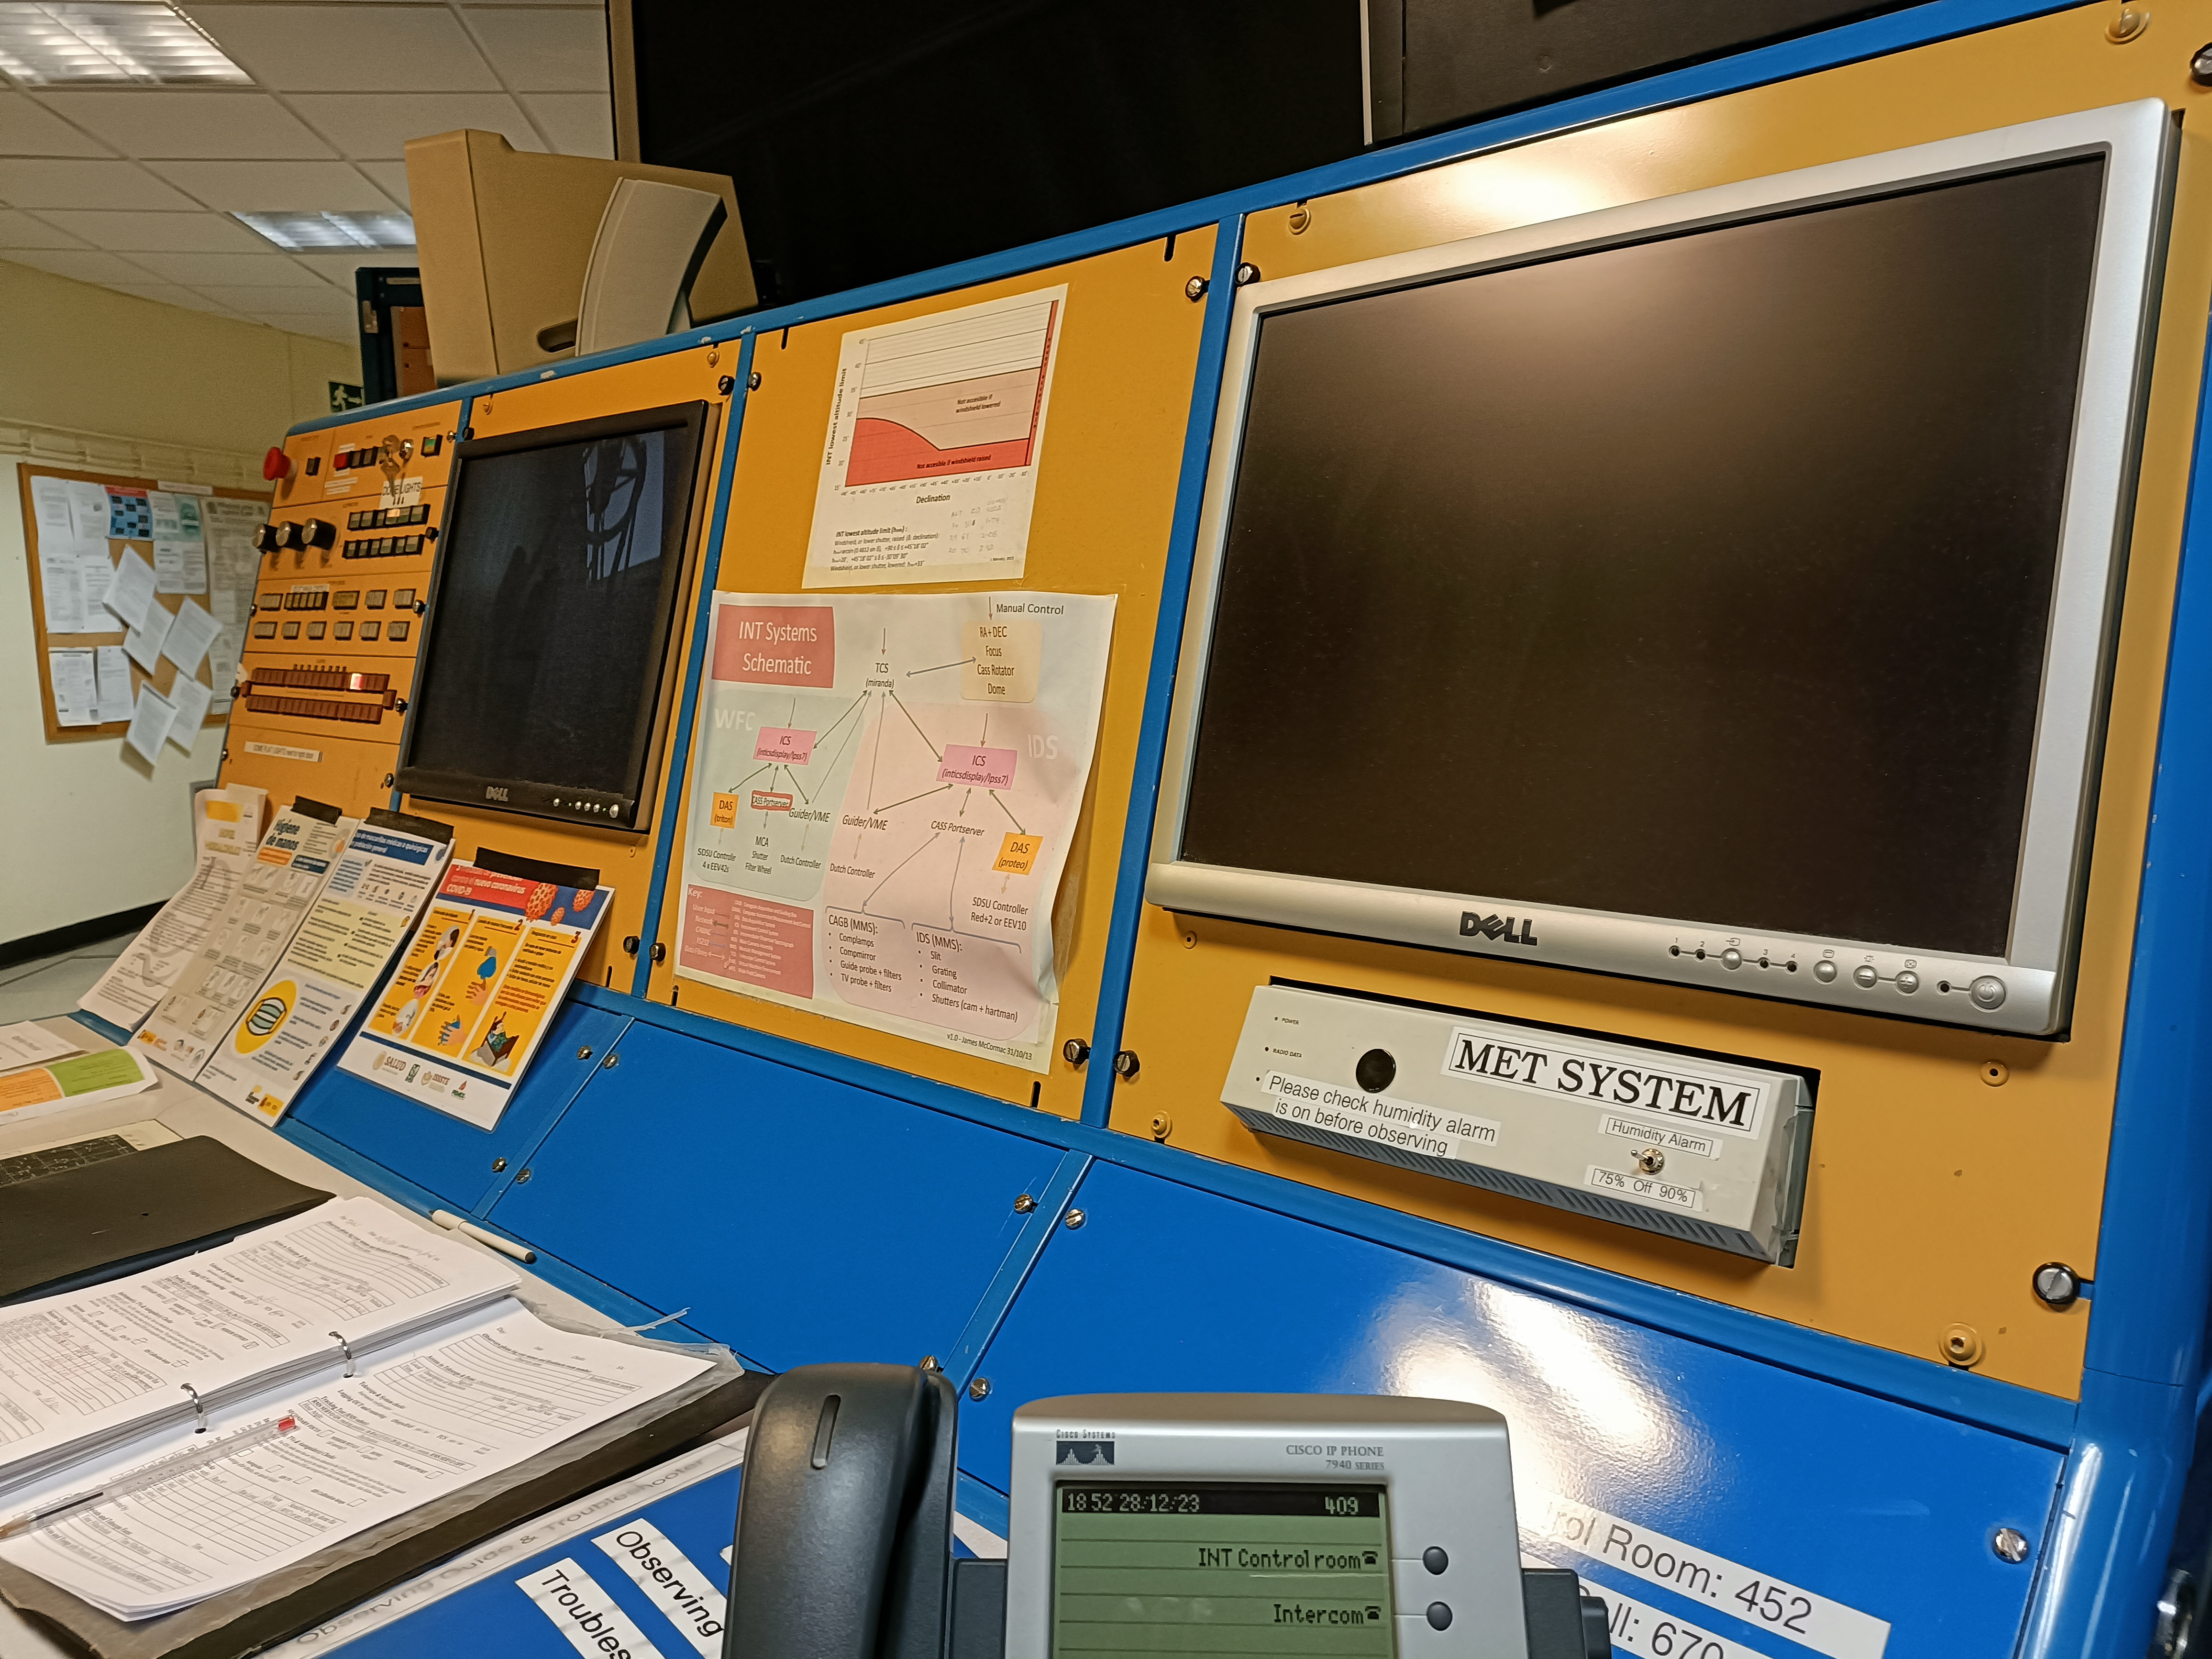
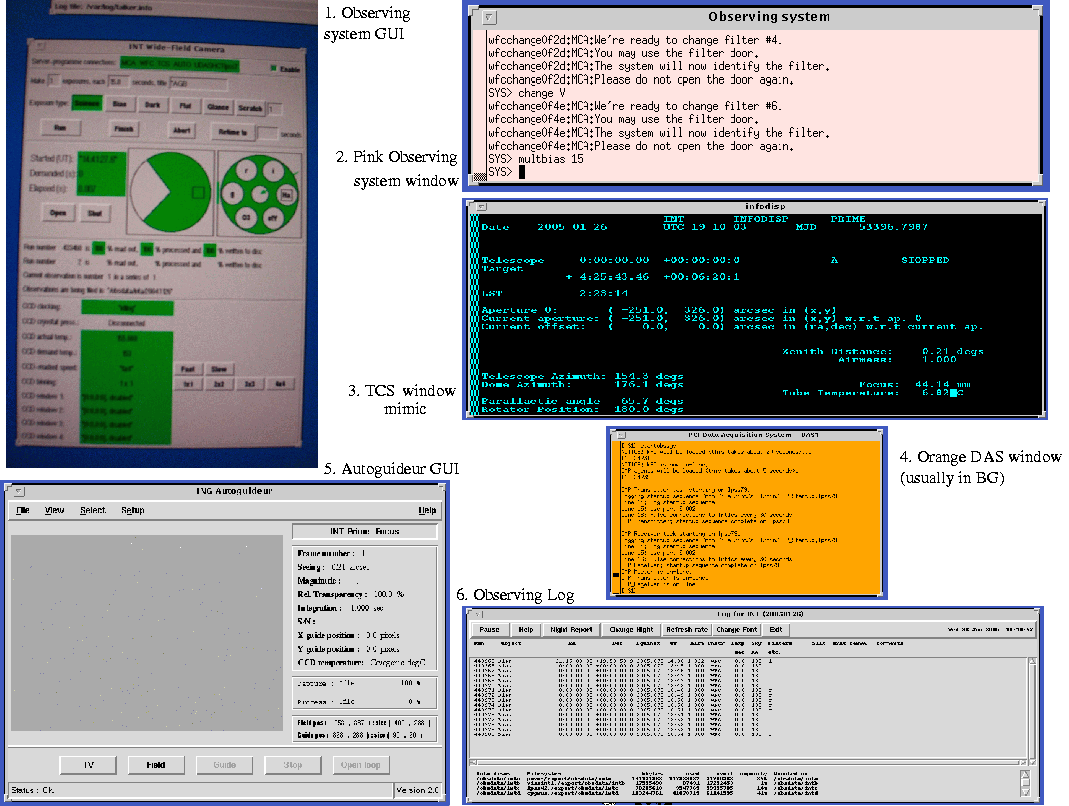
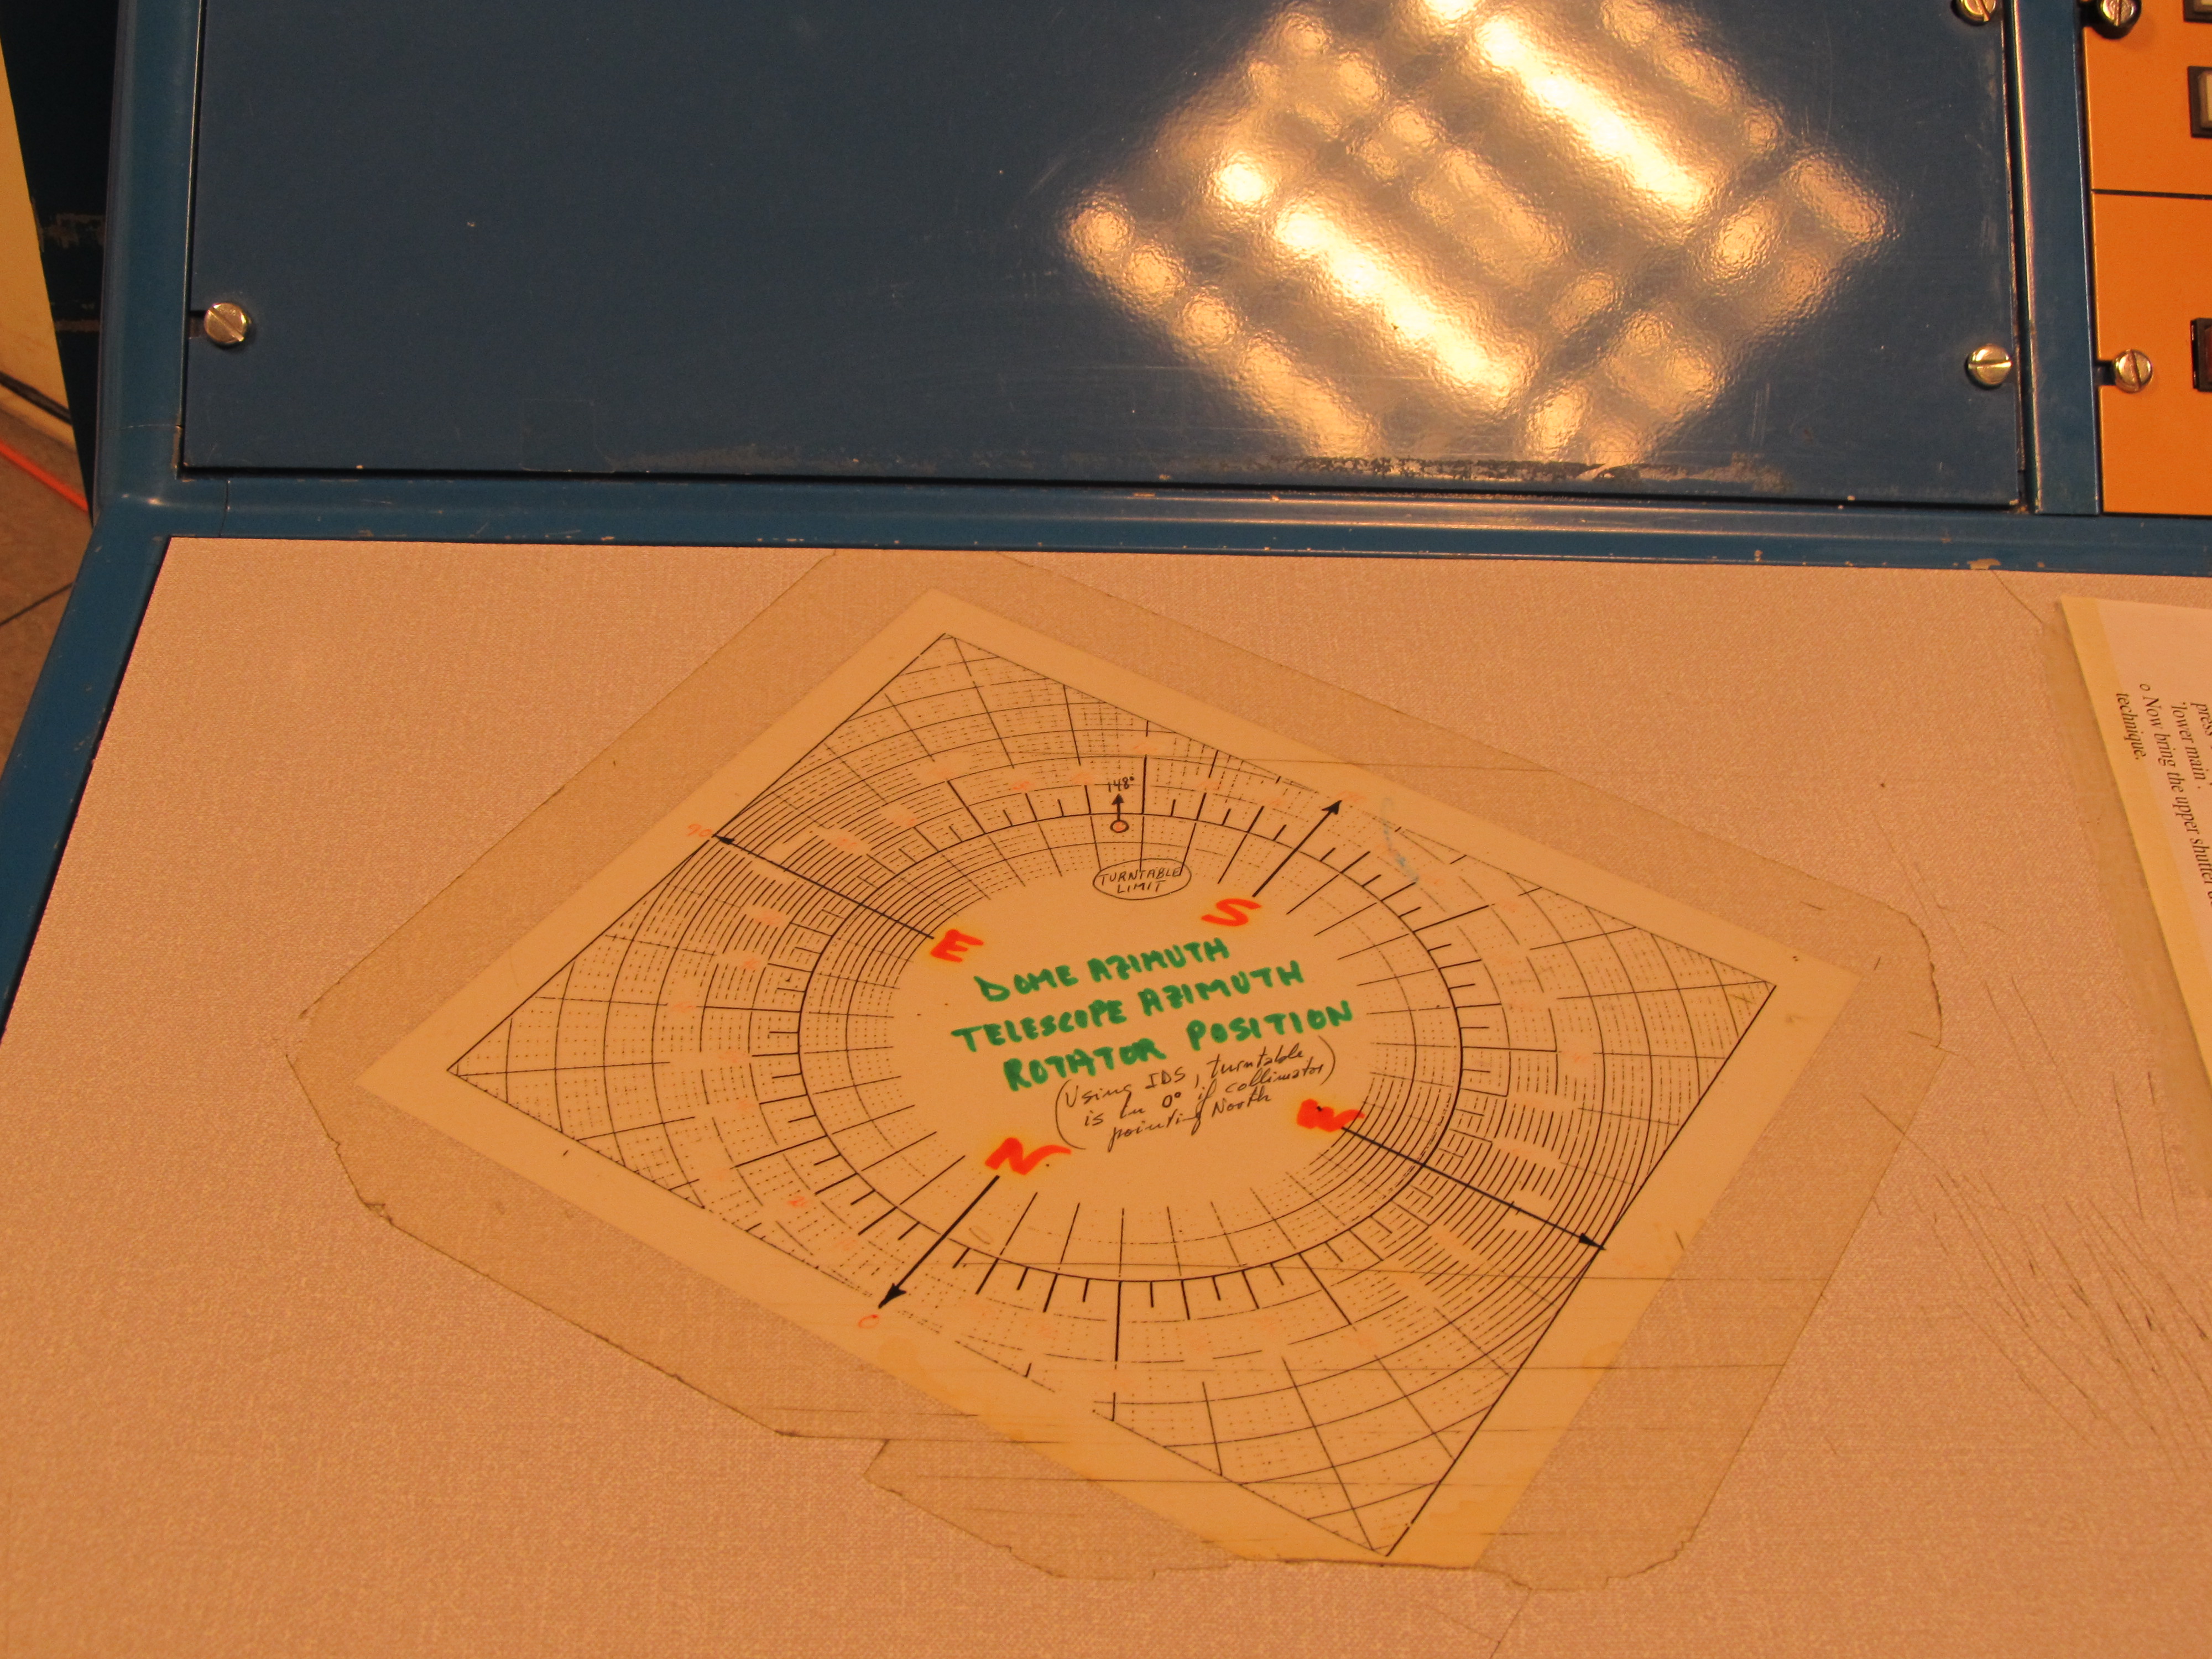
The control room is located at the top floor (3rd floor) of the building, and has the following key areas:
3. Safety
4. Preliminaries
5. Moving the telescope out of access park
On the engineering rack:
6. Moving the telescope into access park
Had the telescope not been zeroset since the last time the TCS was re-started then the entire procedure would have to be done in Engineering Mode:
To avoid having to do this it is easiest to park the telescope at zenith before re-starting the TCS, should you be forced to do so. 7. Zeroset
The "Complete zeroset" of the telescope should be done only in the afternoon of the first night of
your run by the SA. It can be also executed after any TCS restart or when the pointing
is poor. Remember to park zenith the telescope first. Note that in HA there are two positions separated by only 13 arc minutes. Make sure to take the one closest to the indicating arrow. IMPORTANT: During all runs, the "Complete zeroset" must be run only by the INT SA student astronomer on the first night. It is not necessary to zeroset the telescope by the visitor observers during any another night. Visiting observers only need to run the "Abbreviated zeroset" in order to inherit the TCS pointing model from the previous night or the INT TCS default one. If a "complete zeroset" is required for the reasons stated above, then the observers should contact the WHT OSA for help. IMPORTANT: Record an encoder log whenever the complete zeroset is done. The command sequence should be (in the TCS User window): USER> LOG ENC ON 10
... Perform the complete zeroset ... USER> LOG ENC OFF
7.1 Complete zeroset
USER> cal def Loads the default TCS pointing model. 7.2 Abbreviated zeroset
On subsequent nights of the observing run, and if the TCS has not been restarted, load the previous TCS pointing model:
USER> cal last Loads the previous TCS pointing model. Should 8. Initial TCS commands
These should all be typed now so that the telescope is
ready for the night's observing. If the focal station is not the one
you expect, contact your support astronomer.
USER> show focal Shows the focal station setup.
USER> focus {x} Sets focus to a good value, 9. Loading catalogues
Start by checking which objects are loaded into the TCS current list of targets.
USER> out term
If there are objects loaded which you don't need, then the command
USER> erase
can be used to delete all targets from the current list. Note that the catalogues will still be
stored on the computer, but will no longer be loaded into the TCS. It is possible to load your own catalogue onto the TCS with all your targets in it, see the TCS catalogue format page for more information. They can be created with any text editor, and should be saved as {your_catalogue}.cat, with no capital letters in the filename. Each line of the file should contain one object and its coordinates in the following format: [object] [ra] [dec] [epoch] [!comments]So, for an example object SN 1987A: sn1987a 05 35 27.9 -69 16 10.00 J2000 ! commentThe line must be delimited by spaces (one or more), but no tabs, and there should be no spaces or punctuation other than an underscore in the object name. They can then be loaded into the /int/cat/ directory on the ICS computer. This can be done using the scp command to copy the catalogue from your laptop to the data reduction computer (intdrpc1 or intdrpc2): your_laptop$> cd directory/containing/catalogue your_laptop$> scp {your_catalogue}.cat intguest@intdrpc1:/home/intguest/
and then, from the instrument control system:
SYS> cp /home/intguest/{your_catalogue}.cat /int/cat
The catalogue can then be included using the command: USER> include {your_catalogue}
Note that the .cat extension is not required. It is also possible to add and remove individual objects using the following commands: USER> source sn1987a 05 35 27.9 -69 16 10.00 J2000 Creates object.
USER> add Important! Loads USER> remove {object_name} Removes object.
USER> out file {your_catalogue} Writes the contentsNote that to add the object you must include the epoch. No error message will be shown if you do not, but the object will not load properly. 10. Pixel binning
Binning is possible in all 4 CCDs and windowing on CCD4 only.
WFC binning can be set with the following commands:
SYS> bin 1 1 (1x1 pixels, no binning, by default, pixel scale=0.33")
SYS> bin 2 2 (2x2 pixels, pixel scale 0.66")
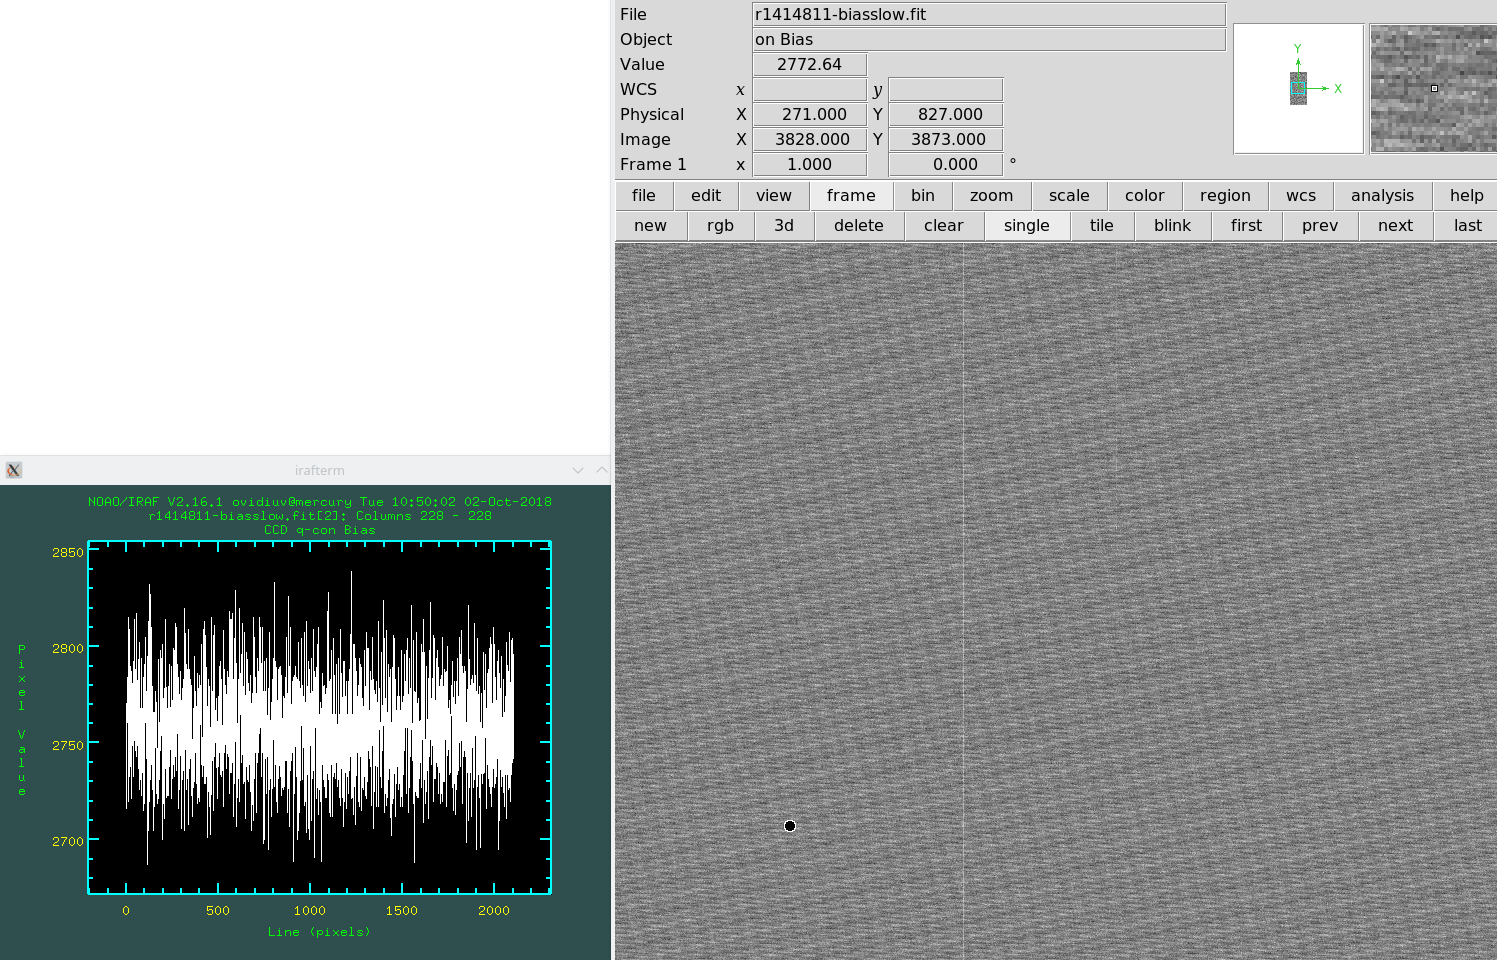
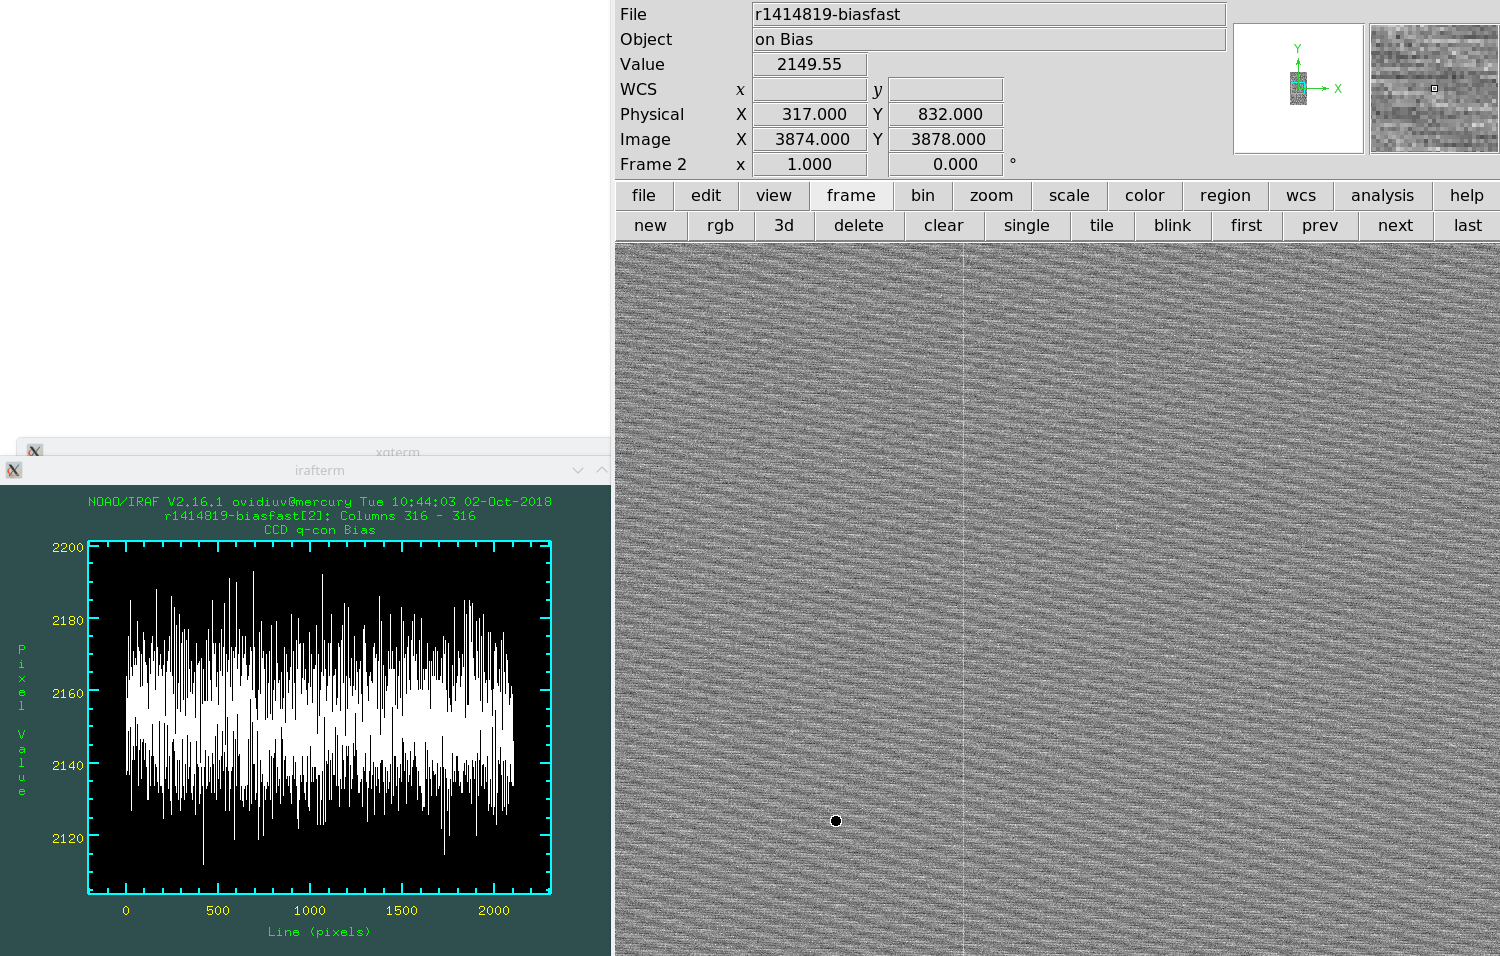
SYS> bin 3 3 (3x3 pixels, pixel scale 1.0") Be aware that binning increases the noise by a factor of 2-5. For the last binning noise and gain values, please check the CCD Quality Control pages. The following plots show examples of binning and noise on CCD2:
CCD2 bin 2x2 slow Readout times for the whole 4 CCD mosaic for different binnings and readout speeds are provided in the following table:
11. Detector windowing
For time resolved photometry windowing data can be a useful way to
reduce readout time. Note that only chip 4 of the WFC can be windowed.
The window size can be set with the command:
SYS> window {n} "[{x1}:{x2},{y1}:{y2}]"
To enable this window type:
SYS> window {n} enable
and to disable type:
SYS> window {n} disable
The window size and whether it's enabled can be seen on the GUI. NOTE: Please do not attempt to use the entire CCD4 as a window (with or without any binning option). This will crash the system. WFC windowing is possible only on CCD 4. To set binning window [X1:X2,Y1:Y2] (with X and Y coordinates to cover the necessary region (CCD coordinates of chip #4) around the object, type:
SYS> window 4 '[X1:X2,Y1:Y2]'
where (X1,Y1) and (X2,Y2) are the physical corners of the window defined around the object. To disable this window, type:
SYS> window 4 disable
For example, to define a small central 1'x1' window in CCD4, one should use:
SYS> window 4 '[934:1114,1960:2140]'
To define a small central 5'x5' window in CCD4, one should use:
SYS> window 4 '[569:1479,1595:2505]'
While to define a central 10'x10' window in CCD4, one should use:
SYS> window 4 '[168:1988,1190:3010]'
NOTE: By defining a central window, the overscan information is lost. In order to keep the overscan, one should define the window close to the edge of the CCD4 overscan region BIASSEC='[10:2150,4105:4190]'. For example, to define a 1'x1' which includes the overscan, one should use: sys> window 4 '[934:1114,3830:4190]' which includes in Y both the 180-pixel window and the original overscan from Y=4105 to 4190. Once again, CCD4 is the only chip that can be windowed. Moreover, one can define four different windows at the same time on CCD4 (provided they do not overlap), namely window 1, window 2, window 3 and window 4. Remember, these are not related with the four chips. Regarding reading time for different size windows, we measured the following times in slow mode: Whole CCD4 (2154x4200 pix) - 46 sec 10'x10' FOV (1820x1820 pix) - 18 sec 5'x5' FOV (910x910 pix) - 6 sec 2'x2' FOV (360x360 pix) - 4 sec 1'x1' FOV (180x180 pix) - 3 secNOTE: Binning and windowing at the same time will cause the system to crash. 12. Readout speed
Check that the readout speed being used is correct. This can be changed either from the SYS prompt using the commands:
SYS> rspeed slow
SYS> rspeed fast
or from the GUI by pressing the 'fast' or 'slow' button.
The fast readout speed is ~10s faster than the slow. However, the fast readout adds read noise
to your image, so if looking at faint objects for which it is the dominant source of noise then
slow readout is recommended.
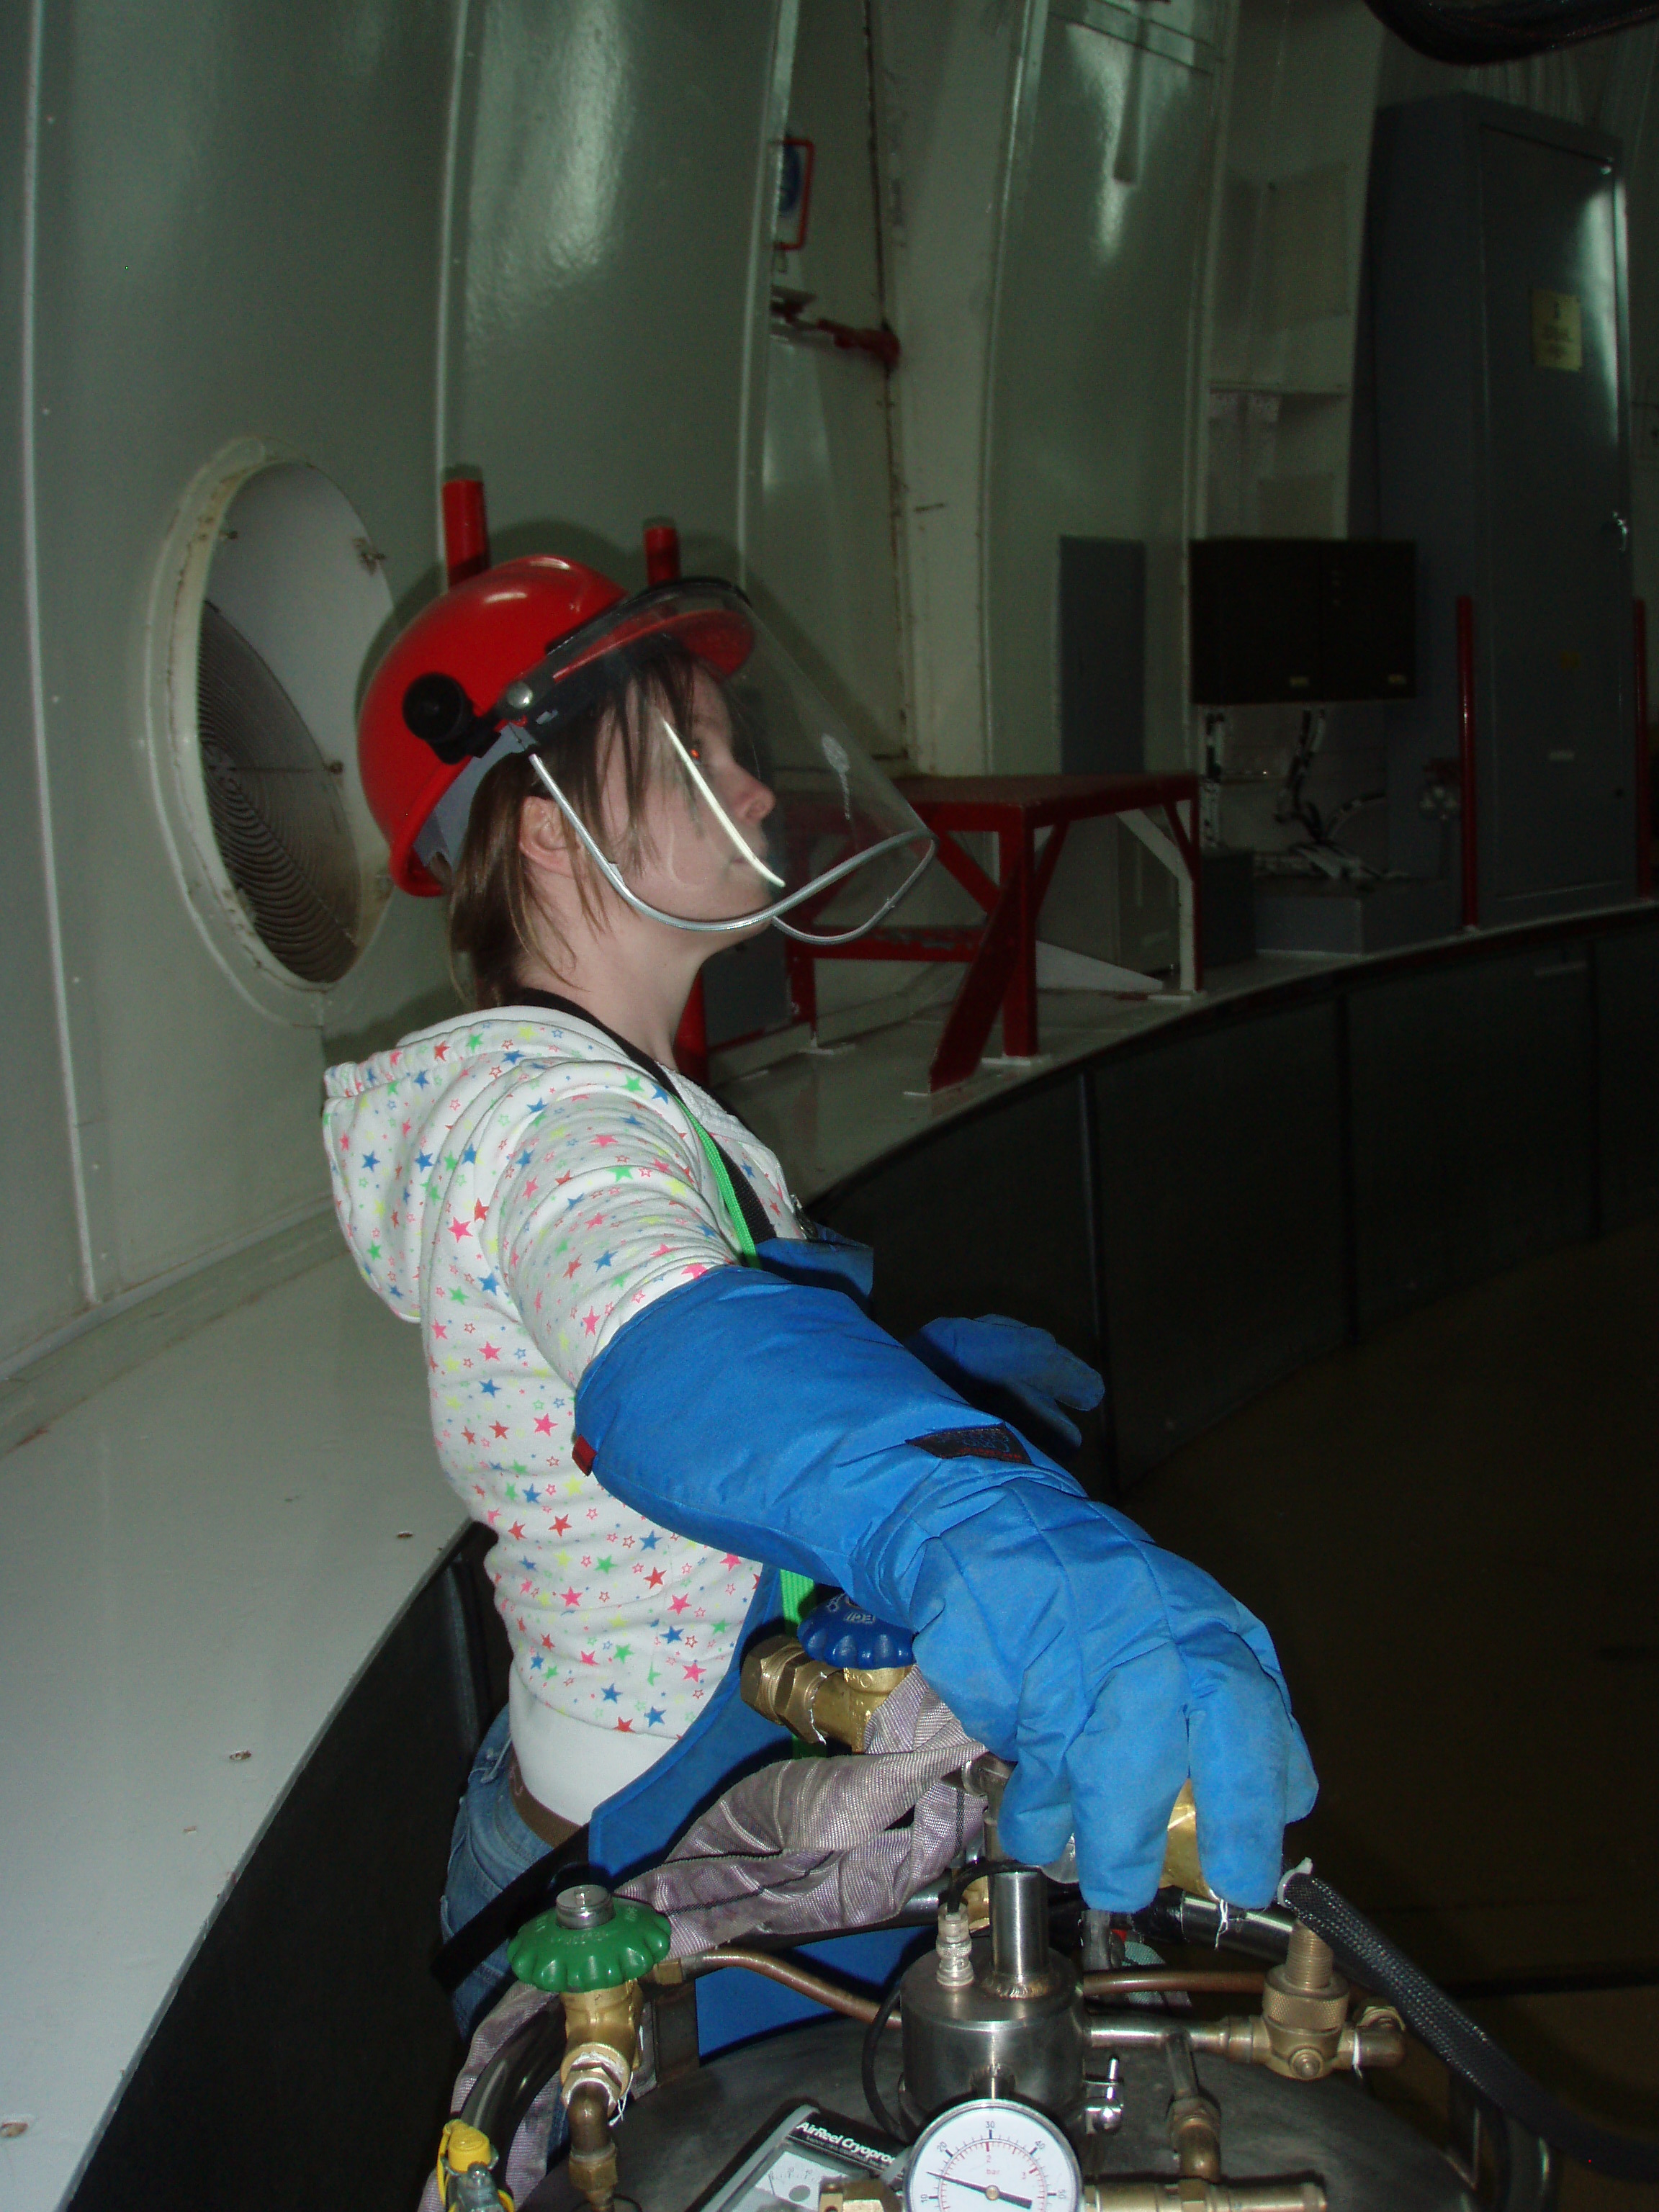
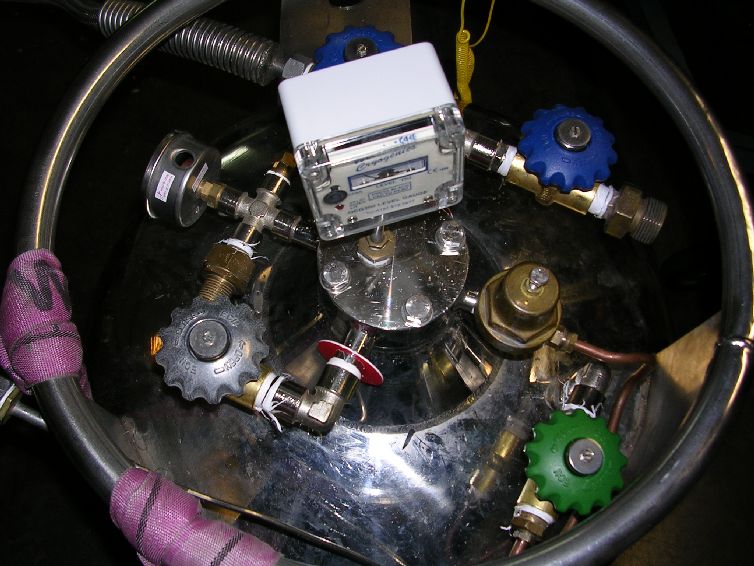
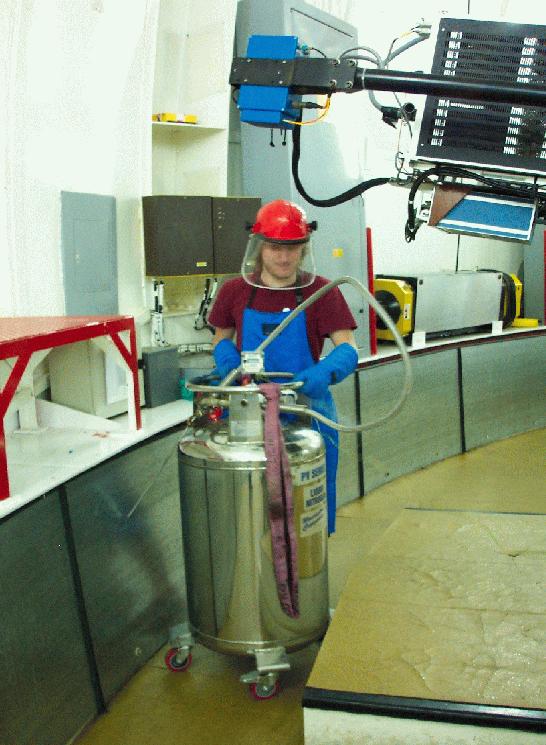
13. Filling the cryostat
IMPORTANT: Wear safety helmet (with visor), apron and gloves when filling cryostats (photo) IMPORTANT: The cryostat on WFC should be filled at least every 16 hours. During normal working week days, the ops-team working at ING will fill it at midday, so observers should fill it just before and after the observing night. During weekends and public holidays, the observer at INT is in charge of ensuring that the cryostat is filled at intervals not exceeding the 16 hour limit. If for any reason the observer at INT cannot ensure that the cryostat will be filled within 16 hours, he/she should contact the WHT Operator to coordinate the filling of the cryostat with sufficient notice. Public holidays are marked in green in the ING schedule. Please take extra care when working with dewars, particularily with the follwoing points:
14. Biases
It is recommended to take a series of biases. Follow this sequence:
15. Opening up
16. Flat fields
16.1 Twilight sky flats
Autoflat is an automated flat fielding script.
Using the commands given below, the script
takes a list of filters, prioritises them and acquires the number of flats requested.
If the sky is too bright/dark for a given filter it will skip that filter and continue
to check the next one. Once all flats have been taken or the sky level is out of range
the script will end. A summary of the successful flat fields is printed at the end.
Be aware, the script does not work with windowing or binning. SYS> autoflat num_flats_per_filt rspeed f1 f2 ... fn
where: num_flats_per_filt represent the number of flats in each filter,
rspeed is the CCD readout speed (slow or fast), and
f1, f2, ..., fn are the filter names for filters 1, 2, ...., n Example: SYS> autoflat 5 fast r stY stB Hbb
This will attempt to take 5 flat fields in fast readout speed in the
filters Sloan r, Stromgren Y, Stromgren B and H-beta. The script does not work yet for the following filters: WFCWash51 (#223), WFCStrHbN (#225), all the NOVA filters. For these filters, flat fields shall be taken manually. The script can be aborted using Ctrl+C. After breaking the script, please check the binning, readout speed and windowing, as they are changed as part of the normal functioning of the script. The autoflat script aims to fulfill the following criteria: MAX counts: 40,000; MIN counts: 20,000; TARGET counts: 30,000; MAX exptime: 120s; MIN exptime: 1s. The filters are prioritised first by bandwidth into broad (B) and narrow (N), then each group of B and N are prioritsed according to central wavelength, typically blue-to-red in the afternoon and red-to-blue in the morning. 16.2 Dome Flats
USER> park flat Sends the telescope to the right position for dome flats
The telescope should now point to hour angle 0 0 0, declination +80 0 0. Now move
the dome to position 242 by typing the command:
USER> dome 242 Sends the dome to the right position for uniform illumination
The main dome lights must be off, and the dimmer lights should be on using the
black control located to the right as you leave the control room to the dome. The
knob of the dimmer lights should be turned somewhere at 2/3 or full position (100%). In the
WFC Dome Flat Assistant
we give a table for some guides about exposure times to be used with the WFC and different filters.
SYS> flat {time} Take a dome flat of {time} seconds.
SYS> multflat {n} {time} Take {n} dome flats of {time} seconds.
17. Single star calibrate
On the first night, the default pointing model should have been loaded
in the initial TCS commands, and it is likely to be accurate. However, it
is good to check it and make an additional correction with the
following procedure. First, check the lower shutter which should be in
the low (default) position and point to a bright star (you can use one from the system catalogue.
On the autoguider window mark a cross in its centre by selecting TOGGLE CENTRE CROSS from the SETUP menu.
When the HANDSET menu is enabled on the TCS window, then type <ctrl-z> on the TCS window to break out of it.
If
the star appears right on the cross-hairs then the pointing is okay,
and the rest of this section can be skipped. Otherwise, press the HANDSET button (INSERT key of the keyboard)
to centre the star on the cross-hairs in the centre of the autoguider window. Use the arrow keys on the keyboard to move the telescope.
USER> point calibrate Writes the new pointing model to file.
USER> cal anal zero Loads the new pointing model
The rms of this solution is typically 0.01, because only one star is being used. Type 'Y ' to accept. Prepare the telescope pointing back to the centre of chip 4: USER> enter aperture 0 -251 326
SYS> autotv off Turns off continuous readout mode.
IMPORTANT: If the pointing is still bad after the single star calibrate, then refer to bad pointing section in the troubleshooting guide.
guide. First try zerosetting the telescope again, the default calibrate and then the 7 star calibrate if necessary.
18. Focusing the Telescope
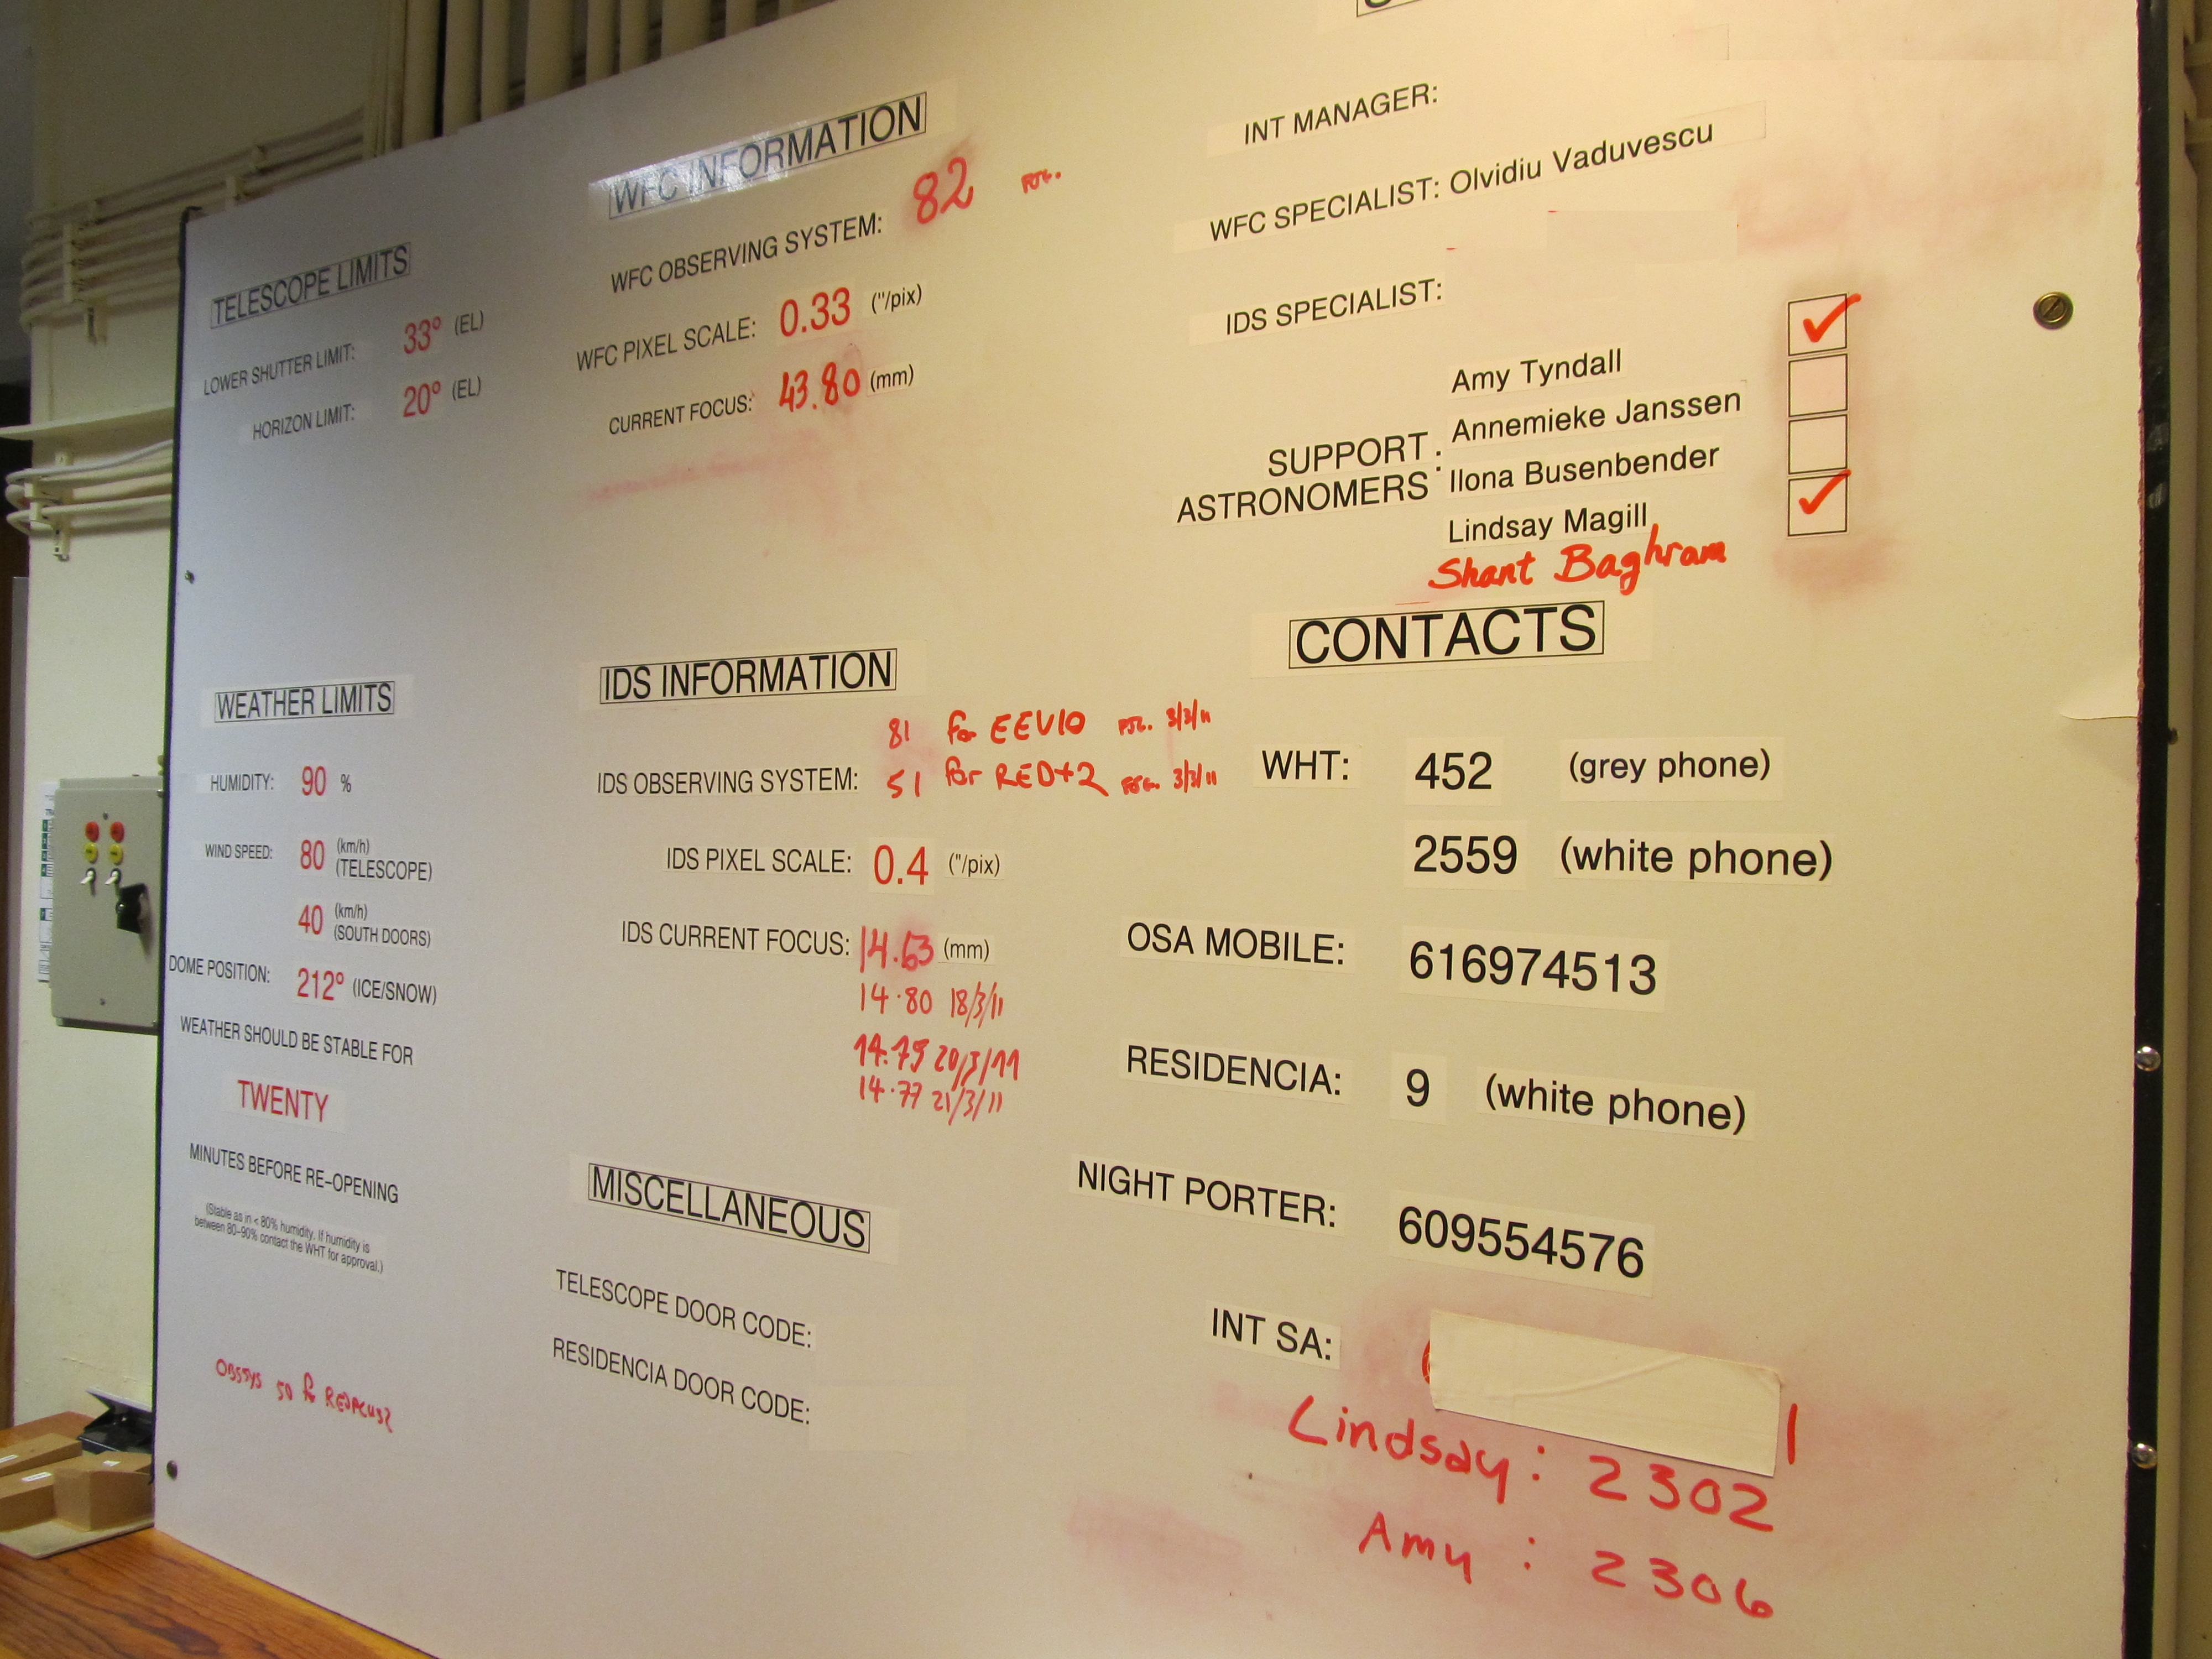
The typical "default" WFC focus is around 43.35 and the last night value is written on the white board.
If the seeing is unstable (changing rapidly) or bad (> ∼2 arcsec) do not
attempt to focus the telescope. Instead, you can adopt the focus from the
last night. If you need to determine focus values in more filters, use
preferably broad band filters first, which need lower exposure times, and
afterwards narrow band filters, if sky conditions are stable. Otherwise you could
rely on filter offsets if they are known in the filter database. Focusing in narrow band filters needs longer
exposure times (at least 2-3 times or more) than in broad band filters.To determine the best telescope focus select a suitable field (e.g. one of the WFC photometric standard fields, check visibility using LANDSCAPE). Choose either a field close to your first target, or continue using the same field as the single star calibrate. Sometimes these fields can be too crowded and in that case try a suitable blank field. SYS> gocat {suitable standard field}
Then make sure the camera is not binned or windowed (disable any eventual defined window),
SYS> window 4 disable
and run the focus script.
SYS> focusrun &
IMPORTANT: If you are focusing on one only filter, then run the focus run in a suitable filter. A broad-band red filter is desirable
since it will have the best FWHM for a point source. IMPORTANT: After the fucusrun, it is important to check that the detector configuration was correctly restored and it is recommended to take a glance to confirm. A dialog box will pop up and the appropriate values may be filled in and a focus run started. The default values should be good, but the recommended values are: Number of exposures (n) = 9 Focus start value = 0.2mm below last known focus (see white board) Step size = 0.05 mm Exposure separation = 10 arcsec Exposure time = 15 sec
If, after running the focus script, the stars are still very unfocussed or doughnut-like instead of
point-like, then the focus run can be done again using a larger step size and more steps as
appropriate. A 0.1mm step size with 11 steps may be a good next try. 19. Observing
This section acts as a glossary of standard commands, but is organised into progressions of
tasks and order of use.
19.1 Acquisition
Loading catalogues and objects is described in the section Loading Catalogues. To move to one of these objects:
SYS> gocat {object} Telescope will slew to that object, SYS> gocat 92-248 Moves the telescope to the Landolt field 19.2 Filters
SYS> filter {filter} Changes filter. Use the same acronymA de-focus term will automatically be applied when you change filter. It can take a few seconds to finish changing focus, and this can be seen on the TCS information screen. 19.3 Guiding
IMPORTANT: it is strongly recommended to use guiding for exposures longer than two minutes.
Check that the autoguider tv-mode is off. If it is on, type: SYS> autotv off
When the gocat command has been executed to slew to a new field then a list of guide stars
will appear in the Talker window. This list can also be seen by entering:
SYS> more /tmp/gsc.out
If this does not occur then check that the auto predict is on (see section on finding guide stars in the troubleshooter).The guide window size can be set in the GUI under the SETTINGS tab. A size of 120x120 pixels (resulting in a sky field 45"x45") is recommended. A guide star of appropriate magnitude should be selected from this list. To guide on this star use the command: SYS> guide on pixel {x} {y}
with {x} and {y} being the same values as before.
If the guide star doesn't appear within the window you can try a larger
window size (for instance 180x180 pixels under "Settings" on the GUI)
or do the following:
SYS> guide off
SYS> agwin acq pos {x} {y}
SYS> fieldThis centres the AG on
the position where the guide star should be and searches for potential
guide stars within that field displayed. They will be marked and
numbered on the autoguider. Sometimes this command needs to be issued
twice before it works.To guide on one of these stars, use the command SYS> guide on star {n}
where {n} will be a number assigned to each star, being 1 the
brightest. Be aware that the field command often picks up artifacts, so
you should always check that you are guiding on a real object. For this
reason it is recommended not to use scripts for setting up guiding.It usually takes some time to turn the guiding off (SYS> guide off). If it takes too long, then use <ctrl-c> to exit it, then check guide job ID number and kill this process: SYS> autotv off
SYS> jobs
SYS> kill -9 %n
where {n} is the job number (not the PID!). The command to turn the guiding back on is:
SYS> guide on
Before starting the exposure it's important to leave the autoguider to
settle. When guiding, the
TCS will display A/G on rather than tracking, and show the x and y
errors in the guiding. These should be allowed
to drop below 0.3, though if the seeing is bad the errors may not get
lower than 0.5. It can take a few readout cycles for the errors to be
displayed in the TCS. If you do not see them then the guiding is not
working.
Observing programs not using guiding (only tracking) for their short science
exposures (less than 2-3 min) should un-mark the sequencer by pressing in the small
window on red click button (un-press it) to dis-activate. Also, observers should
un-mark this option after each TCS restart. SYS> guide off
By default in guiding mode, the sequencer stops autoguiding 10s
before the WFC science image readout, in order to avoid this noise, but you can change this value (thought, it
should not be less than 8s). If you do not need guiding for your science, then you should stop the autoguiding
and sequencer using the above two actions, or using the following sequence commands:
SYS> guide off
SYS> jobs
then look for which job is connected with wfc_ag_sequencer, and type:
SYS> kill -9 %n
where {n} is
the corresponding job number. If you decide to guide later because you
are doing longer exposures, if the sequencer GUI is not on screen then
it can be started using the command:
SYS> wfc_ag_sequencer &
19.4 Dithering
Dithering can be done in several ways, and which is most
useful will depend on whether you are guiding or not, and the size of the
offsets.Offsets can always be applied using the command: SYS> offset arc {arcsecRA} {arcsecDEC}
Note that the {arcsecRA} and {arcsecDEC} offset shifts are in the RA and DEC
directions, expressed in arcseconds. The offsets are relative to the telescope catalogue pointing (the pointing provided by the gocat command), and hence,
if you keep issuing the same offset,
then the telescope will not move.If you're not using guiding this will be the easiest way to perform all your offsets. If you are, however, then complications can arise, because guiding must always be turned off before using the offset command, otherwise the guiding will move the telescope back to its original position. If you're guiding and making offsets small enough to keep the star within the field of the autoguider, then the field command may be used to locate it once again: SYS> guide off
SYS> offset arc {arcsecRA} {arcsecDEC}
SYS> field
SYS> guide on star {n}
Where {n} is the number assigned to your guide star.If your dither positions extend over a range >1 arcmin then you will probably find the guide star moving out of the field. In this case the easiest thing to do is calculate multiple dither positions for the object you're looking at beforehand, and then load them from a catalogue. Doing this allows you to gocat to each new position, and when the gocat command is used new positions for the guide star will automatically be calculated. There is a tool on the NASA Extra-Galactic Database (NED) to help you convert offsets into RA and Dec. Then use the commands: SYS> guide off
USER> gocat {new_dither_position}
SYS> more /tmp/gsc.out Find suitable guide star.
SYS> guide on pixel {x} {y}
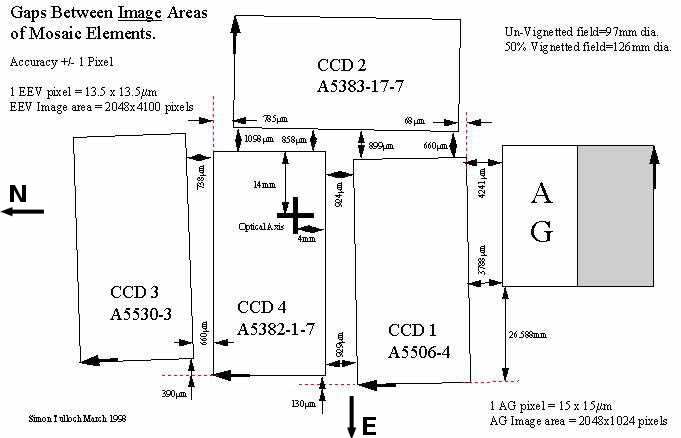
Remember to let the guiding settle before starting your exposure, so that the errors shown on the TCS display are <0.3.Please note that if you want to mosaic images using all four chips then, because of the chip gaps, you will need to offset by at least 30 arcseconds in both x and y. This is due to the layout of the chip, which can be seen here: offsetting in just x or y merely causes you to move along the gaps. There are some dithering scripts WFCdithtrack and WFCdithguide for a 2-point, 4-point and 9-point pattern in either tracking or guiding. The script WFCdithguide is capable for both small dither offsets (max half guiding window, by default 10") and larger offsets (larger than half guiding window, but having longer overhead time). SYS> WFCdithtrack
SYS> WFCdithguide
The scripts will ask for the necessary parameters.
19.5 Exposing
IMPORTANT: Before taking any sky exposure, make sure the dome has finished rotation to the new target,
checking in the TCS Display window that the DOME label is not flashing! SYS> glance {time} Take a glance of {time} seconds.Stored as s1.fits always, ie. it will overwrite former glances. Use it to check you're on the right field or to estimate exposure times before the actual run. SYS> run {time} {"comments"} Take an exposure of {time} secondsFor multiple biases, flats, skyflats, runs or glances, simply prefix the command with 'mult' and put the number desired directly after the command, e.g. SYS> multrun {n} {time} {"comments"} Take {n} exposures of {time} There are three ways to interrupt a running exposure. Type
SYS> <Ctrl>-zto get the prompt back and then type one of the following commands: The command abort terminates an observation started by run and similar commands. The observation is not saved to disk. If the run was part of a multiple-exposure sequence (started by multrun etc.), abort terminates the current run and all subsequent runs of the sequence. SYS> abort
The command finish terminates an observation started by run and similar commands. The observation is saved to disk as if the full integration time had expired. If the run was part of a multiple-exposure sequence (started by multrun etc.), finish only alters the current run, and other runs in the sequence carry on. So for ending a multrun exposure you need the command abort instead. SYS> finish
The command newtime modifies the demanded exposure time of the observation currently in progress. If the new demanded time is less than the time already exposed, then the exposure ends immediately and the last exposure is saved to disk. SYS> newtime {new-exposure-time}
If you are running a script, you need to type: SYS> <Ctrl>-c If this does not work then you can do: SYS> <Ctrl>-z Then check the suspended jobs by: SYS> jobs and kill your script via: SYS> kill %n where n is the job number (not the PID!). Sometimes just kill %n is not enough. In this case you should use kill -9 %n. 19.6 Observing at elevation <33 degrees
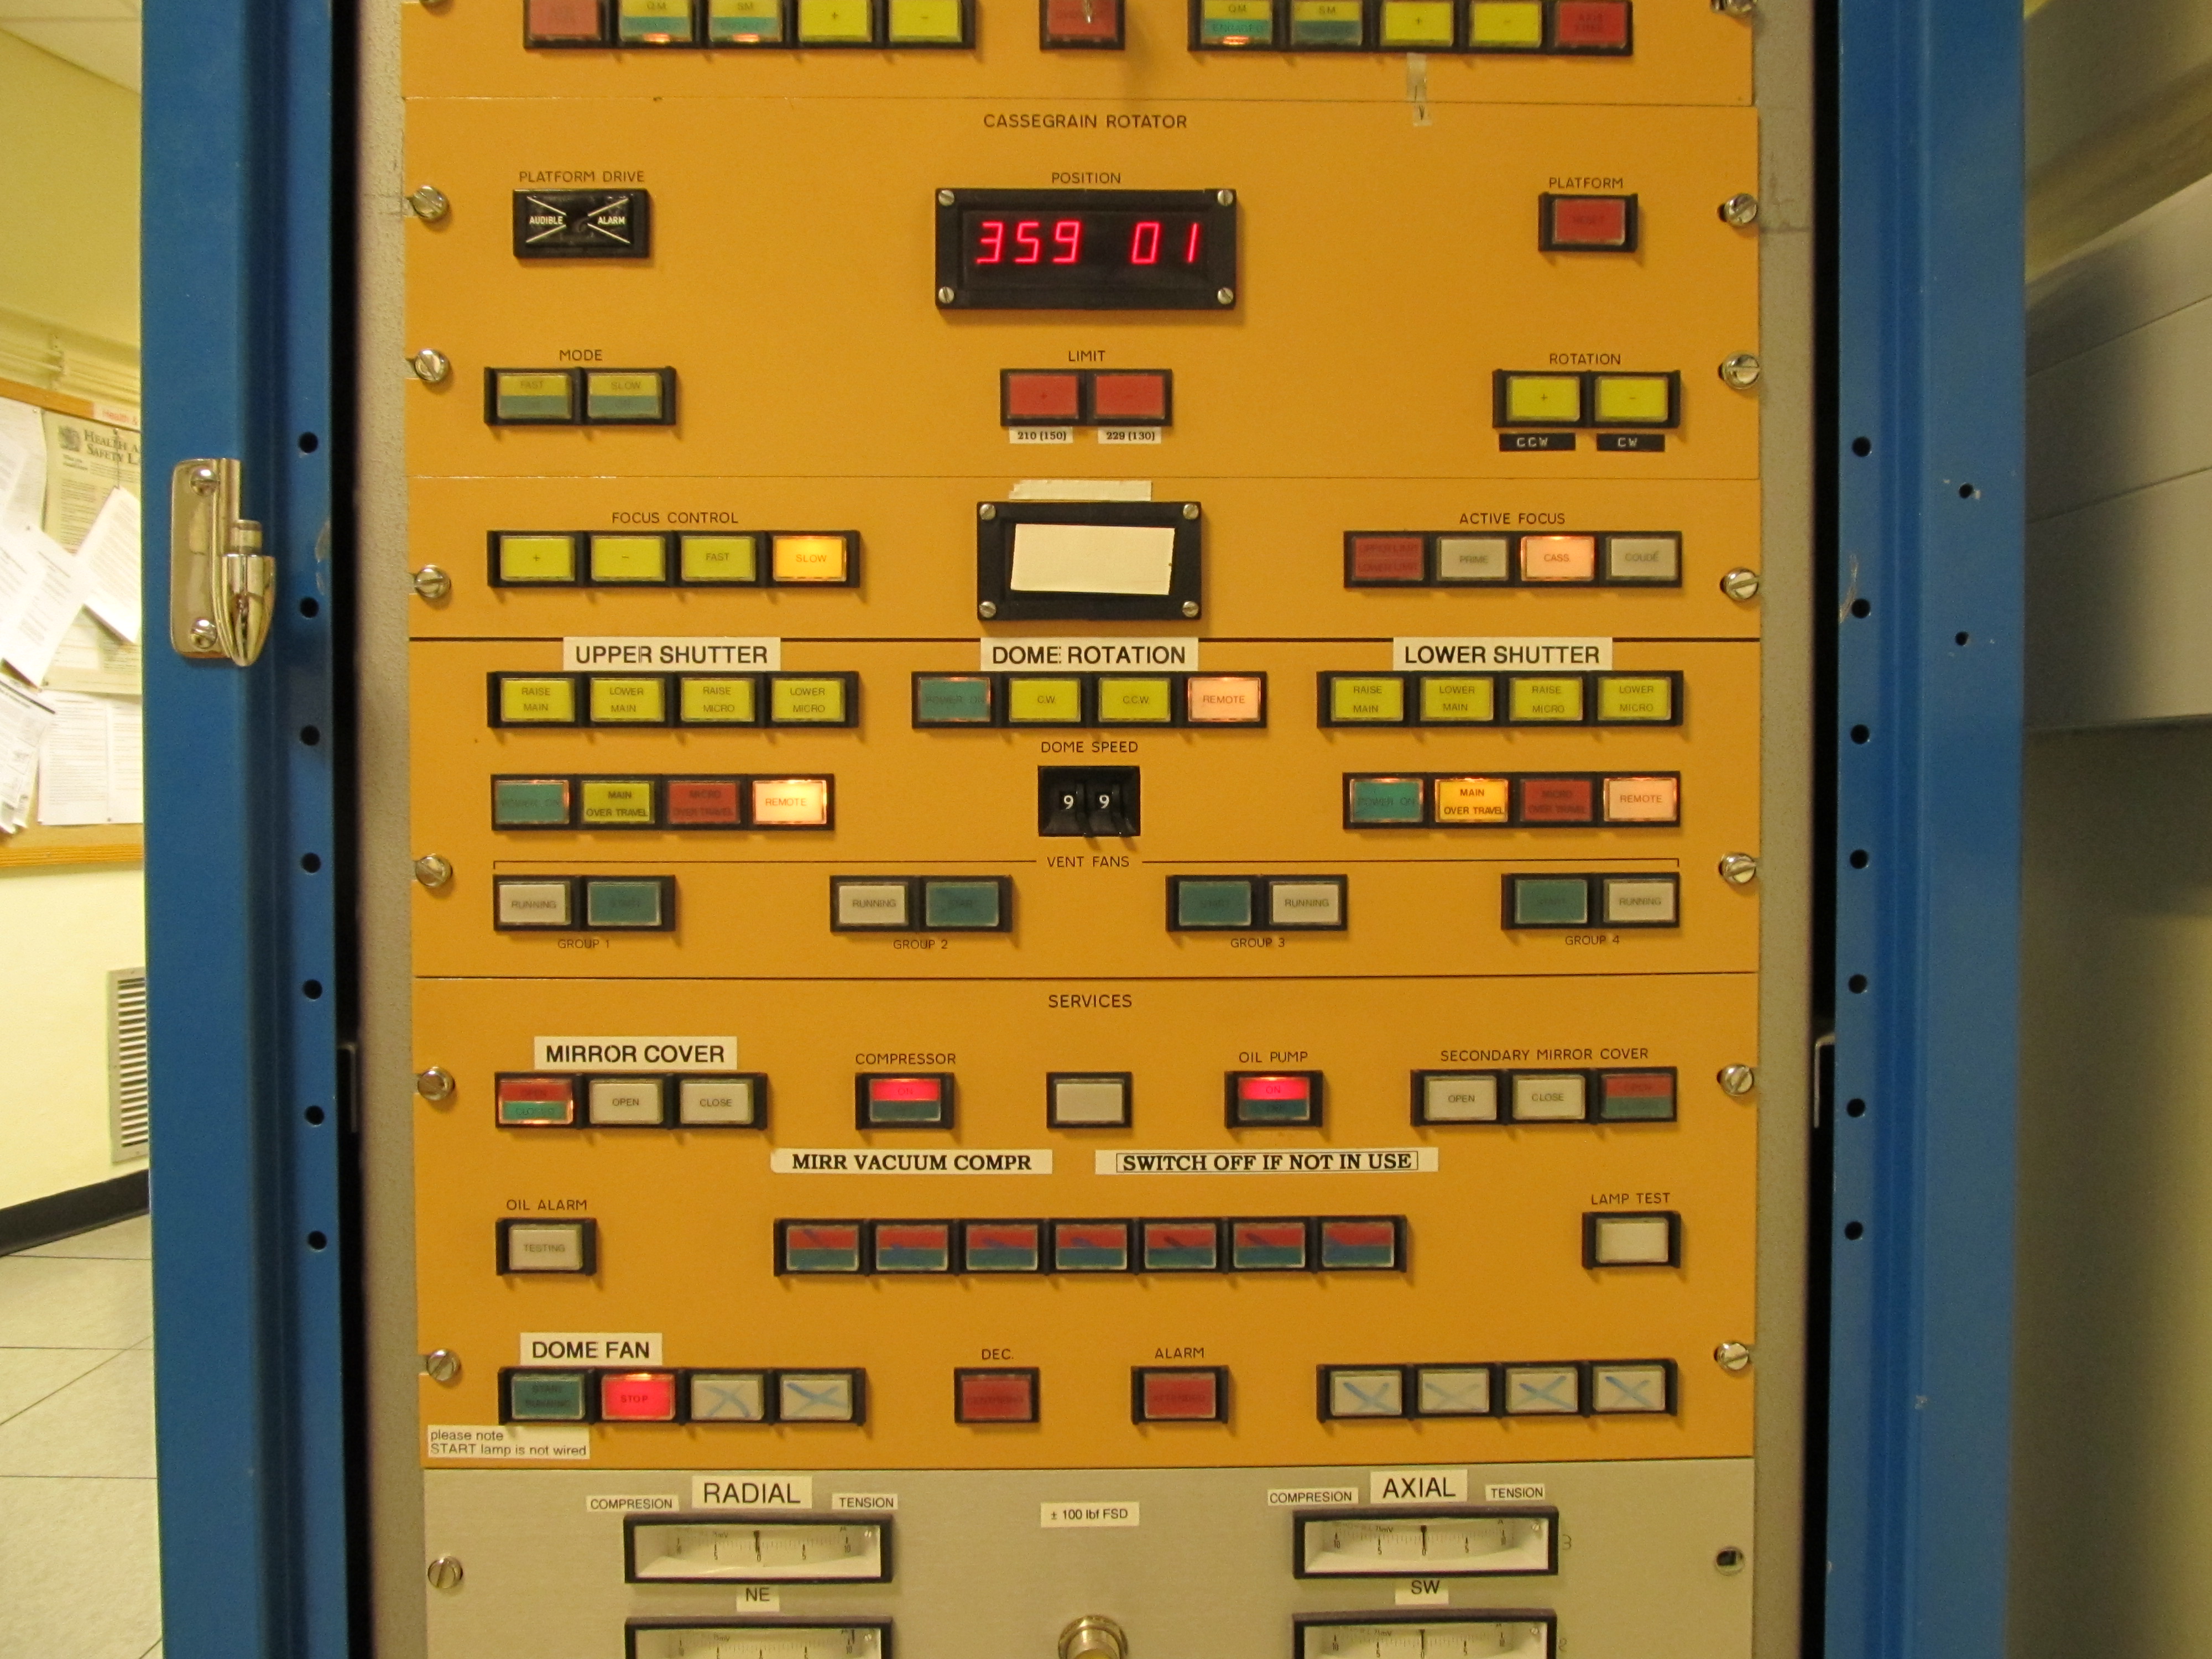
Remember that the lower shutter starts to vignette at telescope elevation lower than 33 degrees. So if you wish to observe at a zenith distance between 57 deg and 70 deg, or elevation 33 deg and 20 deg respectively, then you need to raise the lower shutter. The system does not warn you so you will have to check the zenith distance (ZD) on the TCS window from time to time. Also be aware of the INT pointing limits. If you need to observe at elevation <33 deg then the lower dome shutter must be raised. Follow these instructions: The lower shutter is raised in the same way as the upper shutter, using the respective buttons in the engineering rack, in the section labelled 'LOWER SHUTTER'. Press RAISE MICRO and then RAISE MAIN. RAISE MICRO can then be used again to raise the lower shutter to the top.
IMPORTANT: You must close the mirror petals anytime you move any dome shutters. Remember to open the mirror petals afterwards. Consider if opening the lower shutter is essential. Opening up takes around 10 minutes and the image quality will decrease due to observing through higher air mass. Furthermore, as the lower shutter is very large, it blocks a large fraction above preventing observations at higher elevations. IMPORTANT: Remember to bring the lower shutter down afterwards, as you will not be able to observe above 34 degrees elevation if it is left in the raised position. 19.7 Apertures
With a gocat command the telescope is sent to the RA and DEC specified
for the object, so that this object appears in the middle of the centre
chip (CCD 4). Occasionally, it may be desirable to centre the object
in a different position, and for this apertures can be used.
Aperture 0 is an absolute measurement and sets the centre, from which point all other apertures will be measured. This is the default pointing for the telescope and it is set at the center of CCD4, or -251" 326" from the optical axis (rotator center). All other apertures have values relative to that aperture 0. Apertures 1-5 point to the middle of chips 1-5 (where 5 is the autoguider). This means that aperture 4 is defined as 0 0. To see a list showing the different apertures set, use the command: USER> show apertures
ap 0 -251 326 nominal aperture, object centred on CCD#4 ap 1 704 5 centre object on CCD#1 ap 2 357 -1043 centre object on CCD#2 ap 3 -701 -10 centre object on CCD#3 ap 4 0 0 nominal aperture, object in centre of mosaic camera (shifted from centre of CCD#4) ap 5 1316 -368 centre object on AG-CCD (X=1032, Y=512) ap 6 251 -326 centre object on RC (rotator centre) If, for example, you wanted to have the object you're pointing at to appear in the centre of chip 1, then simply gocat to that object and then type: USER> aperture 1
This pointing will only be used for one command before reverting to its default pointing, so the
aperture command should only be issued just before you want to use it.
If it's necessary to reset the pointing of the telescope for more than one target, and you don't want to keep re-typing the aperture command, then it is possible to redefine aperture 0 so that it has this new value as the default pointing. Extreme care should be taken when doing this, however, to return the telescope to its normal pointing afterwards. Also note that when this is done apertures 1-5 will no longer point to the centre of chips 1-5, since those values are set relative to aperture 0. The command for doing this is: USER> enter aperture 0 {x"} {y"}
In general, this should only be necessary if a seven star calibration has to be performed, and
this procedure is explained in detail in the Troubleshooting Guide.
19.8 Observing scripts
Observers can use their own observing scripts to observe an object previously uploaded to the catalog using standard observing
commands (example of guiding with small dithering is provided here: wfcsamplescript). What follows it's an example of how to save a script to /home/intobs/: sftp intobs@intdrpc1 sftp> cd /home/intobs sftp> put <your_script> sftp> chmod 555 <your_script>Finally, from the INT ICS terminal in the same /home/intobs/ directory, you can run the script by this simple invocation: SYS> johnscript
19.9 Moving targets
Moving targets (such as asteroids, comets or planetary satellites) could be observed with
the INT in both tracking or guiding modes using non-sidereal (differential) telescope moving rates.
The TCS requires the differential tracking rates to be expressed as:
    diff_RA = ΔRA/dt in SECONDS/sec
    diff_Dec = ΔDec/dt in ARCSECONDS/sec
For instance, if rates are provided as
    diff_RA' in ARCSECONDS/hour
    diff_Dec' in ARCSECONDS/hour
Then the following transformations are needed:
    diff_RA = diff_RA' / (3600 x 15 x cos(Dec))
    diff_Dec = diff_Dec' / 3600
In case ephemeris are provided as "coordinate motions" or "sky motions", choose the former so you don't have to divide diff_RA' by cos(Dec). The differential tracking rates are then input to the TCS using the following sequence of commands: USER> gocat {object name}
USER> diff_rates diff_RA diff_Dec
USER> next
To return to sidereal tracking (e.g. for standards) issue the TCS command:
USER> diff_rates 0 0
IMPORTANT: The science exposure time when using guiding at differential rate is limited by the object's
differential tracking and the maximum WFC available autoguider window size (recommended below 120x120 pixels,
namely 40" box size).
19.10 Examining data
The standard way to examine the data is with IRAF on the INTDRPC1. If IRAF is not already running, then type iraf on a terminal window. This will open an xgterm window, a DS9 window and execute IRAF automatically.
The data being collected will be stored in the directory shown on the GUI, usually /obsdata/inta/yyyymmdd with the last directory being the date on which the night starts. IMPORTANT: Data can be looked at in the /obsdata directory but not reduced, and must also never be moved or deleted. If you plan to reduce the data on that machine then it should be copied to a /scratch directory, in which you can make your own directory, as an exmaple /scratch/intdrpc1/<your_name>. Data can be displayed on DS9 using the command: ecl> display r{number}[4] 1
This loads the contents of extension 4, corresponding to CCD4, of image r{number}.fits to the
DS9 display. The {number} for the exposure is found on the GUI, or in the night log. If the
exposure was windowed then the image will be written into extension 1. If a glance was taken
instead of a run, bias, or flat then the image will have been written to file s1.fits and it will overwrite it everytime a new glance is taken.The image can then be examined using the imexam task: ecl> imexam
Useful imexam keys include:
These imexam keys are listed somewhere on the desk. ecl> display r{number}[4] 1; imexam
Or abbreviated as:
ecl> displ r{number}[4] 1; imexam
IMPORTANT: To match the standard sky orientation
North up, East left, in DS9 one should
rotate CCD1, CCD3 or CCD4 images by 270 deg (on DS9 Zoom/270 at the top menu), while CCD2 should be
rotated by 180 deg (on DS9 select Zoom/180 at the top menu).
If you want to display all 4 different buffers (corresponding to the four CCDs) at once, then this can be done using the command wfc_display from the IRAF package wfc: ecl> wfc_ql
ecl> wfc_display r{number}
The 'tile' option must be selected under frame tab on DS9. Note that the IRAF package 'wfc' is loaded only once, no need to load it everytime you issue wfc_display.An example of finding chart server to identify the CCD4 field is DSS STScI. Enter the RA and Dec corresponding to the INT pointing, set height=11, width=22, file format GIF, and retrieve image. The resulting star chart should match exactly the WFC CCD4 (as displayed in B/W and rotated 270 degrees in DS9). Use the following command to ring a bell sound after finishing an exposure, for example: SYS> run 20; talkerBellINT
20. Closing down at the end of the night
21. Closing down in a hurry
If it suddenly starts to rain or snow, the humidity rises above 90% or the wind speed is above 80km/h, you will
be forced to shut down in a hurry. If this is the case:
22. Saving data
You can save your data directly
to your laptop, an external USB device or ftp. Please refer to
Transferring and Recording Observational Data for details.
23. Creating the observing log
Fill in the night report (even if the weather was bad and
you could not observe!) by selecting 'night report' which is situated
in the observing logger window on the ICS monitor.
Fill out all fields, and when done hit 'create log'. A copy called
run_log_yyyymmdd.int is put in the observation directory so you can
copy it when copying your data, and there is an option to email it to a
comma-separated list of addresses.
Please contact
your support astronomer for copies of your log if you forget to do the above.
Since June 2022, the new ING Observing Log web-based night logging system must be used to enter and show any night reports. Go to http://obslog.ing.iac.es, which should load by default the current INT night form - otherwise, please type for example http://obslog.ing.iac.es/20221110/INT, and change the date 20221110 accordingly. The web log loads all the images in near real time (including the ones most recently taken). At the end of the night, if you scroll down the page to the end, you will see the button End-Of-Night Report (leave active or eventually change to INT under the other button Choose telescope), which must be pressed to get displayed the Night Report form, able for completion. Please complete all fields there, then scroll down the page at the bottom, and then press the two buttons Save to database and Save to /home/lplogs! 24. Filling in the log book
The printed logbook in the control room contains fields which must be filled out during the
night:
- CCD cryostats : initials and local time for filling the cryostat. - Breakdown of observing time: fill in any down-time that was encountered (bad weather, technical problems, etc.) and note the time lost. - The last focus used during the night. This can be found next to focus on the TCS display. 25. Leaving the building
Before leaving the building, please switch off all the lights in the control room and in the
kitchen area. Check that no electrical devices are left on in the kitchen, e.g. the sandwich toaster,
the coffee machine, etc.
26. Observers' handover check
Ready to go it alone? Please check you are familiar with the following tasks:
|
| Top | Back |
|
