If you have a large list of objects, you probably want to create your own
catalogue before your observing trip, so that you or the telescope operator (TO) do not have to type the coordinates
each time you want to move the telescope, which makes observing more efficient.
The day staff will aim to leave the observing system ready for the night by 16:00 each day.
Subsequently, the following tasks/checks may be carried out in the afternoon
before the night's observing:
- Check that the
PFIP instrument control panel is running. If the control panel is not running, then it may be started by typing the following command in the pink ICS window:
SYS> 4MSControl -panels PFIP &
Select the tab labelled
PFIP Observer in order to display
the observer's GUI.
This panel shows relevant info about the filter wheel, atmospheric dispersion corrector (ADC) and autoguider, and allows the user to change filters
and update their associated focus offsets if necessary. A complete description of the control panel and the new UNIX software for the PFIP controller is
available here.
Please only use the PFIP Observer tab on
the PFIP control panel, or the command line, when changing filters. If you change filters with the pull-down menu under the PFIP tab,
then the filter focus
offset will not be applied, since this is an engineering GUI.
- To bring up a telescope information window, type the following in the ICS pink window:
SYS> tcsinfo &
- Check that the detector readout speed, binning and windowing are all as required for your run. The detector
readout speed may be set to slow or fast using the following ICS commands:
SYS> rspeed pfip slow
SYS> rspeed pfip fast
The following detector webpage lists the CCD characteristics for each readout speed.
The detector binning may be set (for example to 2 by 2) using the following ICS command:
SYS> bin pfip 2 2
We recommend no windowing with PFIP. In this case, each of the two extensions could be displayed in a separate frame (ex from IRAF: "disp r1374405[1] 1" and "disp r1374405[2] 2") and will have two separate headers, and both CCDs of the mosaic could be displayed together using Frames / Tile control in the DS9.
Alternatively, a single window may be defined that covers all (or some area) of both CCDs. In this case, a single extension FITS file will be produced that contains the relevant sections from each CCD. The following window will produce a 4308x4200 pixel single extension FITS file containing the full readout from both CCDs side by side:
SYS> window pfip 1 "[1:4308,1:4200]"
To disable the windowing, one should type
SYS> window pfip 1 disable
In both cases, the user should Invert X in the image display in order to match the normal sky orientation (N up, E left).
For more information on windowing please see thefollowing link for
general windowing commands.
- An IRAF session may be used to examine PFIP data. Check whether an IRAF session is already open on whticsdisplay1, and
if not, then open a terminal and simply type:
$> iraf
This will open an xgterm with IRAF already loaded, and it will also open a DS9 image viewer. Change the current directory to the
directory where the data is stored for the night (/obsdata/whta/YYYYMMDD where YYYYMMDD is the current date and whta
may instead be whtb) and load the PFIP quick look package in IRAF by typing:
ecl> pfip_ql
Mosaic images may then be displayed by using the following IRAF command:
pf> mosaicdisp <image>.fit
Remember to set the correct DS9 image orientation in order to match PFIP images to normal sky orientation.
- Afternoon bias frames may be taken at any time, after ensuring that the dome lights have been switched off, using
the following command(s) in the ICS pink window:
SYS> bias pfip
SYS> multbias pfip <nbias>
- Dark frames are not necessary for PFIP since there is no measurable dark current at -120 degC.
- To acquire dome flats, ask the TO (or duty engineer) to move the telescope to a blank part of the dome (elevation 45 deg).
Switch off the dome lights and switch on the flat field lamps on the telescope control panel. Load the required filter in PFIP using
either the PFIP Instrument Control Panel, or by issuing the following command in the ICS pink window:
SYS> pfilter <name OR number>
The command(s) to take dome flats may then be issued in the ICS pink window:
SYS> flat pfip <exptime> "<name>"
SYS> multflat pfip <nflat> <exptime> "<name>"
- Make sure that the automatic compensation of the telescope focus and autoguider focus
for the different filter thicknesses are enabled, as well as the automatic update of the atmospheric dispersion corrector.
The status of these corrections/updates may be determined from the observer's GUI where
they will appear red if they are disabled. To enable them, select the tab labelled PFIP, and click to enable the Automatic Filter Focus
Compensation, the AG Automatic Filter Focus Update, and the ADC Update as required. Alternatively, one may type the
following commands:
SYS> pfip_set -m filtfocus enable
This enables the automatic compensation of the telescope focus for different filter thicknesses.
SYS> pfip_set -m gdfoc enable
This enables the automatic adjustment of the autoguider focus for different filter thicknesses.
SYS> pfip_set -m adc enable
This switches the atmospheric dispersion corrector on.
Back to the top
3. Focusing The Telescope
The procedure for focusing the telescope with PFIP is as follows:
- Ask the TO to send the telescope to a bright star (no brighter than magnitude ~10), or a not so crowded field of stars.
- All the broadband filters have an associated focus offset which
is recorded by the support astronomer in the ING filter database. During the focusing procedure we determine the zero point
telescope focus zp (mm) as defined in the formula below, which is independent
of the filter used:
Telescope Focus (mm) = zp + DF + TC
where DF (mm) is the filter focus offset (which depends on the filter thickness) and TC (mm) is the focus temperature correction.
Therefore select any one of the broadband filters
available in the filter wheel with a known focus offset.
- Execute a focus run using the following command in the ICS pink window:
SYS> quickfocusrun pfip &
A GUI will appear in which you should enter appropriate values for the starting telescope focus (e.g: 85.30mm), the focus step (e.g: 0.05mm),
the number of focus steps (e.g: 9), the exposure time (e.g: minimum 10 seconds to average out seeing effects), and the telescope offset between focus steps (e.g: 15").
Click the Run button on the GUI and a script will run to take multiple exposures on one image, offsetting both the telescope focus and telescope position between exposures
The telescope movement between the first two exposures is twice the requested length. On the resulting image, each star will be imaged multiple times, forming a "trail" down the image.
- To find the best telescope focus value, use the IRAF pfip_ql task pfip_qstarfocus
as follows:
pf> pfip_qstarfocus r??????.fit fstart=<focus start value> fstep=<focus step> pstep=<telescope offset>
nexp=<no. of focus steps>
Mark the first star in each star sequence with an "m" for a set of unsaturated stars uniformly distributed across the displayed CCD image, and then
press "q" to quit. Wait until an xgterm appears showing the FWHM (in arcsec) and ellipticity
plotted versus the telescope focus value. A star can be deleted from this plot by typing "d" over the star in the displayed image, and then typing "q"
to estimate the best focus value again. The task pfip_qstarfocus reports the best telescope focus value and the best achieved FWHM (in arcsec) both
in the IRAF session and in the plot title.
- Set the telescope focus value to the best value determined above using:
SYS> focus <focus value>
This step must not be skipped because the quickfocusrun command leaves the telescope focus set to the last value of the focus sequence.
Back to the top
4. Observing Commands
4.1 Data Acquisition Commands
A complete list and description of every observing command can be found in the
command dictionary of the UltraDas Software manual.
A summary of the most commonly used commands is given here to serve as a quick reference. These commands are issued in the ICS pink window:
- To take a science exposure, issue:
SYS> run pfip <exptime> "<name>"
- To take multiple science exposures, issue:
SYS> multrun pfip <nrun> <exptime> "<name>"
- To take a bias image, issue:
SYS> bias pfip
- To take multiple bias images, issue:
SYS> multbias pfip <nrun>
- To take a dome/sky flat field image, issue either of:
SYS> flat pfip <exptime> "<name>"
SYS> sky pfip <exptime> "<name>"
- To take multiple dome/sky flat field images, issue either of:
SYS> multflat pfip <nflat> <exptime> "<name>"
SYS> multsky pfip <nsky> <exptime> "<name>"
- To take a test image that is not recorded in the night log, issue:
SYS> glance pfip <exptime>
- To abort a current exposure and not readout the CCD mosaic, issue:
SYS> abort pfip
You may have to issue a ctrlZ and then "SYS> bg" to put the current exposure in the background first.
- To finish a current exposure and readout the CCD mosaic, issue:
SYS> finish pfip
Again, you may have to issue a ctrlZ and then "SYS> bg" to put the current exposure in the background first.
- To adjust the exposure time of an already started exposure, issue:
SYS> newtime pfip <exptime>
Again, you may have to issue a ctrlZ and then "SYS> bg" to put the current exposure in the background first.
4.2 TCS Commands
The following commands control some aspect of the telescope operation. You may issue these commands yourself, or ask the TO to do them for you:
- To set the telescope focus to some value, issue:
SYS> focus <focus value>
- To offset the telescope in RA and Dec from the origin, issue:
SYS> offset arc <RA offset in "> <Dec offset in ">
Note that these offsets are absolute, and hence repeating the same offset command has no effect on the telescope position.
- To define an aperture offset, one may use the following two commands, issued in order:
SYS> user "enter aperture <number> <x offset in "> <y offset in ">"
SYS> user "ap 0"
The offsets are in instrument coordinates and the sign criteria are described here.
To set the aperture to the centre of CCD1, issue:
SYS> user "enter aperture 0 250 0"
SYS> user "ap 0"
- To go to an object in the TCS catalogue, issue:
SYS> gocat <object name>
However, it is a probably better to let the TO do this for you, since he/she is responsible for the telescope itself.
- To offset the telescope in x, y and/or position angle, while keeping the autoguiding loop closed, issue:
SYS> user "tweak <x offset in "> <y offset in "> <PA offset in deg>"
The size of these offsets is limited by the autoguider probe field of view of ~12"x12".
4.3 Mechanism Commands
A complete list and description of the PFIP mechanism commands and new
PFIP controller software (PFIP GUI included) can be found in
here.
To change the current PFIP filter using the command line, issue:
SYS> pfilter <number or name>
It is not recommended to use this command within scripts. The following command can be used instead:
SYS> pfip_move -m filter <number or name>
For the autoguider, one can change the current filter by issuing:
SYS> pfip_move -m autofilt <number or name>
4.4 Quick Look Package
The PFIP's detector is a
mosaic
of two 2048×4100 EEV CCDs. The FITS file produced for one exposure therefore (generally) contains two extensions, one for each CCD.
The CCD1 image is stored in
r??????.fit[1] and the CCD2 image is stored in
r??????.fit[2].
An IRAF package pfip_ql is available to help support astronomers to carry out the
PFIP setup on the first night after an instrument change.
Observers can also use some tasks from the package to display and analyse the data.
To use the IRAF PFIP quick look package pfip_ql, open an IRAF session and load the package as described under
"Afternoon Preliminaries". The useful tasks in this package are as follows:
- To display each CCD of a PFIP image in a separate frame within DS9, issue:
pf> mosaicdisp <image>.fit
Remember to tile the frames to see both CCD images.
- To determine the best telescope focus from an image taken with the observing system command quickfocusrun, issue:
pf> pfip_qstarfocus <image>.fit fstart=<focus start value> fstep=<focus step> pstep=<telescope offset>
nexp=<no. of focus steps>
See the instructions on "Focusing The Telescope" for details on how to select appropriate focus stars.
Back to the top
5. Obtaining A Copy Of Your Data
This
section gives information about how to copy your PFIP data.
Back to the top
6. Useful Notes
6.1 Field orientation for rotator PA=0
When the rotator position angle is zero degrees, the
orientation of the PFIP images
is North up and East right. For a sky PA of 90 degrees, North is left and East is up
6.2 Field shift after applying an aperture
The scheme below shows how the field moves when applying a positive aperture with sky PA zero
(e.g. the command
SYS> user "enter aperture 0 -20 -10" moves the field 20" E and 10" N, i.e. right and up).
                N
      +--------++--------+  sky PA = 0
      |        ||  x     |
      |        ||<-----* |
      |        ||      | |
      |        ||      | |
      |        ||     y| | E
      |        ||      V |
      |        ||	 |
      |        ||	 |
      |        ||	 |
      +--------++--------+
6.3 Minimum recommended exposure time
Note that the minimum effective exposure time for PFIP is 0.5s, and we recommend a minimum requested exposure time of 2s in order to limit
shutter travel time effects. If you request an exposure time of less than 0.5s, then you will only achieve an exposure time of 0.5s.
6.4 Readout time function of speed, windowing and binning
The following table lists the mosaic mean readout times for various combinations of CCD readout speed, binning and windowing:
PFIP Mosaic Mean Readout Times |
| Readout Speed | X Y Binning | Windowing | Readout Time (s) |
| Slow | 1 1 | None | 38.3 |
| Slow | 2 2 | None | 12.3 |
| Slow | 1 1 | [900:1100,1:4200] | 23.2 |
| Slow | 2 2 | [900:1100,1:4200] | 11.7 |
| Slow | 1 1 | [1:2148,1900:2100] | 3.1 |
| Slow | 2 2 | [1:2148,1900:2100] | 1.8 |
| Slow | 1 1 | [900:1100,1900:2100] | 2.3 |
| Slow | 2 2 | [900:1100,1900:2100] | 3.0 |
| Fast | 1 1 | None | 30.0 |
| Fast | 2 2 | None | 9.8 |
| Fast | 1 1 | [900:1100,1:4200] | 22.4 |
| Fast | 2 2 | [900:1100,1:4200] | 11.3 |
| Fast | 1 1 | [1:2148,1900:2100] | 2.7 |
| Fast | 2 2 | [1:2148,1900:2100] | 1.6 |
| Fast | 1 1 | [900:1100,1900:2100] | 2.3 |
| Fast | 2 2 | [900:1100,1900:2100] | 1.6 |
6.5 Defocus due to mosaic non-coplanarity
The two CCDs are non-coplanar, and a plot with some laboratory measurements is given in this
detector page
(section "Mosaic coplanarity and spacing"). Considering maximum 30 microns the shift between the mosaic centre (where usually the camera is focused best) and the corners, we calculate
maximum ~0.15" focus alteration in the corners, which agrees with the observational evidence.
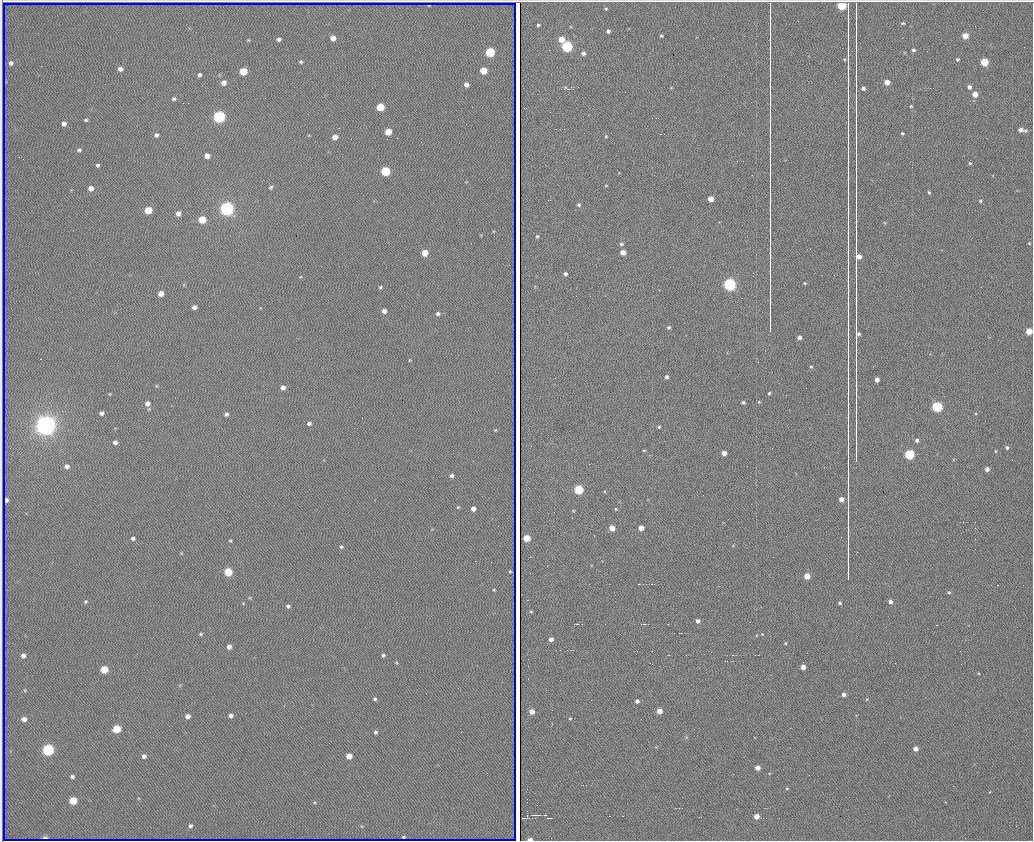
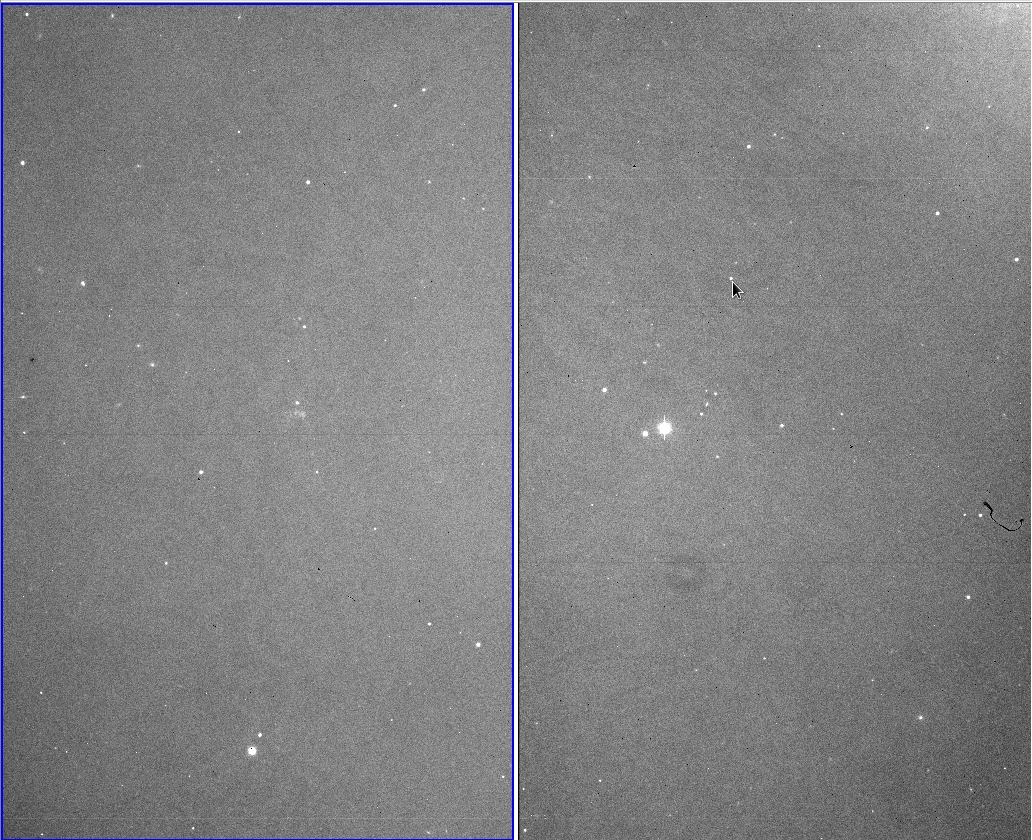
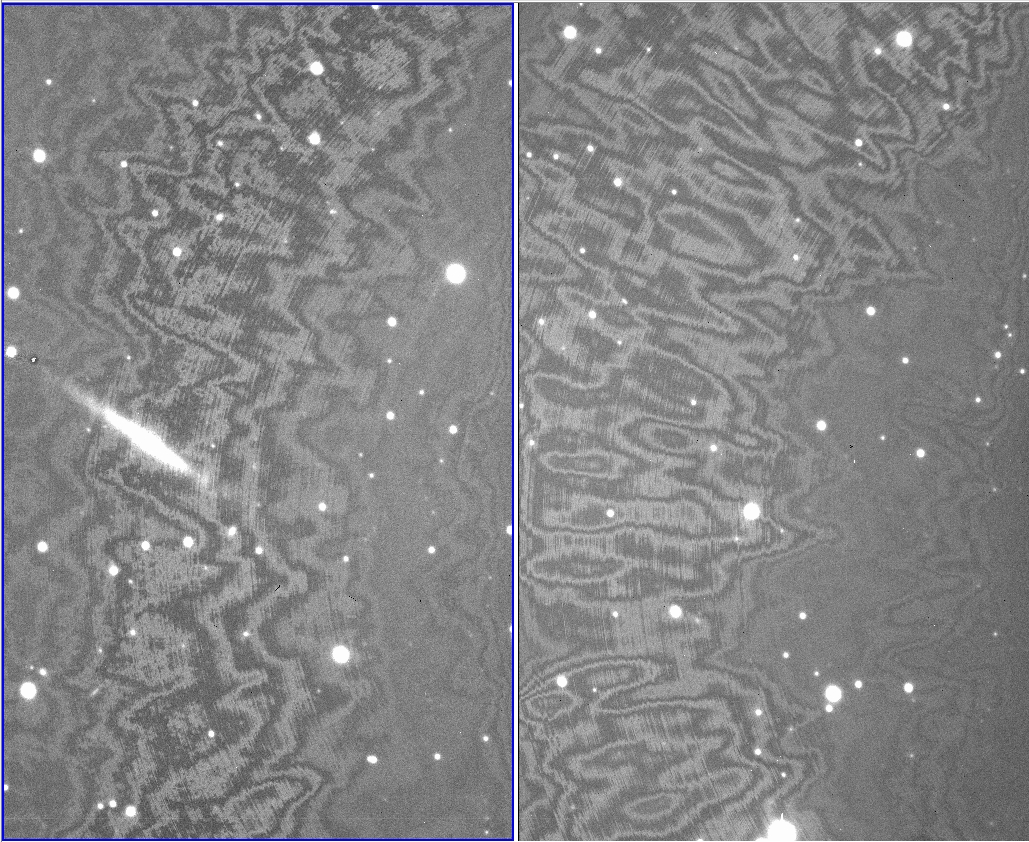
6.6 Fringing
Not much fringing is present in PFIP. Some examples here:
PFIP fringing in Harris R filter (no fringing)
PFIP fringing in Taurus R 6373 filter (virtually no fringing)
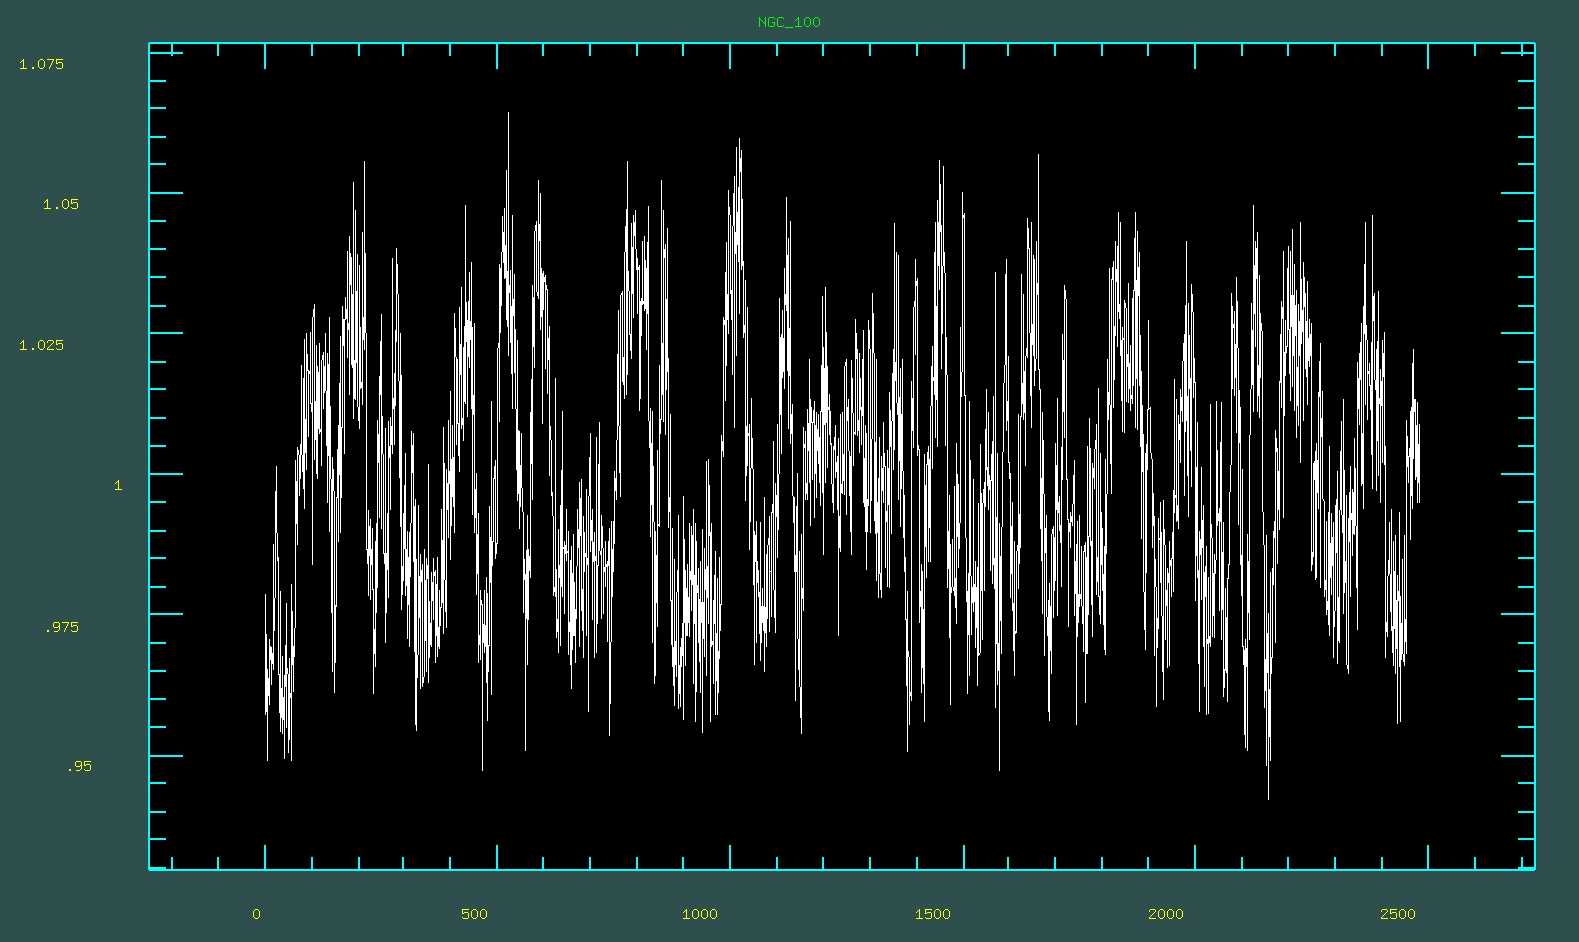
PFIP fringing in Harris I filter (about 5% fringing,
sample plot here)
To reduce any fringing, we recommend using THELI software (see
here some guide how to use it with WFC).
6.7 DS9 Image Orientation
While using
mosaicdisp or simply
disp to display PFIP mosaic images, remember to tile the view in DS9 [Menu: Frame / Tile Frames ] in order to see both chips side by side.
In order to match correct sky orientation (North up, East to the right), both Frames should be applied [Menu: Zoom / Invert X ] and also the first CCD should be displayed
at right of second CCD, so select [Menu: Frame / Move Frame / Forward ].


