User Guide
- Starting the system
- INGRID real time display (RTD)
- INGRID mechanisms
- INGRID observing commands
- End of night
- Shutting down the system
- Important notes
- Log on to the Sun workstation taurus (next to the ICL
computer):
- LOGIN: whtobs
PASSWORD: provided by your support astronomer
An openwindows session starts, and an xterm pink window (labelled
"Central intelligence of observing system") and an orange xterm window
with a number of tabs
will appear. Also a netscape window appears, which shows the
UltraDas Software Operations Manual (command dictionary included).
Select the tab on the orange window corresponding to the DAS
(data acquisition system) computer that controls INGRID (get its name
from the white board above the ICL computer). It will be entitled whtdasx.
- Start the data acquisition system:
- Type obssys in the orange
window. This defines the software to use and will then prompt you to
select the observing system. Select the "manual camera
selection", follow the instructions, and wait until the DAS>
prompt appears.
- Type DAS>startobssys to start the
software.
Wait until the prompt is back, then minimize this window (it is not
needed until you shut down the system).
- Start the system computer:
- Type obssys in the pink window.
- Follow the same procedure as you did for the orange DAS
window and
wait to get the prompt SYS> back.
- Type SYS>startobssys
This initializes the telescope control software
(TCS) link, the INGRID mechanism controller and the INGRID SDSU
controller, and brings up several new windows:
- A real time display (RTD) control tool
- An Ximtool window to display the data
- The INGRID
mechanism mimic.
To get more detailed information about the INGRID mechanism wheels,
select Control from the File menu.
- An "identify" window.
Enter your name and proposal identification.
- The observing log.
The log is automatically refreshed. To add comments about an
observation
click once with the mouse on the appropriate line; a box appears where
you can
type shorts comments.
- The
array info display window
- The "talker" window. It displays messages from the
observing system to the user.
- Initialize the pupil stop wheel and the two filter wheels.
SYS>fwheel1 ingrid datum;fwheel2 ingrid datum;pstop
ingrid datum
- If you want, you can bring up a telescope
info display window. Type:
SYS>tcsinfo&
- Set the array readout speed to slow:
SYS>rspeed ingrid slow
- To examine INGRID data:
- Log on to whtdrpc1, the Fedora-based PC
dedicated to quick look reduction (the monitor to the right of taurus):
LOGIN: whtguest
PASSWORD: provided by your support astronomer.
- Open up an xgterm (type xgterm -sb&).
- Open up a ds9 session (type ds9&).
- Start an IRAF session (type cl or ncl)
from the home directory (/home/whtguest), in the recently opened
xgterm.
- Type cl>ingrid_ql
in
IRAF,
to start up the INGRID quick look
reduction package.
- Change to the disk and directory where the
data is going to
be stored ( e.g. cl>cd /obsdata/whta/20050429).
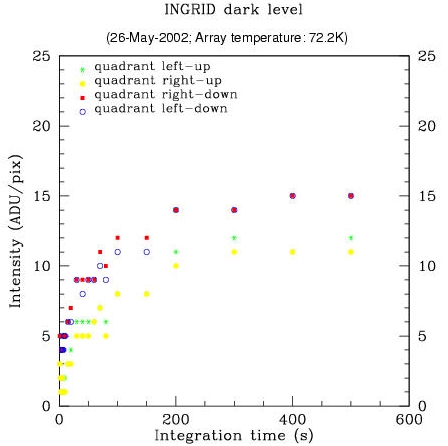
- Now is a good moment to take two darks of the same exposure time
and measure the INGRID array readout noise. To do this, put blanks in
the light path, then take a couple of dark frames.
- SYS>fwheel1 ingrid blank1
- SYS>pstop ingrid blank
- SYS>dark ingrid 2 "dark 2s a"
- SYS>dark ingrid 2 "dark 2s b"
- On lpss13, within the INGRID quick look package, type: in>ifindron
and enter the filename of the
two darks.
The result is given in ADU.
IMPORTANT: the readout noise value given in the image FITS
headers is fixed, and regularly updated, but not derived from each
specific image.
Observers are therefore recommended to check the readout noise of their
images.
The INGRID real time display (RTD) consists of two elements: a RTD
control panel and an Ximtool window to display the data.
- RTD control panel. INGRID fits data files
contain two extensions (e.g. r414230.fit[*,*,1] and
r414230.fit[*,*,2]),
which correspond to (i) the array readout after the reset process but
before the integration (the pre-read, extension 1) and (ii) the readout
of
the array after the ntegration has finished (the post-read, extension
2). Click
here for a more detailed explanation.
The RTD control panel (see the image below) allows one to
display (i) the post-read image, (ii) the pre-read image or (iii) the
post-pre (=post minus pre) image of a particular run. Also, it is
possible to display the result of
subtracting one image from another (e.g. a sky subtracted image).
This operation affects only the displayed data (i.e. only raw data is
stored on disk).
On the RTD control tool window, from top to bottom:
- Observation Data Shows the file name of the image
displayed in the Ximtool window.
- Reference Data Shows the file name of the image
loaded as reference data (see below).
- Status Status of the RTD. It can be "scanning'' if
the Data Detection is selected to be on (clicking on
the corresponding diamond), or "data detection off'' if Data
Detection is off.
- Data Directory Shows the directory where the data are
being stored.
- Data Detection If you click on the on box,
new images are automatically loaded into the
RTD.
- Display State This section offers several options to
display the data, which are activated by clicking on the diamonds on
the left:
- OBS-REF Displays the post minus pre of the observation
data minus the post minus pre of the reference data
- OBS/REF pre Displays the pre-read of the observation/reference
data
- OBS/REF post Displays the post-read of the observation/reference
data
- OBS/REF post-pre Displays the post minus pre of
the observation/reference data
- Refresh Click on this button to refresh the display
on the Ximtool window.
- OBS->REF Load the current observation data
as reference data.
- Quit Click on this button to quit the RTD.
- Load OBS/REF Data These buttons can be used to load
any fits files in the Data Directory as observation data/reference
data: type the file name
of the image in the required box and click on the associated
button.
For example, in the figure shown above the post minus pre of the file
s1.fit is
displayed (and no data has been loaded as a reference frame).
- Ximtool image display window. In addition to displaying an
image, this window also has the facility to alert observers to
saturation by turning pixels red
if (a) the value of the post minus pre of the data set is higher
than 28000 ADU or (b) the value
in either the pre- or the post-read is higher than 43000 ADU.
Note that non-linearity is ~± 2% over the range 0-12000 ADU (in
the
post-pre). More information is given here.
INGRID mechanisms comprises a pupil stop wheel, two filter wheels (one for narrow band
filters and another one for broad band filters), the focus drive and a
pupil imager. During normal science observations one broad or narrow
filter might be
in the beam, as well as an appropriate pupil stop to eliminate as much
unwanted background radiation as possible, before it enters the camera.
- Status of INGRID mechanisms
The position of the filter wheels, the pupil stop wheel, the
instrument internal focus and the pupil imager can be checked by means
of the mechanisms mimic or the command line:

- The INGRID mechanism mimic summarizes the selected positions
of the filter and pupil stop wheels, the pupil imager and the
instrument internal focus value in microns.
A graphical user interface
(GUI)
can be obtained from the File menu, by selecting Control.
The selected positions in each wheel are coloured green.
- In the pink instrument control system window, the command mchstat
shows the status of the INGRID controller and all the mechanisms:
SYS>mchstat
- Click here to see the
filters and pupil stops currently available in INGRID.
- Moving INGRID mechanisms
Mechanisms can be moved using either the GUI or the command
line interface (pink window).
- From the GUI
- Filters and pupil stops. To move any of the three
wheels, enable the GUI (clicking on square at the top-right) and then
click on the filter/pupil stop you want in the beam. While moving, the
whole wheel is coloured blue and the selected position yellow. When the
wheel movement has finished the demanded filter turns green (success)
or red (undefined position). If the latter occurs, you have to datum
the corresponding wheel (click on the datum button or type
e.g.: SYS>fwheel1 ingrid datum (or fwheel2, or
pstop)). IMPORTANT: the motion of two wheels simultaneously can
result in losing wheel accuracy and hence is not recommended.
- Focus drive. For
INGRID+NAOMI observations, the INGRID internal focus should be fixed
at -1200 microns. (If it is not set to this value, type -1200 in the
box and hit return.)
- From the command line in the "pink window"
- Filters. Individual filter wheel movements can be
performed, for broad band and narrow band filters respectively,
with the commands
SYS> fwheel1 ingrid <filter name>
SYS> fwheel2 ingrid <filter name>
- Pupil stops can be changed independently of
filter movements with the command:
SYS> pstop ingrid <pupil stop name>,
where, for observations with NAOMI, <pupil stop name>
may be:
- naomi-obs, osca-obs Pupil
stops
with central obscurations, used for observations with NAOMI and OSCA
respectively.
- naomi-clr, osca-clr Pupil stops
without central obscurations, used for observations with NAOMI and OSCA
respectively.
- clear No pupil stop in the beam.
- blank1 Aluminium blank for dark
frame acquisition.
Consult your support astronomer about most
appropriated pupil stop for
your observations. For details on the dimensions of the pupil stops
click here.
- INGRID focus drive. Type SYS>ifocus
ingrid <position in microns>. This should be set
to -1200 microns for INGRID+NAOMI observations.
- Pupil imager. This is only used in engineering
mode. For normal astronomical use the pupil imager must be out
of the light beam. If you need the pupil imager to be removed, call
your support astronomer or duty engineer.
A complete list and description of
the commands
can
be
found in the command
dictionary of the UltraDas Software manual (except the dither
command for INGRID+NAOMI, which is described below). A summary of the
most commonly used commands is given here for a quick
reference (where arguments are denoted by <>):
- INGRID data acquisition commands
- rmode ingrid mndr < Nr> < N
coav>
Sets the number of MNDR (multiple non-destructive reads) to Nr
and the number of coaverages to N coav. Nr is the
number of times that the array is read non-destructively prior to and
after an integration. The array data from the Nr pre- and
post-integration reads are averaged independently. Nr
is an integer between 1 and 16; the default is 1, corresponding to
"correlated double
sampling". N coav is the number of accumulated exposures that
are averaged and written as a single output file. See here for more
details.
- coave ingrid < N coav>
Sets the number of coaverages to N coav.
- multglance ingrid <N> < int
time>
This command can be used to use INGRID in "movie mode". It produces a
sequence of <N> exposures of the required
integration time. E.g.: multglance ingrid 999 2
produces a sequence of 999 2s exposures. The sequence can be finished
by pressing control-C.
- run ingrid <int time> <"title">
Takes a run and saves it in rxxxxxx.fit. The OBSTYPE header
parameter is set to TARGET.
E.g. run 8 "FS33 ks", performs an 8 second exposure
and stores
it in the output file (e.g. r240976.fit).The title of the fits file is
set to "FS33 ks". If the number of coaverages has previously been set
to 2 (i.e. coave ingrid 2 or rmode ingrid mndr
1 2) the command run 8 "FS33 ks" takes two 8
second exposures in succession, then coaverages the data before storing
it in the output file (e.g. r240976.fit).
- dark ingrid <int time> <"title">
Takes a run but sets the
OBSTYPE header parameter to DARK.
- flat ingrid <int time> <"title">
Takes a run but sets the
OBSTYPE header parameter to FLAT.
- glance ingrid <int time>
Takes an exposure and saves it in s1.fit. This file is
overwritten when a new glance is taken.
- scratch ingrid <k> < int time>
<"title">
Takes a run and saves it in: sk.fit. Note that k must be an
integer between1 and 99. The scratch file sk.fit is overwritten
when a new scratch is taken with the same value of k.
- multrun ingrid <m> <int time>
<"title">
Same as run but repeats the run sequence m times and generates m
output files.
- multflat ingrid <m> <int time>
<"title">
Same as flat but repeats the flat sequence m times and
generates m output files.
- multdark ingrid <m> <int time>
<"title">
Same as dark but repeats the dark sequence m times and
generates m output files.
- dither -intcount <integrations> -secs
<int
time> -offset <x offset> <y offset> -title
<"title"> -5point <x dither offset> <y dither offset>
The dither command is used to take exposures at different telescope
positions
while using the AO system NAOMI. Note
that it should be used with sky
PA = 0. Amongst other things, one can select
the number of exposures at each dither point, the exposure time, the
number of pointings and the size of the offsets. Eg.
dither -intcount 2 -secs 10 -offset 0 0 -title
"fs28
ks" -5point 4 4
In this case, a five point dither is performed. For each
ditherering position, 2 individual 10s exposures are performed (plus
any coaveraging) and given the title "fs28
ks". The dither pattern consists of a central position, with
four surrounding dither positions that are offset by ±4 arcsecs
in x and y.
See here
for a detailed explanation about the dither command and its options.
Before starting the dithered exposures, the AO loop should
be closed by the SA. When performing the actual
dithers, the script will (a) open the loop, (b) move the telescope, (c)
move the wavefront sensor pickoff probe to reacquire the guide star,
and (d) close the loop, before starting the next exposure.
- INGRID diagnostic commands
- detstat Shows
detector status and temperature of the monitoring points.
- mchstat Shows mechanisms
and
INGRID controller status
- TCS commands (usually performed by
the
TO)
- user "ENTER APERTURE <number> <ra
offset>
<dec offset>"
Defines the aperture < number> characterized by <ra
offset> and <dec offset> arcsec offsets in RA and
DEC respectively (e.g.
user "ENTER APERTURE 1 -400 0").
- aperture <number>
Offsets the telescope according to the previously defined aperture.
- offset arc <ra offset> <dec
offset>
Offsets the telescope by <ra offset> arcsec and <dec
offset> arcsec in RA and DEC respectively from the nominal
position.
- gocat <object_name>
Moves the telescope to the object <object_name> if this
has previously been loaded into the TCS.
- object <object_name> <ra(hh mm
ss.ss)>
< dec(dd mm ss.ss)> <equinox>
add
Adds the object <object_name> to the catalogue.
At the end of the night, please put
blanks into the light path. It is not necessary to shut down the
observing
system.
- Shut down the system computer:
Type SYS>shutdownobssys on the pink
window
and wait until the prompt is back. Most of the windows will disappear
(the RTD, log, mechanism mimic, array info window, talker, identify
window).
- Shut down the DAS:
Type DAS>shutdownobssys
on the tab corresponding to INGRID on the DAS orange window and wait
until the
prompt is back.
- Close the TCS display window manually by selecting Exit
from the File
menu.
- Close the Ximtool window by selecting Quit
from the File menu.
- Log out of INGRID's control computer by clicking the right
mouse
button on the background screen and selecting exit.
|


