

Instrument Control System (ICS) and Data Acquisition System (DAS)
For any issues which appear to affect the instrument, including control mechanism errors,
communication errors, or observing system problems, try the following actions in order
until the problem is resolved.
Reseting the Data Acquisition System (DAS)
This can also be important when solving issues with high read-out noise.
SYS> dasreset WFC
Reseting of the Instrument Control System (ICS)
This takes about 5 minutes, and will clear most communication errors. Logout from the ICS
In the pink window type: SYS> shutdownobssys
SYS> exit
Logout from the DAS
On the orange DAS window for WFC (triton), type:
DAS4@triton> shutdownobssys
Are you sure you want to shut down the DAS? y/n? > y DAS4@triton> exit
intobs@triton> exit
Start up the DAS
Single left-click on the DAS term icon, then type:
intobs@triton> obssys
followed by the number of the observing station you need (4).
Choose your station> 4Then, to begin, type:
DAS4@triton> startobssys
Start up the ICS
Once the DAS is running, repeat the same steps in the pink ICS window.
If ICS window is not displayed already, just single left-click on the ICS icon.
Then type:
intobs@lpss7> obssys
followed by the number of the observing station you need (4).
Choose your station> 4Then, to begin, type:
SYS> startobssys
Then, wait for the following windows to appear.
1. Talker 2. Observation Log 3. Who goes there? 4. WFC GUI 5. Autoguider 6. WFC Autoguider Sequencer
Wait for the GUI to read all the filters. Remember to check the CCD readout speed and binning.
Check the filter wheel can be rotated and the camera shutter works. If one or the other does not work, type:
SYS> cmd MCA RESET
In case your observations do not need guiding, shutdown the wfc_ag_sequencer following instructions at the
no guiding section
of the WFC Operation Manual. In case you need guiding, in the autoguider window, overlay the cross in the centre by selecting TOGGLE CENTRE CROSS from the SETUP menu.
Restart of individual system controllers
If you are not 100% sure how to power cycle any systems, do not
attempt to do this without contacting your Support Astronomer or
the WHT Observing Support Assistant.
CCD controler
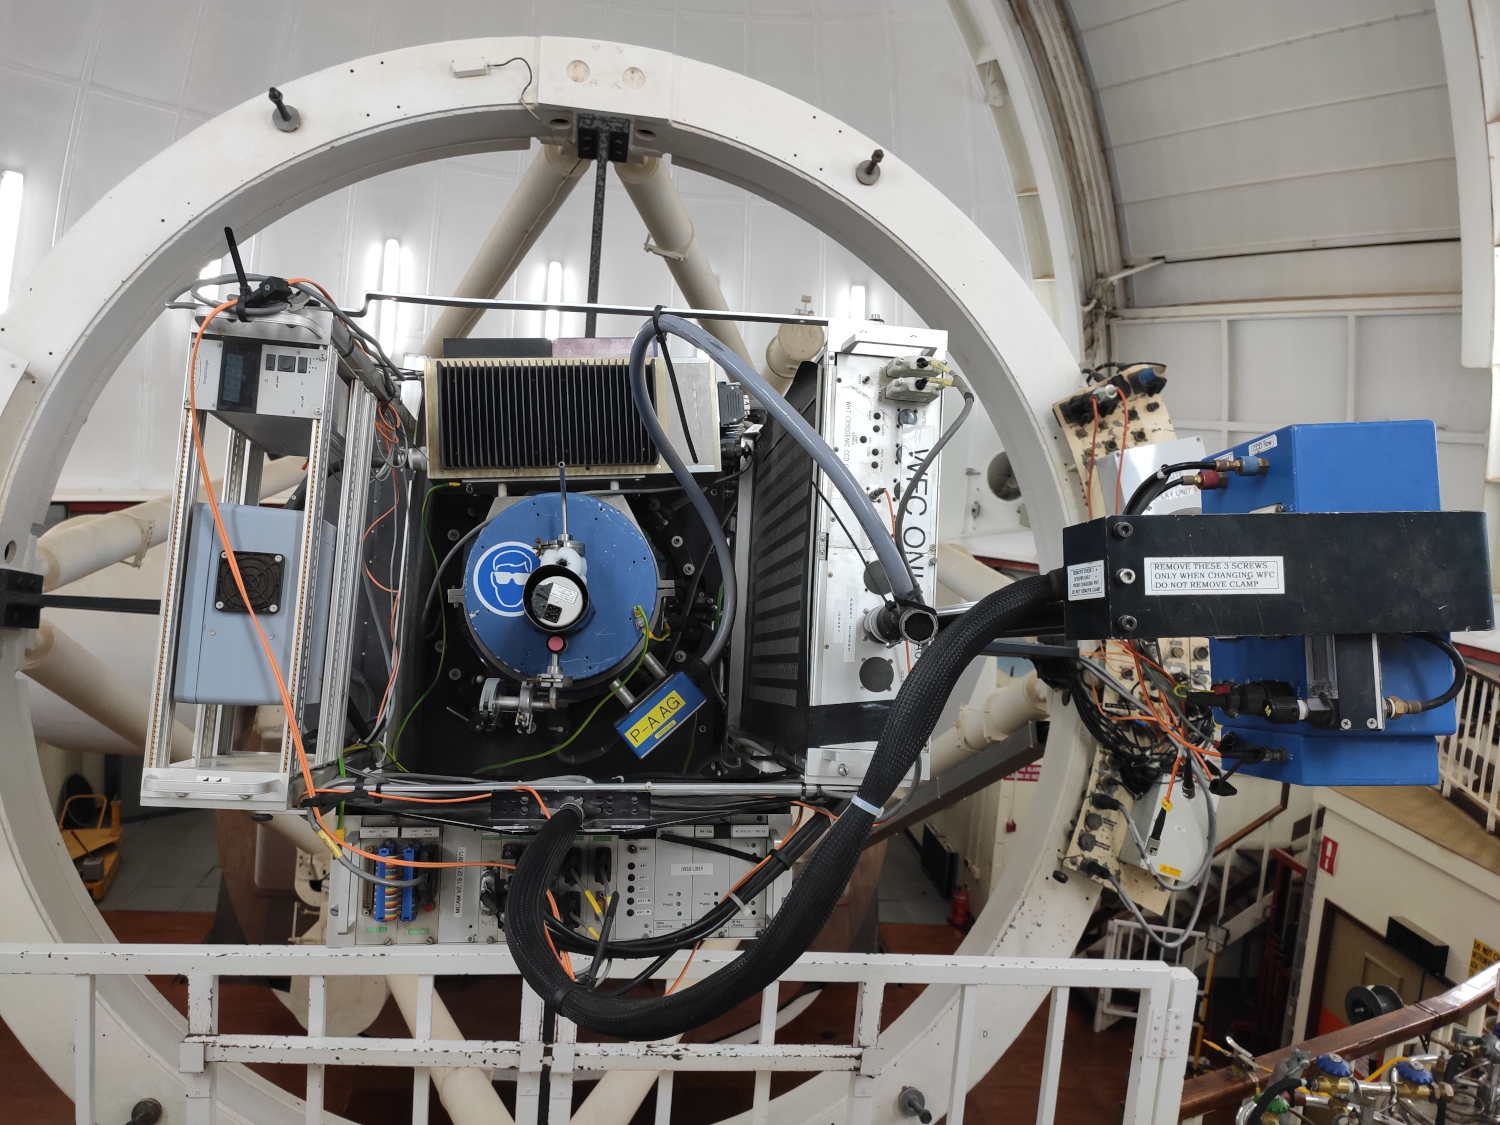
If you encounter a problem of communication with the CCDs, or an issue when reading out, You may be asked to power cycle the CCD SDSU controller which is located to the left of the cryostat, as seen in this photo. First take the telescope to the access park. Then turn the switch at the back of the power supply off, wait for one minute, and then turn it on again. After this, you need to complete a DAS and ICS resets as described above.
Filter wheel or camera shutter
A problem with the filter wheel or the camera shutter may require a power cycle of the MCA controller. This is located below the cryostat, as seen in this photo. Turn off the MCA controller, wait for one minute, and then restart. After this you may need to complete a DAS and ICS resets as described above.
Autoguider
An issue with the autoguiding system may require to power cycle the AG controller.
This is located to the right of the cryostat, as seen in this photo.
Turn off the controller, wait for one minute, and then restart. After this
you may need to complete an ICS reset as described above.
If the problem persists, then contact the WHT Observing Support Assistant, and clearly explain the actions taken.
Telescope Control System (TCS)
If you encounter
a problem with the telescope control system, like focussing, pointing or tracking,
you may need to restart the TCS. Shut down the observing system and
log out of the ICS as described above. Be sure to follow this order:
1. Park the telescope at zenith using park zen command.
2. If the communication with the TCS is lost, then manually bring the telescope to zenith using the engineering mode.
3. Log out from the ICS and then log out from the DAS.
4. Switch to engineering mode.
5. Log out from the TCS.
6. Start up the TCS.
7. Zeroset the telescope.
8. Start up the DAS and then the ICS.
Log out of the TCS
To log out type:
USER> tcsexit
Then log out of the computer by right-clicking on the desktop, select 'Leave', and then 'Log out'.
Starting up the TCS
On the ICS computer (lpss7): | 1. | Check the desktop environment, which should be KDE rather than GNOME. You can find the KDE option on the bottom right of the screen. |
| 2. | Start the detector and instrument control systems by clicking the "DAS term" icon. |
| 3. | Log in with the intobs account (within the OpenWindows desktop; Session=Plasma). |
| 4. | Single left-click on TCS icon, then use: username: int_login and password which can be found on the left monitor. |
| 5. | At next menu choose START from the menu options. This will bring up both the telescope status display and the USER> prompt by default. If it doesn't work, type "REOPEN". |
| 6. | Remember to do a ZEROSET whenever the TCS is restarted. |
| 7. | After the TCS is restarted, check that the telescope focus value is what you need. If not, check the focal station. |
| 8. | Then you can restart the ICS following the instructions above. |
DEC synchro arrows jumping
The DEC arrows in the engineering rack can jump back and forth sometimes (instead of settling) after the telescope has reached its demanded position (during the zeroset or going to a new sky field). The DEC arros are not essential for the operation of the telescope,
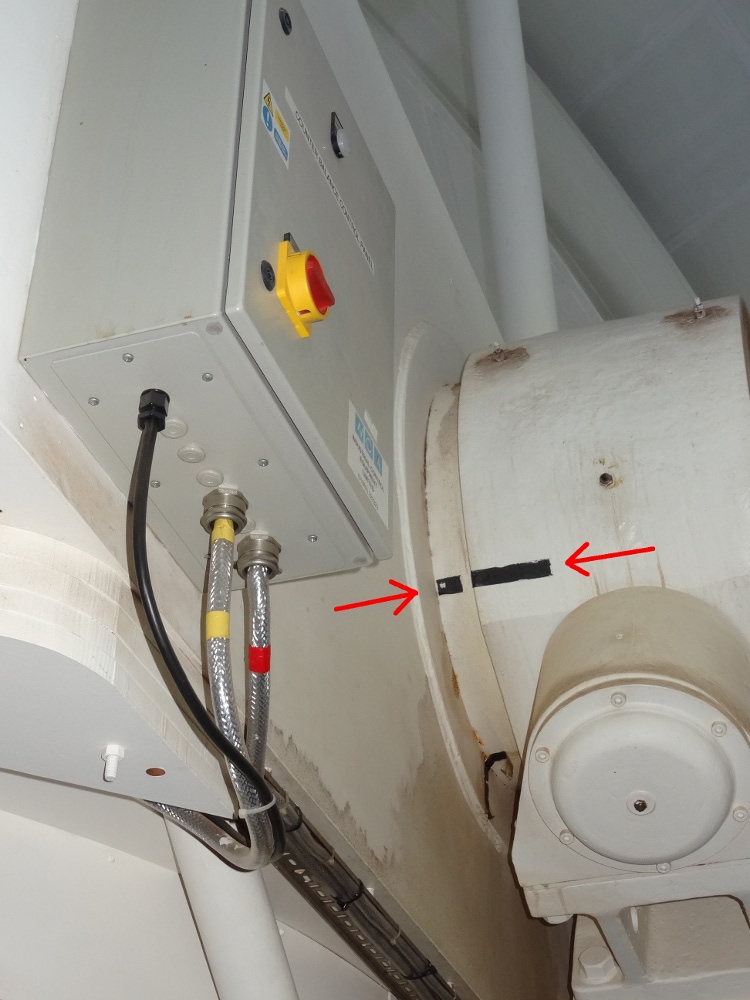
being only useful as a reference especially when you do zeroset the telescope. The way to work-around if the DEC arrows start jumping while doing a zeroset is to check the black tape marks on the right hand DEC bearing of the telescope (photo here) in this order:
1. Move in DEC to zenith. If the two marks coincide, then you are close to zenith; 2. Then, from the engineering rack move DEC and find the point where the DEC LED lights up; 3. Do zeroset drive DEC in positive direction over the point where the DEC LED lights up.
If the DEC arrows jump while going to a sky field, then you can either simply disregard them (but check the first image) or work-around by going to a nearby field (for example using the command offset arc 0 1000) then gocat back to the required sky position, and the arrows should settle in this second intend.
TCS disconnects
Check that the TCS USER window is responsive. If it is not, it is
possible that the TCS TELD task has died. To restart, go to the
x-terminal where the TCS user interface and info display are running
and type: intobs@inttv> telnet lpas2Then, log onto the computer named lpas2 (username: int_login, password can be found on the lpas2 monitor), and select the option > TELD This will re-establish contact between the observing system and the TCS. When contact is re-established, the TCS icon at the top of the WFC GUI will turn green.
TCS communication hangs
In the case of loss of communication between the TCS and the user interface, i.e. if either the TCS USER window stops responding, or the TCS DISPLAY window stops updating, try one of the following solutions: S1) Try to restart the TCS by opening the INT TCS terminal on the TCS computer and logging in with the INT TCS username and password.
S2) If this does not work, then clearing the communications may recover the system:
 In the blue band at top of the window, click on
 Commands --> Clear Communications
S3) In case this still does not work, please contact the WHT OSA asking him/her to restart the TCS display using the following steps:
Log in again to lpas2 using the usual userid and password. Select the option REOPEN from menu as shown below:
 This is the INT TELESCOPE CONTROL SYSTEM

 The TCS is running, using version I30-0-2

 Please enter an option -

 STOP     - Stop the TCS

 TELD     - Start the TELD task

 REOPEN   - Open the TCS user and display windows
            Info display on inticsdisplay.ing.iac.es
            USER window  on inticsdisplay.ing.iac.es

 DISPLAY  - Select different display devices

 NFSMOUNT - Mount the ICS Unix partition

 EXIT     - Exit this menu and log out
Note: It is NOT necessary to do a zeroset of the telescope after reopening the windows using the REOPEN.
TELFOCUS value in image headers
The value of TELFOCUS seems to be changing as recorded in the WFC headers (up to about 0.1 mm) for the same filter.
This information in the headers is actually false, the actual telescope focus being constant, with the old UNIX TCS software being responsible for this minor apparent change in the headers. There is no failure in the focus mechanisms and both the telescope and the instrument are working just fine (see fault report 22542).
Other known issues
Dome
If the dome does not rotate when the telescope is preset to a target, then the DOME SHTRS
button may still be pressed on the Engineering console. Depress it to
set the dome back to computing mode. Alternatively, the dome might be
erroneously left in local (engineering) mode. Turn the key in the dome control panel located inside the dome to set it back to remote (computing mode).
WFC shutter
If, when you start an exposure, you get the message The shutter failed to open at the start of the exposure accompanied by red/blinking/beeping, quit the alarm and repeat the last command. Elapsed time is counted in a blue box on the WFC Graphical User Interface (GUI) while the shutter is open. After read-out has completed, the box turns green. If the box turns orange with time elapsed = 0, then a fault has occurred. This exposure will then either be logged with a 0 second exposure time, or not quoted at all, in the observations log and in the headers. The fault is a result of a problem with the MCA controller (the electronics rack mounted on the WFC which drives the shutter and filter wheel). To recover type:
SYS> cmd MCA RESET With the next
exposure, the exposure time should be recorded correctly again. If this
does not fix the issue, bring the telescope down to access park and
power cycle the MCA controller.
This is located below the cryostat, as seen in this photo. Turn off the
MCA controller, wait for one minute, and then restart followed by: SYS> cmd MCA RESET
Filter wheel
- Symptom: There are problems with
the filter wheel: E.g. (i) The wheel is not operating correctly, (ii)
there is a problem with its status and/or (iii) the mounted filters
have not been correctly identified.
SYS> cmd MCA RESET
This will reset the MCA controller (the electronics rack mounted on the
WFC which drives the shutter and filter wheel). Next the filter wheel
will be rotated and the identity of each of the filters will be checked
using the bar code on their filter mounts. It may be necessary to
repeat this command more than once.Be warned that this procedure will leave the WFC shutter closed. It can be opened again from the WFC GUI.
- Symptom: When changing filter position you get the message 'The filter-wheel detent pin is malfunctioning' (red/blinking/beeping) or 'filter wheel movement timed out'.
SYS> cmd MCA RESET
- Symptom: It is not possible to
open the filter access door. Possible remedies (in their suggested
order) are:
3. When opening the door, try pressing on the bottom left hand part of the door (tip from ops team)
- The WFC GUI does not respond after the observing system has been restarted:
- The filter is not correctly identified in the filter wheel:
SYS> cmd MCA RESET
If the probem persists, then check that is correctly seated in the wheel and the barcode doesn't look damaged. See fault report 22015 for more information.
Data acquisition
The data acquisition term refers to the management of an exposed
image, reading of data from the CCDs and saving to disk. This may fail
in one of several stages, for example: 1. Run, Finish, Abort or Re-Time commands are not successful.
2. Run process stops after CCD clearing.
3. Run spontaneously aborts during readout or transfer to disk.
4. Transfer to disk does not complete to 100%.
5. Data on disk is corrupted (e.g. torn frames).
These may or may not be accompanied by a pop-up error box/alarm. If the error pop-up mentions the (ultra) DAS or reset the camera and you cannot continue observing, then the following procedure is recommended:
SYS> dasreset WFC When this completes,
try a new run and see if the above fault reoccurs. If it does, then a
lower-level reset of the CCD controller may be necessary. In this case,
move the telescope down to access park and power cycle the unit labeled
SDSU CCD controller (located to the left of the cryostat), followed by:
SYS> dasreset WFC
Note: The above procedures deal with CCD controller problems.
Procedures on how to carry out a full restart of the DAS (Data
Acquisition System) can be found above.
Meteorological Data System (MDS)
Occasionally the measurements from one, two, or all three of the
meteorological stations can fail to reach the MDS, leaving all the
windows red. If this continues for more than a few minutes the MDS can
be restarted. To close it type Alt+F4 on the attached keyboard, and
reopen by double clicking on the MDS icon near the middle of the
screen. After a minute this should update and work as normal. If this
does not not help, restart the computer with username: skyview and entering the password found on the MDS monitor.
Bad pointing
There may be several ereasons why the telescope is not apparently pointing to the right target. Below we list some and possible solutions.
Repeat zeroset
First, check that the target positions and epoch are correct.
If these are OK, then reload the telescope last pointing model:
USER> cal last
If still bad, then proceed to repeat the ZEROSET procedure.
Checking pointing with the autoguider
Firstly, check the pointing with a pointing grid star and the autoguider: USER> gocat [object name]
USER> aper 5
Mark the autoguider window centre (SETUP/TOGGLE CENTER CROSS)
SYS> agwin acq pos 1032 512
SYS> autotv on
If the star comes up near the centre, the pointing is fine. If the star does not appear near the centre of the autoguider, then repeat the telescope ZEROSET, check that the apertures are correct and type
USER> cal default
Repeat single star calibration
If pointing does not improve after re-doing the zeroset, perform another single star calibration.
Perform a seven-star calibration
For the ING SA supporting the first S/D night: the seven star calibration should be done always during the first WFC D-night.
Please write down the resulting rms and send the value to the WFC instrument specialist. For the observer: In case the single star calibration does not improve the pointing, then perform a manual 7 star calibration, here is the procedure:
SYS> agwin acq pos 1032 512
SYS> autotv on
USER> enter aperture 0 1065 -42
(redefines aperture 0, i.e. the default pointing position, to the centre of the autoguider chip)
USER> cal faint (this runs the 7-star calibration script)
The method to follow is exactly the same as that of a single star
calibration (centering the star on the crosshairs, etc). However,
instead of breaking out of the script using ctrl+z once the first star
has been found, simply position it accordingly and press the HANDSET
button to automatically slew the telescope to the next star. In case one star does not show up
in the field (possible closer to the North pole where the pointing could be worse), then it could
be ignored by typing "I". The script will then end after 7 stars have been centered.
The resulted RMS should be smaller than 10 arcsec for a normal pointing model.
You will then be asked to accept the result. Follow with:
USER> next
in order to re-centre the star using the updated pointing model. Prepare the telescope pointing back to the centre of chip 4:
USER> enter aperture 0 -251 326
SYS> autotv off
Check focal station and aperture
Check that the focus is set to the correct plane (WFC = prime focus): USER> show focal
Check if apertures have been defined and have been defined correctly: USER> show aper
ap 0 -251 326 nominal aperture, object centred on CCD#4 ap 1 704 5 centre object on CCD#1
ap 2 357 -1043 centre object on CCD#2
ap 3 -701 -10 centre object on CCD#3
ap 4 0 0 nominal aperture, object in centre of mosaic camera
(shifted from centre of CCD#4)
ap 5 1316 -368 centre object on AG-CCD (X=1032, Y=512)
ap 6 251 -326 centre object on RC (rotator centre)
If the apertures are not defined, the observing system (ICS) must be restarted.
After the system returns, re-issue the following commands:
USER> show aper
USER> show cal
USER> cal def
and redo a single star calibration. Regarding other possible focus problems, the SA or OSA can check the focus encoders following instructions in the document INT Sony incremental focus transducer, about the absolute and incremental focus encoders.
No stars in the autoguider window
Check if the automatic procedure for finding guide stars is activated,
using the command:
SYS> cmd INFODISP PREDICT ON
This enables the automatic star acquisition. It predicts the x,y
pixel coordinates at which suitable guide stars are expected to appear in
the autoguider CCD at a given telescope pointing. The prediction is
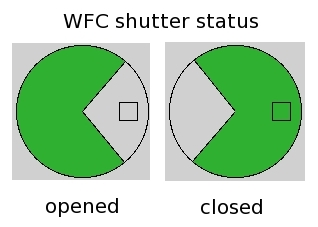
activated with every gocat command. If no stars are visible in the autoguider window, although the focus and pointing have been checked or/and they are assumed to be fine, then check the camera shutter.
First, select a broadband filter (preferably G or R), otherwise a narrow band filter that is centered in the range 500-700 nm.
If you still don't see a bright star in the autoguider, then check on the GUI whether the camera shutter is open. This image shows the two possible states of the shutter. Make sure that it is in the OPEN position. If the shutter is closed, then click on the image on the WFC mimic window to open it.
NOTE (FR 24392): When the connection to the TCS is lost, then the INFODISP task responsible for making the prediction, exits. The recommended solution is to restart the ICS, which then starts the INFODISP task and turns the predictions on. Nevertheless, it is possible to run the task without restarting the whole ICS:Â
1. Check that the TCS is shown as connected (shown in green at top of INT Wide field Camera Mimic).
2. In the main INTICS pink window start the infodisp then guide star predictor, by typing:
SYS> online TCS && ( infodisp >/dev/nul & )
SYS> cmd INFODISP PREDICT ON
In case of a further connection problem, the INFODISP task will exit. Once the problem is resolved then repeat last two instructions.
Shifts/jumps/large ellongation on images
Shifts, jumps, large ellongation on images can be caused by a number of reasons related to issues with telescope tracking, guiding, shaking, balance, focus, or even mirror support.
If possible, first check the repeatibility of the problem. For instance, switch to observe another object in a different sky position and come back to the previous object later in the night.
When reporting a fault, remember to include the run numbers affected and a brief description of the problem, including coordinates, time, exposure time, direction on sky of the shift/jump/ellongation, and any other relevant information.
Record the logs of the RA/DEC encoders
If you experience possible tracking problems while observing (e.g. the stars appear elongated in the images)
it is important to save the logs of the encoders that describe the position and movement of the telescope. This
information allows to do a better diagnostic of the problems and helps to find a possible solution. To save
the encoders' logs there are the two TCS commands (so they have to be typed in the TCS computer) described below.
To start logging the encoders' information for the next minutes you should type in the TCS
USER> log enc on <time>
where <time> is the number of minutes you want to be logging the encoders' information. The <time> duration parameter defaults to 15 minutes, if omitted it will be prompted for. It is recommended to accept the default and in case is necessary, repeat the command after the previous log was saved. When the <time> have passed a file with the encoders' information is saved and in the TCS the file name will be displayed. Please take note of this file name and include it in any fault reports arising.
To save the encoders' information of the past minutes you should type in the TCS
USER> log enc keep <time>
where <time> is the number of minutes for which you want to save the encoders' information.
The maximum duration is 30 minutes. After you type this command, a file with the encoders' information is saved and
in the TCS the file name will be displayed. Please take note of this file name and include it in the fault reports arising.
Example:
USER> log enc keep 30
Then in the TCS it will be displayed the name of the encoder log file just created, which will look as:
USER> SYS$SYSDEVICE:[INT.DATA.ENCODER]ENC151027.DAT;1
Observing low
When observing at an elevation of ~25 degrees, it is possible that the support system of the primary mirror can fail to keep the mirror in position, generating small shifts on the images. This has been recorded in 1 out of ~50 short exposures at such elevation (see for instance the fault report FR-24637) .
Large ellipticity on images
August 2013: Significant ellipticity of images in WFC data observed during the last months has been traced to bad tracking due to an irregularity in a specific drive gear (namely the worm driving the INT hour angle wheel). This has been addressed via a periodic correction in the telescope-control software released on 1st Aug 2013, and on-sky tests and independent data taken after this date show a considerable improvement in the INT image quality. WFC tracked images exposed as long as 2-3 minutes, as well as longer exposed guided images taken in very good natural seeing 0.5" now have FWHM=0.8-0.9" in the WFC, and star ellipticities give e < 0.1.
WFC disconnects
If WFC disconnects, as shown by the orange warning-label on the mimic,
the DAS has most likely crashed. Check the orange telnet window that is
logged onto the DAS. If it is not available, you have to start a new
telnet connection from the background. First run obssys with the option shown on the whiteboard first in order to get the DAS> prompt (there is also an option to start up a new DAS window found by right-clicking on the desktop). Press the return key to see if there is a termination message for udas_server (the WFC task is an instance of the udas_server program). If udas_server has stopped running, do the following:
1. Type startobssys at the DAS> prompt.
2. Watch the talker. Wait until you have seen WFC come on-line.
3. Type startobssys at the SYS> prompt.
4. Wait for the mimic to reconnect to WFC.
The wfc_ag_sequencer window missing
In case the small wfc_ag_sequencer windows is closed, it can be activated using the command:
SYS> wfc_ag_sequencer&
The autoguider window missing
In case the WFC autoguider window is missing, first you should check in the bottom
programs bar, maybe it was minimised by another user. Search for the "ING Autoguider" button
showing a small telescope icon (usually the first from the left in the bottom screen programs bar)
and click on it to restore the window. In case the window was indeed closed, then you can start it again by typing in the pink window:
SYS> agstart prime
To establish a connection, choose "File" botton, then "Connect", and confirm a message
which appears in a separate window.
Data reduction PC
Log out
In the IRAF window, at the prompt type:
ecl> logout
then close any remaining windows and exit the system as previously shown.
Log in
To log in type:
username: intguest and the password can be found on the intdrpc
monitor (below). Then click on the xterm icon to open up a xterm
window. Here you should type:
> irafFollowed by:
ecl> wfc_ql
Check what directory you are in by typing:
ecl> pwd
The correct directory is displayed on the WFC GUI. If you are not in the correct directory, type:
ecl> cd /obsdata/inta/yyyymmdd
where yyyymmdd is your observing date, e.g., 20110321 for the night started in 21 of March 2011.
Reporting/searching faults at the ING fault Database
The ING has a Fault Management System to be used by ING staff and visiting observers mainly to record faults that occur during the operation of the telescopes and to review previous faults and their possible workaround. The INT-WFC observers may use the system by "Login as guest" being able to create and review fault reports.
Reporting a fault in the ING Fault Management System is a way of communication between visitor observers and the ING staff. Therefore, the faults reported can be of diverse nature: instrument problems, telescope problems, INT car issues, etc. The ING Fault Management System is reviewed daily in the morning by Telescope and Instrument Engineers, Operations Team and Instrument Specialists, who will address the reported situations and update the Fault Report with the 'Workaround' or any other relevant information related to the report.
Searching for previous fault reports
Searching for fault reports can be useful to identify similar problems that occurred in the past and help the WHT operator to find a possible solution. INT observers should not try actions described in the fault reports without the explicit authorisation and supervision of the WHT operator, unless they have done it before and they fully understand what are they doing.
To look for a fault report in the database proceed as follow: Go to the ING Fault Management System and log on 'intobs'. It will open an interface with several options for searching and browsing.Reporting a fault
Reporting a fault in the ING Fault Management System it is the way to communicate to the ING staff the problems you had during the night. It is recommended to report most of the faults whether solved or not (to keep track of the system failures in the former case and to allow ING staff handle the problem during the day in the later case). Minor issues as a single "read time out" message after a command in the ICS do not need to be reported unless it keeps on repeating several times.
It is important that the fault report has all the relevant information related to the problem described, written in a concise and ordered way. Find below a guideline for writing a Fault Report:1. Go to the ING Fault Management System and log on as 'intobs'. Click on 'Report Fault'.
2. The 'Summary' should shortly describe the problem. It will appear in the Fault Report list when doing a search for previous fault reports.
3. Provide information on the problem at the 'Description' field. Basically write about:
- What happened. - When did it happen (shortly describe the situation). - If applicable, describe the actions, in chronological order, you have followed trying to solve it. - Was the fault finally solved? - Continue editing the fields to the end of the form, leaving as 'Unknown' only those items that you are not sure about. - Once you have finished take a few minutes to read the Fault Report you have written, to be sure that what is written is clear and understandable (for someone that was not in the INT control room when it happened), also check that you have not forgotten any essential information. Finally, press 'Create'.
If you were working together with the WHT OSA to solve the fault, and you are not sure about what and how
to write in the Fault Report, please ask the WHT OSA for help.
INT usual alarms
There are 3-4 alarms at the INT that are triggered sometimes, but the observers should not worry about them:
- Oil pump: Sounds about a minute after switching off the oil pumps. Just need to be "accepted" from the engineering console.
- Horizon limit: It may sound when slewing to access park (AP) for filling the WFC cryostat.
- Mirror support: It might sound when slewing to a new sky position. If its character is not repetitive, then it can be accepted.
- Pointing beyond the INT pointing limits: It may occur a beeping if you try to point the telescope beyond the
pointing limits. By simply pointing the
telescope to another allowed position, the beeping should stop.
If there is an alarm different from the ones described above, or you are doubting or the alarm is persisting please call the WHT OSA to inform the situation and look for advice.
Some useful ING web addresses
It may occur while you are observing that you cannot access to common user INT web pages
(even when Internet is working properly). Sometimes (depending on the origin of this problem), an
easy work around that allows access to the pages is just copy and paste in the browser the web
address of the page (instead of using the page's link from other web pages). Use this list of
common use web addresses for observers at INT to copy-and-paste the address in the browser
in case links from other pages do not work (and whenever you have time make a Fault Report of
the problem so it can be solved as soon as possible).There is a printed copy of this page in the INT control room, in the same folder as the IDS Operational Manual and Troubleshooter.
