 | |||
|

| Home > Astronomy > IDS > Troubleshooter |
INT-IDS TroubleshooterThe aim of this page is to guide the INT-IDS observer to solve common and known problems that may arise during an observing night. If you are not sure about what is exactly the problem, you have doubts about how to proceed or the basic solutions described here didn't work contact the WHT operator (call to the WHT control room by dialing 452 on the grey phone) for assistance.
1. Closing down in a hurry (bad weather)
NOTE: It's possible to close the dome while in computer mode, by pressing the DOME SHUTTERS button on the Engineering Console. But remember later to release it otherwise the dome will not track with the telescope. 2. Shutting down the system:
|
| NOTE: The Telescope Control System (TCS) and the Instrument Control System (ICS) are independent, but if you need to restart the system, you should first shut down the ICS *then* the TCS. Then restart the TCS followed by the ICS. Doing otherwise might cause you to lose the apertures for the acquisition camera. |
- Exit detector and Instrument Control Systems
-
Type:
SYS> shutdownobssys
- In the pink window click file -> close window
-
DAS5@proteo> shutdownobssys
and answer "y". - In the orange window type "exit" and then click file -> close window
- Close gss2 window, file -> close
- log out (logout) from gss window
- In the terminal you logged out from, click file -> close window
On the inttv computer:
- Shut down acquisition camera.
DAS6@miranda> shutdownobssys
and answer "y"- DAS6@miranda> exit
- Exit from ds9 and autoguider windows
- Exit from "talker", file -> Exit
- Log out from the computer by right-clicking on Desktop, choose "Leave", then "Log Out".
In the orange DAS window type:
On the lpss7 computer
- Exit TCS:
- Park the telescope at Zenith:
USER> park zenith
If the TCS is lost, manually put the telescope at Zenith using engineering mode.
- USER> eng
- USER> tcsexit
- Log out from the computer by right-clicking on Desktop, choose "Leave", then "Log Out".
Note: If the TCS is restarted at any point, the zeroset of the telescope must be redone.
On the lpss7 computer
3. Starting the system
| NOTE: The Telescope Control System (TCS) and the Instrument Control System (ICS) are independent, but if you need to restart the system, you should first shut down the ICS *then* the TCS. Then restart the TCS followed by the ICS. Doing otherwise might cause you to lose the apertures for the acquisition camera. |
| Note: The following operations should be done in the order indicated below |
- Start the
TCS (Telescope Control System)
On the intics machine (lpss7):
- Log in with the intobs account (within the OpenWindows desktop; Session=Plasma)
- Single left-click on TCS icon, then use: username:int_login and password which can be found on the left monitor.
- At next menu choose START from the menu options. This will bring up both the telescope status display and the USER> prompt by default. If it doesn't work, type "REOPEN"'
NOTE: If the TCS is restarted at any point, the complete zeroset of the telescope must be redone.
Important: After the TCS is restarted, check that the telescope focus value is what you need. If not, check the focal station.
Log onto the left computer (inttv) using: username: intobs, password: can be found on the monitor. Select KDE session. Note that GNOME is default session but the KDE should be selected, otherwise the following commands won't work.
Click the icon "IDS TV (bin 33)" on the inttv computer to open a DAS window (orange).
On the DAS window (orange) type:
- intobs@miranda> obssys
- From the available options choose:
1 - manual camera selection
The system will ask for a confirmation of this option, choose again the option "manual camera selection". - Ensure the camera server is not running by executing
DAS6@miranda> shutdownobssys
DAS6@miranda> startobssys
DAS6@miranda> startag AG0
Choose option:
station: 9 - Any other instrument station
- When asked to start ds9 respond y.
- Still in the DAS terminal execute:
> bin 3 3 - Acquire an image with the Acquisition camera by pressing Field.
It will be just noise but it's not important. It's only so that you can
load regions on ds9 by going to Region -> Load Regions. From the directory "/home/intobs/Documents" (usually opens by default) select the most recent "IDS_centres_bin3" file (for 3x3 binning).
This should result in the green and red crosshairs being displayed on the ds9 screen. - Invert the ds9 image in Y by doing Zoom -> Invert y
On the intics machine (lpss7):
-
Start the detector and instrument
control systems by clicking in "DAS term" icon
- In the orange IDS DAS window (intobs@proteo):
- Click on "ICS term" to open ICS pink window on lpss7 (you may have some pink windows opened on inticsdisplay after logging in, just close those). In the pink Observing System window:
- Restart gss2 as described in "Restarting gss2" section of this troubleshooter.
intobs@proteo> obssys
NOTE: Refer to MIMIC for instrument and which CCD to use.
DAS5@proteo> startobssys
intobs@lpss7> obssys
NOTE: Use the same option number as in the previous step.
SYS> startobssys
|
Note that the IDS 235 camera shutter has been mechanically locked in the permanent open position. When the system is re-started or if you issue the command: SYS> camshut open an error message will pop up. This message must be ignored. It can also happen that the camera shutter mechanism appears in blue color in the IDS mimic, rather than in the usual green color which indicates that the mechanism is in the right position. This should be ignored as well, it won't cause any problem as the camera shutter is always open. |
4. INT usual alarms
At INT there are several alarms that are sometimes triggered and observers should not be worried by them:
- Oil pump: Sounds about a minute after switching off the oil pumps. Just needs to be "accepted" from the engineering console.
- Horizon limit: It may sound when slewing to AP for filling the WFC cryostat or parking the telescope with the WFC.
- Mirror support: It might sound when slewing to a new sky position. If its character is not repetitive it can be accepted.
- Point beyond INT pointing limits: A beeping may occur if you try to point the telescope beyond the pointing limits. By simply pointing the telescope to an allowed position this beeping should stop.
If there is an alarm different from the ones described above, or you are doubting or the alarm is persisting please call the WHT OSA to inform about the situation and look for advise.
5. INT Engineering rack indicators not lit
If you notice that all the indicators in the Engineering Rack are not lit try to switch ON the lights from the Engineering Console, by pressing the "INDICATORS" button.
The intensity of the illumination level can be regulated with the wheell on the left to the light buttons, label with the word "Indicators".
6. Problems zerosetting the DEC encoders
The DEC arrows in the engineering rack are not working any longer.
Unfortunately, the synchro units are old and cannot be repaired anymore.
These units are not essential for the operation of the INT but they are
useful as a reference when doing zeroset of the telescope's encoders.
When the arrows are not working for DEC you can use as a reference the black tape marks on the right hand DEC bearing of the telescope (only visible from inside the dome) and the red and black metal marks (on top of the black tape which are visible from the control window) and proceed as follows:
- Move the telescope in DEC to Zenith position. When the two marks coincide you are close to Zenith.
- Then from the engineering rack, move the telescope in DEC until you find the point where the DEC led flashes (note that the led will flash for less than a second, just when you pass the zeroset position).
- Once you have found the zeroset position, move in the DEC so that you have to press the DEC[+] button to pass over the zeroset point when you do the zeroset.
- Once you have found the zeroset point proceed as described in the IDS Operational Manual to perform the Zeroset. Remember that you have to drive DEC in positive direction over the point where the DEC LED flashed.
7. Objects are not visible on the TV acquisition camera (AG0)
If objects are not visible on the TV then first proceed with the following (sanity checks):- Check that the TV mode of AG0 is ON. That is, AG0 in taking and displaying images continuously (this is activated in the DS9).
- Check the exposure time of the TV camera, and increase it if necessary (~15-30s should be enough to distinguish some objects or at least the slit).
- Check that the comparison mirror (used for A&G Box calibrations) is not in the light path. To take it out do:
SYS> compmirror out - Play with the 'scale' of the DS9 display from the TV camera (by moving the cursor over the displayed image while simultaneously pressing the right mouse button or alternatively, changing the 'Scale' parameters in the DS9 top menu).
- Check that the coordinates on the TCS info display are correct and that they are actually the coordinates of your target.
- Check if there are filters deployed in the TV camera.
- Check that the mirror petals are fully open.
- Check that the dome shutter is open and not vignetting.
- Check that the telescope focus is not far from the nominal focus.
- Check the INT focal station by typing:
USER> show focal
The focal station should be set at Cassegrain/IDS.
If the focal is Prime/WFC first change the focal station to Cass/IDS by restarting the observing system in the INTICS machine (pink window) as follows:
SYS> shutdownobssys
intobs@lpss7> obssys
NOTE: Choose the option of Cassegrain focus.
SYS> startobssys
After this check again the set focal station to be sure that it is Cassegrain.
Repeat the Single star calibrate procedure if you had to change the focal station.
- Move the telescope with the HANDSET to see if you can see objects near your pointing. If so, most probably the telescope pointing is bad and it is necessary to repeat the ZEROSET procedure.
- Make sure the TV probe is positioned to see the slit and the rotator center of IDS. This can be checked in the IDS GUI where it should be written TV X:498000 Y:500000
(a difference of few units in X,Y is not relevant).
If the probe XY coordinates are other, then type (in the ICS):
SYS> tvxy 498000 500000
and check that these values are updated in the IDS GUI.
|
Note that the TVX mechanism was disconnected and set to a fix value (498000). If you try to
move this mechanism by issuing the command: SYS> tvxy 498000 500000 you will get an error message of this type: "MECHFAIL, Mechanism fail" or "CMDTIMEOUT, Command timeout". This message must be ignored as it is a known consequence of TVX being disabled. |
8. Bad Pointing
If objects appear way off centre on the TV camera, then check that:- The telescope is in the correct focal station.
It can be checked by typing:
USER> show focal
The focal station should be set at Cassegrain/IDS.
If the focal is Prime/WFC first change the focal station to Cass/IDS by restarting the observing system in the INTICS machine (pink window) as follows:
SYS> shutdownobssys
intobs@lpss7> obssys
NOTE: Choose the option of Cassegrain focus.
SYS> startobssys
After this check again the set focal station to be sure that it is Cassegrain.
Repeat the Single star calibrate procedure if you had to change the focal station.
- Make sure the TV probe is positioned to see the slit and the rotator center of IDS. This can be checked in the IDS GUI where it should be written TV X:498000 Y:500000
(a difference of few units in X,Y is not relevant).
If the probe XY coordinates are other, then type (in the ICS):
SYS> tvxy 498000 500000
and check that these values are updated in the IDS GUI. - Check the encoders' reading by typing in the TCS:
USER> page enc
There are 2 types of encoders:
- Ferranti 1,2, and 3 (for HA)
- Heidenhain 1 and 2 (for Dec)
The readings of each enconder set should be within ~20 arcsec (if you find bigger discrepancies please inform the WHT OSA about this).
In case of bad pointing do a zeroset. After zeroset the two Heidenhain encoders should agree to within few arc-secs. Only the HH are used for pointing in Dec. If the two HH agree and the pointing is still bad you should consider using CAL DEF instead of CAL LAST. If using CAL DEF improves the situation do a new 1-star calibrate. This will update the CAL LAST pointing solution.
To get back to the usual TCS information page type:
USER> page info
- Repeat the complete ZEROSET:
In the TCS User window, enter:
USER> LOG ENC ON 10
USER> zeroset ha target [or: zero ha tar]
USER> zeroset dec target [or: zero dec tar]
USER> LOG ENC OFF
9. Tracking Problems
If you experience possible tracking problems while observing (e.g. the stars appear elongated in the images) it is important to save the logs of the encoders that describe the position and movement of the telescope. This information allows to do a better diagnostic of the problems and helps to find a possible solution. To save the encoders' logs there are two TCS commands (so they have to be typed in the TCS computer) described below.
- To log the encoders' information for the next minutes you should type in the TCS
USER> log enc on <time>
where <time> is the number of minutes in the future you want to be logging the encoders' information. The <time> duration parameter defaults to 15 minutes, if omitted it will be prompted for. It is recommended to accept the default and in case it is necessary, repeat the command after the previous log was saved. When the <time> have passed a file with the encoders' information is saved and in the TCS the file name will be displayed. Please take note of this file name and include it in the Fault Report. - To save the encoders' information of the past minutes you should type in the TCS
USER> log enc keep <time>
where <time> is the number of minutes in the past for which you want to save the encoders' information. The maximum duration is 30 minutes. After you type this command, a file with the encoders' information is saved and in the TCS the file name will be displayed. Please take note of this file name and include it in the Fault Report.
USER> log enc keep 30
Then in the TCS there will be displayed the name of the encoder log file just created, which will look as:
USER> SYS$SYSDEVICE:[INT.DATA.ENCODER]ENC151027.DAT;1
Sometimes a work around can be, if possible, to observe another object in a different sky position and come back to the previous object later in the night, being in another sky position. As the time has passed it may not be a problem anymore to observe the object.
10. Autoguider window disappears
In case the IDS autoguider window is missing, first you should check in the bottom programs bar,
maybe it was minimised by another user. Search for the "ING Autoguider" button showing a small telescope
icon (usually the first from the left in the bottom screen programs bar) and click on it to restore the window.
If the autoguider window was indeed closed, it can be recovered by typing:
SYS> agstart cass
To establish a connection, choose "File" botton, then "Connect", and confirm a message which appears in a separate window.11. Failing to find guide stars
First of all ensure that you have refreshed the Autoguider image (either taking a Field or using the TV mode) with large enough exposure time to be able to see objects (something like 10 sec for testing).
No suitable guide stars in GSS2 at certain SkyPA
Sometimes it's not possible to find suitable guide stars for the required Sky Position Angle (PA). When this happens, the first step one should take is to search with the opposite slit PA (PA - 180). If this does not resolve the problem and in the case of long exposures where an average PA (e.g. average parallactic angle) is usually chosen, small PA changes can be tried (5-10 degrees). If this also fails, the alternative is to guide manually by opening the HANDSET tool (F6 on the TCS keyboard) and applying the necessary corrections to maintain the target over the red crosshair inside the slit. If the target is not visible and there are other stars in the FOV, then one of them can be used for manual guiding by creating a region around it and keeping it inside that region during the exposure.Predicted star by GSS2 does not appear in the Autoguider field
Sometimes, it can happen that the predictions of the GSS2 are not accurate (particularly when the x,y offsets are large) and no guide star is seen in the Autoguider field after the probe was moved to the predicted position.If you followed the standard procedure for guiding and you do not find a guide star in the Autoguider field, take note of the x,y offset you used in the HANDSET and try the following workaround:
- GOCAT to the faint science target.
- Search in the GSS2 a guide star there, with 0,0 offset.
- Move the guide probe to the position provided by the GSS2 and set the Autoguider in the "TV mode" (so it keeps on taking images continuously). Leave the Autoguider in the "TV mode" during the whole procedure until you are ready to start guiding. This is convenient for two reasons:
- If you need to move the probe to keep the guide star centred you need to see which way it is moving and how far it moves as you move the probe.
- In case you are doing a blind-offset you will see immediately if the guide star appears or not if the TV mode is already running and you don't have to waste time doing a "Field".
- Now enter in the HANDSET the x,y offset that you had used for the acquisition of the bright target keeping the guide star visible in the autoguider window by making changes to the autoguider probe positions using the command "autoxy {xxxxxx} {yyyyyyy}" and changing the {xxxxxx} and {yyyyyyy} values by about 500 units (you may need to play a bit with these numbers until you get it right) .
-
As a reference, the Autoguider field of view in Autoguider units is 15000 x 10000.
An increase of 7500 units in the value {xxxxxx} will move the guide star half of the Autoguider screen to the left. An increase of 5000 units in the value {yyyyyy} will move the guide star half of the Autoguider screen down. - Then go back to the bright offset star, acquire it again and immediately do the blind- offset and take a Field with the Autoguider when the telescope reached the position. The guide star you have just found in the previous steps should appear there.
- Start guiding as soon as possible.
12. Focus value different from nominal value
The IDS focus value might vary slightly along the time, e.g. after instrument changes. We can expect variations of ± 0.15 mm up to about the nominal focus value, which is currently 15.60 mm. However, if we find larger differences (e.g. > 0.5 mm), it might be possible that there is an issue that we must take into account.When the difference between the estimated and the nominal focus value is very large, proceed with the following sanity checks:
- Check if the focus offset is found in both, the acquisition camera and at the IDS detector. Note that the telescope focus in these two should be the same in normal conditions, as they are parfocal.
- If found only in the acquisition camera, check if there are filters deployed in the TV camera that might be adding a focus offset.
- If found only at the IDS detector:
- Check if there is any neutral density filter or order-sorting filter deployed in the above slit filter trail. These filters above the slit introduce an offset to the telescope focus when they are in the light path.
- Check that the spectrograph set-up has been set correctly: take an arc using a narrow slit (e.g. 1 arcsec) and check that the arc lines are well focused, like on this picture, and that the spectrograph collimator value is within the right range (215 and 240). A bad spectrograph set-up might introduce some offset in the telescope focus. Ask your Support astronomer.
- If the focus offset is found in both, the acquisition camera and at the IDS detector:
- Check if there is not a clear convergency to a good focus, e.g. the focus is different for different stars at different elevations.
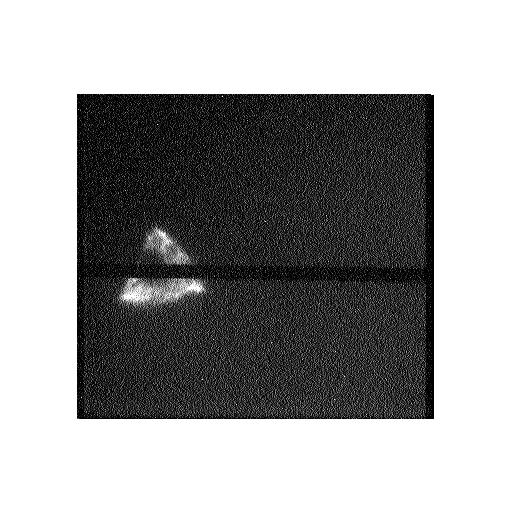
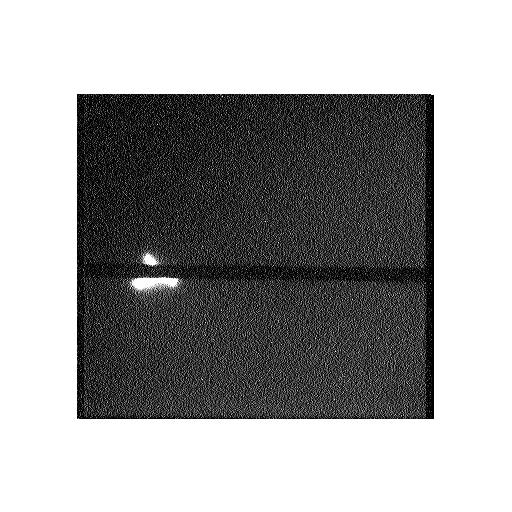
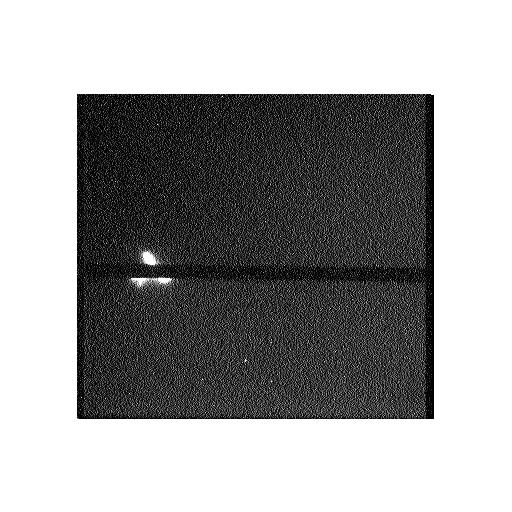
- Check the shape of the star on the acquisition camera when is out/in of focus. Check if the stars have funny triangular shapes like the one here at the current nominal focus 15.6 mm, or these others for other focus values, e.g. 16.8 mm, or 17.0 mm .
- If both, or one of the above points happen, it is very possible that there is a problem related to the mirror support. Call the OSA at the WHT, she/he will know how to proceed in this case.
13. Data acquisition problems
'Data acquisition' refers to the
management of an exposure, reading of data from the CCDs and saving to
disk. This may fail in one of several stages, for example:
- Run, Finish, Abort or Re-time commands are not successful
- Run process stops after CCD clearing
- Run spontaneously aborts during readout or transfer to disk
- Transfer to disk does not complete to 100%
- Data on disk is corrupted (e.g. torn frames)
SYS> dasreset IDS (i.e. startobssys is unnecessary)
When this completes, try a new run and see if the above fault
reoccurs. If it does, then a lower-level reset of the CCD controller
may be necessary and you need to park the telescope at zenith:
- Power cycle the unit labeled SDSU CCD controller, located to
the left of the cryostat, followed by:
SYS> dasreset IDS
- If this does not resolve the problem, follow the instructions to shut down the ICS and DAS on the intics screen and then restart.
14. Problems with IDS control
If the right-hand side of the
mimic shows IDS mechanisms in red, this infers that attempted movements
have either failed or are incomplete. If this occurs the MMS controller
or IDS MMS may need to be power cycled. To do so contact the WHT OSA or
your SA. Only they can access the Power Distribution Unit.
15. Problems with Acquisition &
Guidance Box (A&G) control
If the left-hand side of the mimic
shows A&G mechanisms in red, this infers that attempted movements have
either failed or are incomplete. If this occurs and the AGB MMS needs
to be power cycled contact the WHT OSA or your SA. Only they can access
the Power Distribution Unit to do it.
16. Restarting inttv
If the TV system fails to readout/update, then in the pink window on
inttv:
DAS6@miranda> dasreset AG0
When this completes, try a new TV or 'field' operation. If there are still problems power cycle the TV CCD controller, followed byDAS6@miranda> dasreset AG0
If this still does not resolve the problem, try the following: DAS6@miranda> shutdownag
DAS6@miranda> shutdownobssys
DAS6@miranda> startobssys
DAS6@miranda> startag AG0
DAS6@miranda> bin 3 3
17. Restarting gss2
Suitable guide stars can be found using a graphical user interface
to the Guide Star Catalog. If you can not find the GSS2 interface in any of the screens, open a new generic terminal in the ICS computer, from there open an xterm:intobs@inticsdisplay> xterm &
and in the xterm type:
intobs@inticsdisplay> ssh -X gss@whtgss
Login as gss (the password should be written on the whiteboard. If not, ask your support astronomer or the WHT telescope operator).
| [gss@whtgss ~]$ gss2 | A new window with the graphic user interface for Guide Star Search will be displayed. This will be used later for selecting appropriate guide stars. |
NOTE: Do not forget to set the gss2 configuration to INTCass.
18. Starting up the data reduction
PC
- Log on to the INT Data Reduction PC (INTDRPC1)
-
Start iraf:
-
From any terminal window, open an xgterm window ( > xgterm & )
and type:
> iraf
(Alternatively, go to the home directory, and type:
> ds9 & [to start the image display tool]
> ecl [to start Iraf] ) - In IRAF, move into the "date" directory where the images are
stored. The current date is entered in the format 'yyyymmdd' e.g.
ecl> cd /obsdata/inta/yyyymmdd/
Username: intguestIt is a good practice to select plasma as the desired desktop before doing login.
Password: ******** (as shown on monitor)
19. Restarting the meteorological data
screen
We have now implemented a new meteo system. If you see that the data is not up-to-date, try refreshing the page with F5. If there is no improvement, contact the OSA so it can be reseted.
20. Observing log window is not opened in the ICS
If the observing log window is not opened in the ICS computer (lpss7) or has accidentally closed, you can open it again by typing in the ICS pink window:SYS> obslog &
Note that after opening it you may need to change the night to the correct observing night.
21. Power cuts
In the case of a power cut, the systems will go on batteries and
moments later the generators will start.If this happens the exposure will be interrupted and two alarms will sound which will have to be acknowledged by pressing a button. One in the control room, on the Engineering Console, marked with an ACCEPT sticker. Wait until you're on generator power to do this otherwise the alarm won't stop. The other is on the ground floor, by the entrance, opposite to the door and will be flashing red.
Call the WHT OSA to know what has happened. After the generators start it may be possible to resume observations.
If you notice the alarm when coming in the afternoon, please let someone from the Operations Team, INT SA or WHT OSA know that the INT is running on generators.
If later returning to power grid, the control room alarm will sound again.
22. TCS Screens Hang (TCS communication issues)
In the case of loss of communication between the TCS and the user interface, i.e. if either
the TCS USER window stops responding, or
the TCS DISPLAY window stops updating,
clearing the communications may recover the system: In the blue band at top of the window, click on
Commands --> Clear Communications
Note that even when the TCS key mapping is lost, it will be still possible to select any of the ALT_AZ, RA_Dev and X_Y modes.
In case this does not work, please contact the WHT OSA asking him/her to reopen the TCS display using the following steps:
Log in to lpas2 using the usual userid and password. Select the option REOPEN from menu as shown below:
 This is the INT TELESCOPE CONTROL SYSTEM

 The TCS is running, using version I30-0-2

 Please enter an option -

 STOP    - Stop the TCS

 TELD     -  Start the TELD task

 REOPEN   - Open the TCS user and display windows
           Info display on inticsdisplay.ing.iac.es
           USER window on  inticsdisplay.ing.iac.es

 DISPLAY  - Select different display devices

 NFSMOUNT -  Mount the ICS Unix partition

 EXIT    - Exit this menu and log out
NOTE: It is NOT necessary to do a Zeroset of the telescope after reopening the windows using the REOPEN.
23. Cenwave value fluctuating in the IDS mimic
Fluctuations of the central wavelength value at the IDS mimic can be caused by a temporal malfunctioning of the grating encoder. The fluctuating values in the mimic do not mean that the grating actually moves. In case you find this problem, please report the failure to the WHT OSA (and at the ING Fault Management System) and continue with your observations.
24. Problems with data image quality
You can check the image quality of your data following a procedure
suggested in the
IDS Operation Manual. If you think that the image quality of your
data is not as expected, you should ask your support astronomer for help
(on the first night of your run), or fill the fault report.
25. Reporting/Searching faults at ING Fault Management System
The ING has a Fault Management System to be used by ING staff and visiting observers mainly to record faults that occur during the operation of the telescopes and to review previous faults and their possible workaround. INT-IDS observers may use the system by "Login as guest" being able to create and review fault reports.
Reporting a fault in the ING Fault Management System is a way of communication between visitor observers and the ING staff. Therefore, the faults reported can be of diverse nature: instrument problems, telescope problems, INT car issues, etc. ING Fault Management System is reviewed daily in the morning by Telescope and Instrument Engineers, Operations Team and Instrument Specialists, who will address the reported situations and update the Fault Report with the 'Workaround' or any other relevant information related to the report.
Searching for previous fault reports
Searching for fault reports can be useful to identify similar problems that occurred in the past and help the WHT operator to find a possible solution. INT observers should not try actions described in the fault reports without the explicit authorization and supervision of the WHT operator, unless they have done it before and they fully understand what they are doing.
To look for a fault report in the database proceed as follow:
- Go to the ING Fault Management System and click on "Login as guest". It will open a window with three tabs on the top.
- Click on 'Search' and there, the best option is to select the 'Advanced' tab. A window with a space to write 'keywords' and a series of options for several searching parameters will appear.
- Write down the searching keywords and open the menu in the relevant parameters for your search to choose the correct option then click on the left side box to select the parameter. Note that it is not necessary to select all the parameters available (but check for example 'INT' option under 'Site' parameter to constrain the search).
- After you have made your choices go to the 'Search' button. This will produce a list of previous fault reports that match your requested keywords and parameters. The list contains basic information about the report. To access the complete Fault Report (which includes the 'Fault Description' and the 'Workaround' or an updated status of the report) click on the 'ID' number in the first column (it will open the complete report in a new tab in your browser) or click on the Fault Report title (it will open the complete report in the same tab).
Reporting a fault
Reporting a fault in the ING Fault Management System is the way to communicate to the ING staff the problems you had during the night. It is recommended to report most of the faults whether solved or not (to keep track of the system failures in the former case and to allow ING staff handle the problem during the day in the later case). Minor issues as a single "read time out" message after a command in the ICS do not need to be reported unless it keeps on repeating several times.
It is important that the Fault Report has all the relevant information related to the problem described, written in a concise and ordered way. Find below a guideline for writing a Fault Report:
- Go to the ING Fault Management System and click on "Login as guest". It will open a window with three tabs on the top. You will already be in the tab for writing the fault report.
- The 'Title' should shortly describe the problem. It will appear in the Fault Report list when doing a search for previous fault reports.
- In the main window below the 'Title' you have to describe the problem. The basic information there should be:
- What happened.
- When did it happen (shortly describe the situation).
- If applicable, describe the actions, in chronological order, you have followed trying to solve it.
- Was the fault finally solved?
- At the end of the fault report window there are series of buttons with options to choose or fill in. Please, try to specify them as much as possible, leaving as 'Unknown' only those items that you are not sure about (normally Duty Eng. and System).
- Once you have finished take a few minutes to read the Fault Report you have written, to be sure that what is written is clear and understandable (for someone that was not in the INT control room when it happened). Also check that you have not forgotten any essential information. Finally, press 'Submit Fault'.
If you were working together with the WHT Operator to solve the fault, and you are not sure about what and how to write the Fault Report you can ask them for help with this as well.
26. Some useful ING web addresses
It may occur while you are observing that you cannot access common user INT web pages (even when Internet is working properly). Sometimes (depending on the origin of this problem), an easy work around that allows access to the pages is just copy and paste in the browser the web address of the page (instead of using the page's link from other web pages). Use this list of common use web addresses for observers at INT to copy-and-paste the address in the browser in case links from other pages do not work (and whenever you have time make a Fault Report of the problem so it can be solved as soon as possible).There is a printed copy of this page in the INT control room, in the same folder as the IDS Operational Manual and Troubleshooter.
27. Acknowledgements
Credits should be
given to the INT Support Astronomers, WHT operators, ING ops-team staff and INT observers who have contributed to improve this manual along the years.
| Top | Back |
|
