Software components and communication
- The 3 major components are 3 linux machines that communicate over the ING network
- dimmserver
- the mount and
- the client machine (usually osadisplay1)
- The Server program (/home/newdimm/DIMM) is a C++ executable running under ubuntu 16.02
It manages all hardware communications and monitoring processes.
- the server runs omniorb (a corba nameserver) to manage communication with the both the client and the mount
- it sends commands and obtains encoder and status from the mount
- it controls and powers the focuser over USB
- it controls and powers the CCD camera over USB
- The GUI is a java client installed on osadisplay1 and whtdrpc1 but could conceivalbe be run on any machine connected to the ING network with java installed
- The seeing monitor cannot be started or stopped without an active GUI.
- If the GUI freezes it may be possible to exit and start a new one
- Images are not stored, but are discarded after measuring centroids
- The variance in centroids from 500 images are used to compute the FWHM seeing
GUI Features
The GUI has two tabs that are selectable: Normal operation and Advanced Control , the following image shows Normal operation:
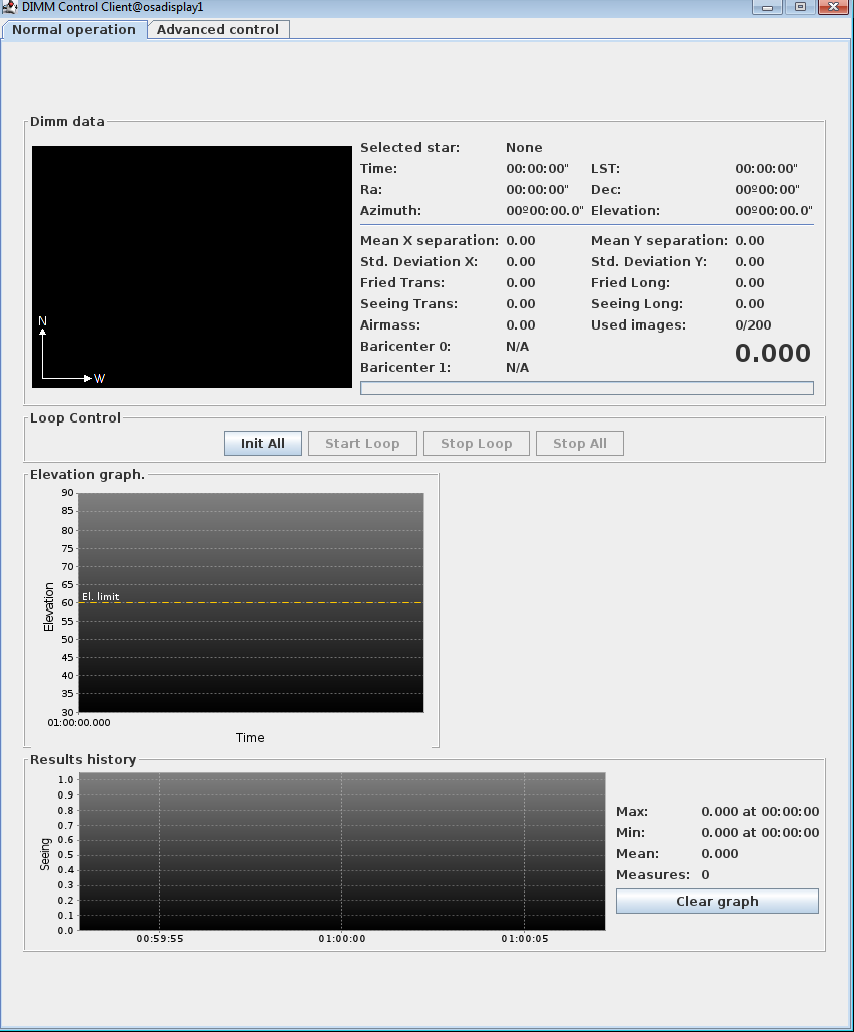 Top left is a diagram of the two image centroids from the star. Note while this is in real time, it is not a real image, but a schematic to represent the centroid data used in calculating the seeing.
Top right shows data reported by the mount: Time should be in UTC, while the Local
Siderial Time should concur with WHT TCS. The current pointing data should include Elevation > 60 degrees.
Under this, data about the latest seeing measurement. The large number in the bottom right corner is the average of Long and Trans FWHM, derived from the Std. Devition of image centroids (here called baricenter). The Fried parameters are also known as r0. Mean separation refers to that of the image pair.
Next the Loop Control section has 4 buttons, of which only [Init All] is currently active. The GUI shows this when started but quickly changes to swap the activations of these buttons (See next section).
The Graph underneath shows the elevataion of several target stars available over the next hours (the catalog has only 7 stars to cover the entire year), plotted in elevation against time.
The bottom graph is supposed to show the time series of seeing but I have not seen it working.
- Wait after starting, until the [Init All] button becomes
inactive and the Start/Stop buttons become active. In the image above the
opposite is the case! There is a brief
delay while initial telemetry data (position and status) is read from the
mount and displayed on the GUI.
- The time displayed is UTC as kept by the mount, which it needs to point accurately.
-
[Start Loop] button (if active) to start monitoring.
- Activity of the monitor can be verified by watching the Alt/Az change on the GUI, quickly during slewing, slower while tracking. The Server terminal feeds messages about the demand during slewing (ra diff: will decrease).
- Seeing Measurements will appear on the GUI main pane very soon after a star is found, no more than 10 minutes after starting the Loop. Measurements will also be displayed on the Weather web page.
- If after 1 hour no star has been found, the program may crash and it is better to stop the loop, Shut down and restart client and server, as documented below.
- Once seeing measurements appear, no further action is neccessary until observing stops.
In an emergency the DIMM Dome can be closed before stopping either of the monitors.
- [Stop Loop] button is will pause the monitor (recommended during high cloud) or stop it for good.
This action stops measurements and target searches, but tracking will continue.
Measurements can continue later without restarting the Server using [Start Loop].
-
If a Loop restarted in this way fails to move telescope, it may be necessary to use step 5 (not all situations have been tested). The Loop progress can be deduced from Server message feed:
ra diff, dec diff numbers will remain the same if telescope is not moving.
- The [Park] button (click on Advanced Control tab) will park the mount and switch tracking off.
However it does not stop the monitor
Loop process, hence Step 4 should be used previous to Park.-
After a Park, or if the button is unavailable, the only way to continue is to restart the Server, which resets the mount status flag.
- If you [Stop Loop] but do not [Park], tracking will continue until the mount limit is reached (Elevation -1 degrees, soft limit), which switches tracking off. If the Loop is restarted in this position the telescope should slew fine, but check status as described in note to point 4 above.
- The [Stop All] button is not recommended. It lanuches a pop-up which shows a process taking 3 minutes to complete. It stops the loop and parks the mount. While it gives the impression of being more complete than [Stop Loop] followed by [Park], it causes messages to the contrary to appear on the server feed. If used, it requires the Server to be restarted (see Park above) before monitor can be used again.
- Advanced control tab
- The Mount Control pane has 3 buttons used for manual control outside of the monitor loop: [Park], described above, [Point] which slews the mount to the target selected in the catalogue pull-down menu and [Stop] which sends Stop Mount command to the telescope, disabling tracking.
- The CCD control pane has 3 buttons: [Expose] takes a CCD exposure using the exposure time set in the menu above it (Seconds), but the display box at the top of the window will need an upgrade to work. The [Focus +] and [Focus -] send commands from the Server to the Focuser via USB, moving it by steps of 200 units (positive or negative, respectively. Step size is small but configurable). The results should be read from the Server message feed. The center position of the Focuser is about 7000 units.
- Dome control pane has 2 buttons, relevant only for use at TNG. Note the ING Dome is controlled from the PLC PC.
- Loop control pane has [Manual Start] and [Stop Loop] buttons, which as far as I can see, have the same functions as the [Start Loop] and [Stop Loop] buttons on the Normal operation tab, respectively.
|


