WFC Image Reduction with THELI
THELI (Erben, Schirmer, Dietrich et al.
2005 AN 326, 432; and Schirmer,
2013 ApJS 209, 21) is a software package for Linux and Mac for WFC data reduction, and in particular, to do astrometry, mosaic compositions and pipeline automate reduction of large datasets.
Once you have sucesfully installed THELI GUI, below it's a basic procedure to reduce WFC images using THELI version 2:
THELI screenshot showing the Initalize first step.
- Start THELI, by typing in any terminal theli &
- The GUI software is conceived to be run in 7 steps, each step accessed by clicking in a tab button located under the main menu (starting with "Initialize" and ending with "Coaddition");
- Copy your raw FITS images in any working space (ex: MYOBJECT directory) under 3 sub-directories (recommended BIAS, FLAT and SCIENCE);
- First step (tab), "Initialize": In the left menus, assign paths to working directories, namely "Main path: /home/username/MYOBJECT/", "Bias: BIAS", "Flat FLAT", "Science: SCIENCE". Correct paths should appear in green, any wrong path in red; In the right menu, select your camera (ex: WFC@INT) or define a new camera if not in the list (acc to THELI manual);
- Second step (tab), "Preparation": generally in THELI GUI, all steps in red are mandatory. This step splits every raw frame (assumed to come in a cube multi-frame FITS) into separate FITS images. On the left, select "Split FITS / correct header" (in red), then click START button and wait until "Done" message appears.
- Third step (tab), "Calibration": Check mark the available calibration frames to apply (e.g. for the WFC, Biases, Flats and
Calibrate Date) then click Star button and wait until Done message appears.
- Fourth step (tab), "Superflatting" is optional;
- Fifth step (tab), "Weighting" is mandatory, check "Create global weights" and click "Configure", "Same weight for all pixels"
and "OK". Check also "Create WEIGHTs" option, and then the START button. Wait until the "Done" message appears.
- Sixth step (tab), "Astrom/Photom" is mandatory. This requires having Swarp, Sextractor and Pgplot correctly installed on your
system (please refer to Theli installation instructions). Change Mag. limit to 21 and select the reference star catalog SDSS-DR8
(in case this does not cover your field, change to another catalog). Click the button "Get Catalog" to retrieve it online and wait
until a message like this "4525 reference sources retrived. Done" appears. Check "Create source cat" option (in red) and press
START again. Wait until "Done" appears. Finally, check the option "Astro+photometry" (in red), click on "Configure", set
STABILITY_TYPE to INSTRUMENT and MOSAIC_TYPE to SAME_CRVAL and "which FOCAL_PLANE" to "Create new FP" then press OK to save all
changes. Press START button to run this step and wait until "Done" appears.
- Finally the seventh step (tab), "Coaddition", select only the red Coaddition option (although in red, the "Sky subtraction" is optional). Set "Combine Type" to MEDIAN. Accept changes by clicking OK then make sure "Coaddition" remained selected! Then, press Start button to run this last step.
After running THELI with no errors, then you should check a few images and plots to make sure that THELI data reduction worked properly. If you need to re-run the whole THELI, then come back to the first step (tab) Initialize and press Restore ALL button close to the Main Path.
First, you should check the file /SCIENCE/plots/distort_1.png and the others there. The correct THELI run should produce the distort_1.png similar with this
distort_1.png plot, namely simetric in colours, matching mainly the optical field distorsion of the instrument (WFC) mapped on its 4 CCDs which should be seen not perfectly horizontaly alligned.
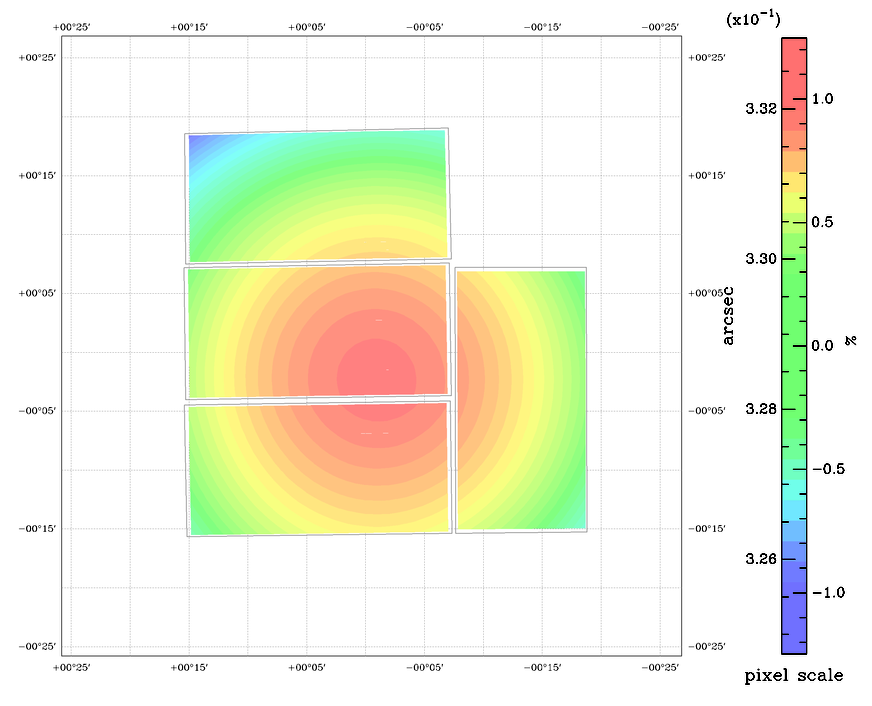
WFC field distortion map obtained after running THELI.
Second, you should check in DS9 the field correction, by loading in DS9 the first image and CCD1 (moved by THELI for example to /SCIENCE/ORIGINALS/r874825[1]) versus the final THELI reduced frame (for example /SCIENCE/coadd_R/r874825_1OFC.R.resamp.fits) loaded in a different DS9 frame, for comparison. The reduced frame should have RA and DEC readable from the headers, should not be perfectly horizontal (check the margins), while the original frame [1] (after DS9 Rotation 270 deg to match the normal sky orientation) and should clearly show some optical distorsion (up to 2-3 pixels = 1 arcsec) after carefuly centering using one same star from the two DS9 frames, then blinking both frames. This is how a such comparison should look like:
WFC THELI field correction. One of these two checks ensures a good run of THELI.
In case you have problems running first time THELI, well, this is quite normal, and could be due either to some incorrect installation of some needed packages or to your incorrect understanding of THELI's multiple functionalities and parameters. In any case, we recommend you to read
THELI GUI,
THELI Installation,
THELI Trouble-shooter and the extensive THELI GUI
PDF manual (version 2.7.0).
Thanks are due to Mischa Schirmer (THELI co-author) and also to the students and former WFC observers and reducers Alex Tudorica (Bonn), Dana Lacatus (Bucharest) and Mansour Karami (ING & Iran) for their know-how feedback about THELI installation and running.


