 | |||
|

| Home > Astronomy > LIRIS > LIRIS Multi-Object Spectroscopy (MOS) |
LIRIS Multi-Object Spectroscopy (MOS)Planning MOS Observations Science Target Acquisition and Observations MOS Spectroscopy Scripts Checking Mask Acquisition Standard Star Observations Autoguiding See also: Calibrations: biases, darks, flats, arcs Slits and Grisms LIRIS Long-Slit Spectroscopy Detector: Bright sources and reflected ghost images Planning MOS ObservationsGeneral
If you have been awarded time for a MOS proposal, please contact the
LIRIS instrumental team (liris@iac.es) and the ING LIRIS MOS
Specialist
(Cecilia Farina: cf@ing.iac.es) as soon as possible after telescope
time allocation for advice. More details of slit-mask design and timelines are available in Considerations about LIRIS MOS observations.
LIRIS can accomodate about 6-8 MOS masks at a time. To change the masks, the LIRIS cryostat has to be warmed up, which is preferably done only once per semester since there is some risk involved for the sensitive IR detector array. If the number of applications for MOS mode is very high, two warmups may be able to be scheduled per semester or, preferably, either one of the long-slits or the coronographic mask will be traded in to accommodate more MOS masks. It is however possible that we will not be able to accommodate all the requested masks if demand is high. MOS mask preparation
The coordinate list
must be sent to liris@iac.es as soon as possible after the telescope
time allocation, as the external company that
produces the masks needs one month for the production (but see above:
they can only be inserted once per semester usually). It is your
responsibility to provide the coordinate lists in
due time. If you fail, you run the risk that by the time of your
observing run your masks will not be available in LIRIS. Any questions
concerning the scheduling and production of MOS masks should be
directed to the IAC.
The MOS masks are produced using an electromagnetic discharge process. The slitlets are 0.8" wide and by default 10" long. About 20 such slitlets can be fitted per mask. The length of the slitlets is user-definable. They can be made shorter, but should ideally still allow for a 3-point dither pattern for optimal sky background subtraction. The slitlets of one mask do not all need to have the same length. The MOS masks are inserted into a part of the focal plane of the telescope which is free from distortions. Therefore, it is sufficient that the observer provides a target list with accurate (0.1" or better) RA and DEC coordinates. The target list must include the coordinates of at least three reference stars which are used to align the mask on the sky accurately. Ideally, these three reference stars should form a triangle that extends over a large part of the detector area. The reference stars must be highlighted in the list since they will not get slitlets assigned in the mask but instead circular holes. Please note that in order to be able to properly trace the spectra, if every science target is fainter than the 19th mag, assigning a brighter star to a science slitlet is now mandatory. 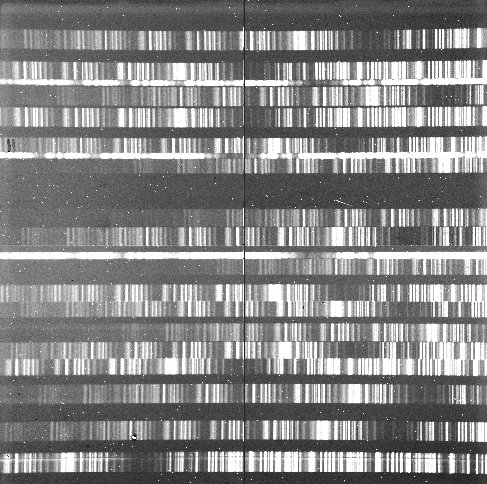 The figure shows a 600s exposure through a MOS mask. The spectra are dominated by sky lines, hence it is important that the slitlets are chosen long enough (default: 10") to accomodate three dither positions. The spectra of three reference stars used for mask alignment can be seen here too. Science Target Acquisition and Observations
The acquisition of a MOS mask is similar to that for long-slit LIRIS
Spectroscopy. The only major difference is that you have to
specify three reference sources instead of one. The procedure is:
Spectroscopy Scripts for MOS:
[ag_]spec_nod
<int time> ["title"] [-ncyc=int] [-nruns=int]
[-offset=float]
[-mndr=int] [-jitter=float] [-clean=int] [-start_center] [-coave=int]
This nods the telescope in an AB-BA-AB-BA pattern up and down by the offset amount, with A and B being the two nodding positions. The nodding step size is given by offset in arcsec, defaulted to 12". The -start_center option should be specified, so that the telescope will consider the starting position as the middle point between A and B and will therefore offset half the offset value down before starting the script. If the autoguider is not desired (i.e. omit "ag_" at the start), use the spec_nod script (not recommended, unless you are observing the target for only about 3 minutes, e.g. for standards). At each nodding position nruns images are taken with the specified integration time. Every subsequent coave (default 1) exposures are coaveraged (note if you enter a value for coave in the script that this overrides the default or any value previously used).The AB pattern is repeated ncyc times. When the script has finished, the telescope returns to the starting point. You can set the jitter parameter up to a maximum value of 30% of the offset parameter. Each nodding point will then be offset from its nominal position by a random vector of the specified length. For the guided version of the script only, starting with ag_ , the number of multiple non-destructive reads is automatically set to mndr=4, if the mndr parameter is not set. Like that the exposures get read out 4 times and averaged, in order to suppress the read-noise. You can also set the clean option which is the number (default 3) of clearing reads before the first exposure in each position. Alternatively, you can use this script: [ag_]spec_nod3 <int time> ["title"] [-ncyc=int] [-nruns=int] [-offset=float] [-mndr=int] [-jitter=float] [-clean=int] [-coave=int] One cycle consists of an ABC pattern. The first exposure will be taken at position A=(0, 0), the second one at B=(0, +offset), and the third one at C=(0, -offset). The offset should not be larger than about 1/3 of the length of your slitlets, otherwise the star will be driven outside the slitlet. Checking Mask Acquisition
Check
the centreing of the mask about once every hour, or more frequently if
you notice a drop in flux not due to cloud. The relative position
between the autoguider star and the science target may change due to
differential atmospheric refraction, especially if the telescope
elevation is low.
To check the centreing, switch to imaging mode without moving the mask (to keep the mask in the light path): SYS> limage <filter> <mask_name> and take an image through the mask. If the reference stars are not in the right position, recentering is needed. The required offset is best estimated maually, rather than using a script, and passed to the telescope operator to make the offset. Then take another image to check it is now centred. Finally switch back to spectroscopy mode: SYS> lspec <grism_name> <mask_name> and continue your observations. You can also use the routine recenter_mos (which runs only on the whtdrpc1 computer) to check your acquisition: 1. Create a working directory: whtobs@whtdrpc1$ cd /scratch/whta/ - whtobs@whtdrpc1$ mkdir Standard Star Observations
You
might want to observe a standard star in a few or all the slitlets.
Observing the standard star in all the slitlets is useful to determine
the trace (since spectra at the bottom and top of the detector suffer
geometrical distortion by about 10 pixels) along the spectral direction
for targets located within each slitlet. The recommendation is to do it
only if it is really necessary, since it is very time-consuming (over
30 minutes). In most cases it will be enough to observe the standard in
three different positions: in the extreme left and right slitlets, and
in one slitlet close to the middle of the mask. With this procedure
full wavelength coverage is guaranteed.
The method to acquire the standard star in the selected slitlet is similar to that used in long-slit spectroscopy: Point the telescope to the standard star, take an image and then roughly position the star in the desired slitlet N by: SYS> lacq_mask <mask_name>_slitN (to find the slitlet number look at the mask overlays in DS9 with the <mask_name> button). Fine-tune the target acquisition by measuring the position of the centroid of the star (x and y coordinates in pixels) and running the command: SYS> lobject_inslit <mask_name>_slitN <x> <y> Once the centreing is finished (overlay your mask to check it), switch to spectroscopy mode: SYS> lspec <grism> <mask_name> and take your exposures using the same scripts as for the science observations. Once you have observed the standard star in the chosen slitlets ask the telescope operator to reset to 0 0 the telescope aperture introduce by the task lacq_mask. Notes about this method: * It provides a very controlled way to obtain the standard spectra. * It is possible to use the autoguider. * It requires several switches between imaging and spectroscopy mode, which increases the overheads. Autoguiding
The telescope operator will take care of all aspects of the
autoguiding, if required. All
the observer needs to do is communicate with him/her about the details
of
the observations, in particular the size of any dither pattern being
used.
In general, for MOS observations, guiding will always be needed in
order to keep the targets in the slits, except if the total time on the
target is very small (< 3 mins), which may be the case for
standards. Guiding overheads are in any
case small: less than about a minute per target at the start and then a
few seconds per exposure. |
| Top | Back |
|
