Targets are usually acquired onto the ACAM slit using the
ACAM target-acquisition tool, commissioned in October 2010.
Should this tool for any reason become unavailable, the target must
be acquired manually, using the recipe below.
ACAM has no equivalent of the slit-viewing camera used with ISIS.
Target are acquired onto the slit in imaging mode.
The procedure is as follows:
- Point the telescope at the target / blind-offset star
- Take an image of the slit, measure the x,y
position at which the target is to be acquired.
- Take an image of the sky, measure the x,y position of
the target.
- Offset the telescope by the required amount.
- Check that
the target is visble through the slit.
- Blind-offset if required.
- Start autoguiding.
- Insert the VPH grating.
- Expose.
- Record an acquisition image, if required (after science exposures,
or after step 4 above).
Carrying out these steps manually takes
~ 3 mins if the target is bright.
Targets as faint as R ~ 22.5 have been acquired.
1 - Point the telescope
Point the telescope at the target, or the blind-offset star
(if the target is not easily visible on exposures lasting a few sec)
with:
TO> gocat target-name &
Ask the telescope operator to set the rotator angle to the required
position angle (usually parallactic).
The operator will then also look for guide stars.
2 - Measure x,y of slit
Take an image of the slit,
and measure the x,y position at
which the target is to be acquired.
Note that
the y position of the slit (1) depends on the slit to be used,
and (2) can change by several pixels when the
telescope is pointed to a new target (flexure
due to change of elevation and Cass
rotator angle). Typically, the centre of the 1.0-arcsec slit lies
at y ~ 1150 when using the standard window
(1:2148,800:3300). It varies slightly with x.
TO> agacam
TO> acamimage SloGunR 1
This puts a 1-arcsec slit in the focal plane,
and inserts Sloan r filter in light path
(and is equivalent to using
the commands
acamslit and acamwh1 or acamwh2).
TO> glance acam 5 (usually enough to see the slit,
even on a moonless night)
NB the same filter should be used throughout steps 2 - 6
of the acquisition sequence (changing filter may change the position
of the image on the CCD by a few arcsec).
Use iraf's imexam option 'k' to find the center of
the slit in the 'y' direction. Note that due to the tilt of the slit
you need to do this at the x-position where you want your star to land.
It's also best to measure this with the telescope pointing at the
target of interest -
after large movements of the telescope and Cassegrain rotator, the
position on the CCD may change by a few pixels.
3 - Measure x,y of target
The telescope and rotator should be in position
('tracking').
Move the slit mask out of the light path with e.g.:
TO> acamimage SloGunR (or TO> acamslit 1)
Take an image of the sky, and display it:
TO> glance acam 10 (should suffice to reach mag ~ 21)
ecl> display s1[1] 1 l+; imexam
If the target is starlike,
use imexam option 'r' to measure it's x,y position.
If it is not starlike, measure x,y using the cursor.
The default WHT pointing should put the target near the rotator
centre (~ 1080,1900 on the unwindowed CCD).
4 - Offset the telescope
Calculate the offsets to the slit
position in x and y directions on the CCD.
Ask the TO to offset the telescope the required amount right/left
and up/down on the CCD (the telescope control software takes
any non-zero sky PA into account).
Check that the target has arrived at the correct x,y position:
TO> glance acam 5
If not, offset again. More than two iterations should not be needed.
5 - Check the through-slit image
Insert the required slit in the light-path, e.g.
TO> acamimage SloGunR 1
inserts the 1-arcsec slit.
Take a through-slit image. A 15-sec exposure works well for a
20th-mag object:
TO> glance acam 15
Display the image using iraf, but
turn off the automatic scaling. Otherwise only the
slit will be visible, not the star on the slit. E.g:
cl> displ s1[1] 1 fill+ zs-
zr- z1=4000 z2=15000
displays the image with black corresponding to 4000 counts,
and white corresponding to 15000 counts.
If, at this point, the target is not well-centred on the slit,
the operator will need to tweak it in. If this requires more than
one iteration, it's probably best to
window the CCD to image only ~ 200*50 pixels around the
target, and start a multglance of short
exposures so that the TO can use the RTD display as a
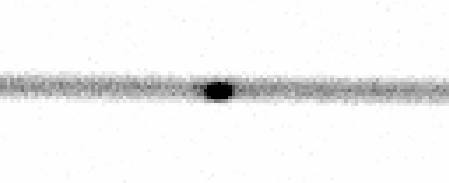
slow acquisition camera, with the image looking something like this:
6 - Blind-offset, if required
If the object acquired is the blind-offset star rather than the science
target itself, ask the operator to blind-offset to the target.
The accuracy is < 0.2 arcsec
over an offset of at least 20 arcmin.
7 - Autoguide
Ask the telescope operator to start autoguiding. This might cause a
small shift of the telescope, so it's worth checking the through-slit
image again.
8 - Insert the VPH
TO> acamspec v400 1 (for a 1-arcsec slit)
9 - Expose
E.g. for an 1800-sec exposure:
TO> run acam 1800 "M51 OIII"
10 - Record an acquisition image
When obtaining a spectrum of an object in a crowded field,
it may be helpful to record an acquisition image, so that the
spectrum can unambiguously
be identified with the target, e.g.:
TO> run acam 60
If no blind-offsetting is involved, this could be done after step 4
above, but otherwise it's probably best to leave it until after the
science exposure, to avoid moving components in and out.
Take an arc first though, if wavelength scale is important.
The x position of the spectrum on the CCD will be slightly different
from the x position on the image. The difference dx (spectrum - image)
in June 2009 was:
 x    400    520   630   1100   1600   1700

dx   -9.1  -13.1  -6.9   -1.9    7.5    8.4


