User manual for the Sparc based
INT A&G box control
Daniel Matthews
Issue 1.0; 19th February 1997
The INT A&G (acquisition and guidance) box is the unit mounted on the cassegrain of the INT, between the telescope and the instrument. Most of the time the Intermediate Dispersion Spectrograph (IDS) is mounted beneath the A&G box. The A&G box provides the mechanisms that make it possible to acquire stars and guide the telescope with an autoguider. It also provides calibration lamp sources and an assortment of filters. The task running on the system computer, that controls the A&G box, is called the AGB server.
1.2 Scope of this Manual
This manual describes the facilities available from the AGB server and the commands used to invoke them. The remainder of this section is a tour of the hardware and software facilities. Observers new to the ING may find it useful to read this information. Section 2 describes, "in cook-book" style, how to use the system. Section 3 is a reference guide to the full command set.
This manual has been prepared using Interleaf. It can be found on the ING Web server, as INS-AGB-2
1.3 References
[1] ING Observer's guide Carter et al, 1994
[2] User Manual for the Sparc Based Data Acquisition system ING/RGO document INS-DAS-11 by Daniel Matthews
[3] User Manual for the Sparc based INT IDS control ING/RGO document INT-IDS-4 by Daniel Matthews
[4] Interfaces to the Sparc Based A&G Box server ING/RGO document INT-AGB-2 by Daniel Matthews
1.4 General description
The mechanisms of the A&G box are controlled by an electronics rack (MMS) mounted on the telescope at cassegrain. A technical description of the A&G box can be found in reference [1]. The system computer communicates with this via a serial port or by a terminal server mounted by the MMS. The software running on the system computer in called the AGB server. It is through this task that the observer requests movements of the various A&G box mechanisms. Movements and positions of mechanism within the A&G box are indicated on a graphical mimic.
1.5 The system computer
The system computer also runs the data acquisition software, as described in reference [2].
The system computer is networked to various VAXes, VAXstations and SPARCstation. If desired, data can be copied across to any other machine for more in-depth data analysis.
1.6 Notation for commands
The following conventions have been used more-or-less consistently throughout this manual:
Examples of commands entered at the terminal are in courier font: asnd 2, as are messages from the computer;
Angle brackets denote parameter values or character strings: <x-probe-position>;
Square brackets denote optional input: e.g. [title]; all other parameters are obligatory;
All commands are case sensitive and should be used in the case given, but parameter values are not unless specifically stated.
2.1 Access to the system computer
As an observer, you can control the data-acquisition system and instrument control from a single console; this is the SPARCstation in the control room identified as the system computer. From the SPARCstation, you can enter commands in the terminal window and receive feedback information both as messages to the terminal window and on the status display/mimic, also on the SPARCstation screen. The command window is running a unix t-shell, so all the standard unix commands are also available, as well as the ability to write scripts (type man csh for help on this)
Data assessment can be carried out on a further xterm window, running for example IRAF, in association with SAOimage or ximtool. Note also that SAOimage alone can be used to view the data, by entering the fits filename under the etc/new menu. It can be found at /star/bin/saoimage.
2.2 Starting up the system
Instructions on how to start the observing system are given in the user manual of the Data Acquisition system (ref [2]). If prompted you should indicate that you are using the INT telescope with the A&G box. If you are also using the IDS, see the user manual for the IDS (ref[3]).
When the A&G box server starts up, descriptions of the filter wheel contents are loaded. The filters used are assumed to be those last used. If this is not the case, or you wish to change one of the filters in a wheel, or a whole wheel for that matter, you should enter the change_agb command (section 2.4 below)
Once the observing system is running, you should identify the A&G box mimic. This is the left-hand portion of the general instrument control mimic. The other window you should note is the "Talker". This reports messages to the user from the various tasks running during normal operation. This window should be checked if an error occurs.
2.3 Entering A&G commands
A&G commands are entered on the xterm that you started the system from, at the shell prompt which will be the time of day: 23:47:25> If you don't see this prompt the system is not ready for A&G commands.
Most commands take parameters, which you must give on the command line. e.g.
01:33:22> <command> <p1> <p2 <p3>If you leave out a parameter, the system will reject the command and indicate the correct usage. The parameters are passed by relative position on the command line so you cannot omit parameters from the middle of the command.
The commands are case sensitive and should all be entered in lower case. Parameters however are not. Titles and commentary will have mixed case preserved in the observing log
If enough characters have been entered to uniquely identify the required command, <TAB> will cause the shell to fill in the rest of the command name.
The time prompt (02:34:45>) will return when a command has completed. You will also be informed by a message on the Talker screen. All commands can be executed in the shell background, by appending a "&" to the command. Some commands can be overlapped and carried out in parallel, but those that can not will return an error message indicating why. For example, entering:
02:34:45> autoxy 405000 435000 &will allow you to enter other commands while the guide probes are moved.
If you forget to put a command into the background, you can do so by typing <ctrlZ> and then bg. It is ESSENTIAL that you put the task into the background once you have stopped it with <ctrlZ>.
2.4 Changing the exchangeable optics
If it is required to change the contents of a filter wheel, you should enter the following command:
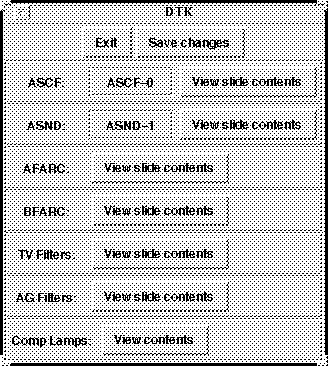
18:25:53> change_agb
The following interface will be started. It allows the user to list the contents of all the filter wheels in th A&G box. If you wish to change the slide in the above slit colour filter (ASCF) or above slit neutral density (ASND) mechanism, clicking on the slide name will pop up a list of available slides. Sliding the mouse down to the one required and releasing will select that slide, and it's name will apprear in the top level screen. This will not have any effect until the "Save Changes" button is clicked.
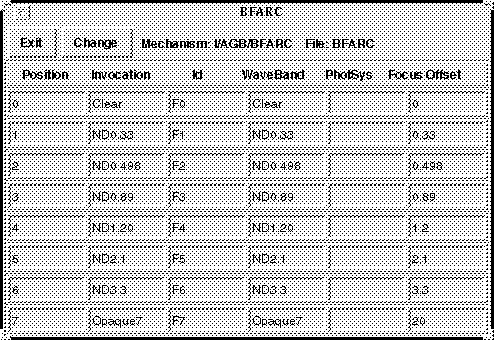
To view the contents of any of the filter slides or wheels, click the appropriate "View Slide Conents" button. A table showing the conents will pop up - an example is shown below. The position indicates which slot the filter is in. Conventionally slot 0 is clear. The Id, WaveBand and PhotoSys ae combined to produce the FITs identifier for the filter. This identifier will appear on the mimic whel the filter is in the beam, and in the FITs header file of subsequent exposures. The focus offset is not currently used in this instrument.
If you wish to change one of the filters in the slide, edit it's entry in this table. You should NOT change the position. Once you have modified the table, clicking on change (and confirming) will change the file that describes the wheel. The Save Changes button on the top level screen (above) will cause the slide contents to be loaded into the current server. Once they are loaded into the current server they will automatically be loaded up in future when the server starts up.
2.5 Using the TV
When the comparison lamp mirror is put in the, a shutter will automatically go over the TV. This is to minimise the likelihood of the TV being damaged due to stray light from the comparison lamps. This shutter will automatically get removed when the comparison mirror is removed.
When the flip mirror is "in" the TV to will look up at the star field directly. When the flip mirror is "out", the TV will look at the star field as reflected from the surface around the slit. If the flip mirror is "in" it obscures the beam. See reference [1] for a technical description of the A&G box internals.
2.6 Shutting down
To shut-down the observing system, use the shutdownobssys command:
07:32:12> shutdownobssys2.7 System Recovery
If there is a problem with the system, such as a stuck command, the system recovery procedure outlined in the DAS user manual (ref[2]) should be followed.
Commands for operating the telescope, the data acquisition and other instruments are listed in the associated users manuals,.
Notation used in this section
Examples of commands entered at the terminal are in courier font: compfilta
Angle brackets denote parameter values or character strings: <position>
Square brackets denote optional input: [title]; all other parameters are obligatory
3.1 Commands listed alphabetically
ascf Move above slit colour filter
asnd Move above slit neutral density filter
autofilt Change the autoguider filter wheel
autocentre Centres the autoguider XY probe
autopark Parks the autoguider XY probe
autoxy Move the autoguider XY probe
change_agb List contents of all filter wheels and allow a change
compfilta Move comparison filter wheel A (formerly afarc)
compfiltb Move comparison filter wheel B (formerly bfarc)
complamps Control comparison lamps
compmirror Move comparison mirror - and TV shutter
compnd Move comparison filters A and B to get desired neutral density
flipmirror Move the flip mirror
tvfilt Change the TV filter
tvcentre Centres the TV XY probe
tvpark Parks the TV XY probe
tvxy Move the TV XY probe
3.2 Command descriptions
3.2.1 ascf
Format: ascf <position>
position: Requested filter position (0 to 5)
Example: ascf 3
Comments: This moves the above slit colour filter to the position requested. The command change_agb can be used to see the names of the filters currently mounted.
3.2.2 asnd
Format: asnd <position>
position: Requested filter position (0 to 5)
Example: asnd 3
Comments: This moves the above slit neutral density filter to the position requested. The command change_agb can be used to see the names of the filters currently mounted.
3.2.3 autofilt
Format: autofilt <position>
position: Requested filter position (0 to 3)
Example: autofilt 3
Comments: This moves the autoguider filter to the position requested. The command change_agb can be used to see the names of the filters currently mounted.
3.2.4 autocentre
Format: autocentre
Comments: This moves the autoguider probe to the central position of (498225,496957).
3.2.5 autopark
Format: autopark
Comments: This moves the autoguider probe to the park position of (405000,405000).
3.2.6 autoxy
Format: autoxy <x-position> <y-position>
x-position: Autoguider X probe position (405000 to 595000)
y-position: Autoguider Y probe position (405000 to 595000)
Example: autoxy 453346 402980
Comments: This moves the autoguider probe to the required position. The central position is (498225,496957). It is worth remembering that this probe can vignette the beam through to the instrument below the A&G box. If the probe is vignetting, this will be indicated on the mimic display. Vignetting occurs when the X position is between above 448000, while the Y posotion is between 444000 and 554000. The mimic will clearly show when the probe is vignetting.
3.2.7 change_agb
Format: change_agb
Comments: This command is used to view the contents of the various filter wheels and names
of the comparison lamp sources in the A&G box, and can also be used to change these if required. See section 2.4 for more details
3.2.8 compfilta
Format: compfilta <position>
position: Requested filter position (0 to 7)
Example: compfilta 3
Comments: This moves comparison lamp filter A filter to the position requested. Position 0 is
clear, ie no neutral density. The command compnd can be used to change both comparison filters A and B to generate the required neutral density. The command change_agb can be used to see the names of the filters currently mounted.
3.2.9 compfiltb
Format: compfiltb <position>
position: Requested filter position (0 to 7)
Example: compfiltb 3
Comments: This moves comparison lamp filter B to the position requested. Position 0 is clear,
ie no neutral density. The command compnd can be used to change both comparison filters A and B to generate the required neutral density. The command change_agb can be used to see the names of the filters currently mounted.
3.2.10 complamps
Format: complamps <lamps>
lamps: Lamps required - case sensitive
Example: complamps CuNe+CuAr
Comments: This turns on the requested comparison lamps. The valid arguments depend on the
lamps currently mounted. These may be CuAr; CuNe; W; FeAr; FeNe; NAK; and ALMGCA. The command change_agb can be used to see the names of the lamps currently mounted. These names should all be unique, so if tere are two CuNe for example, the "Invocation" names should be CuNe1 and CuNe2. The lamp names are case sensitive, and should match those set as the invocation name.
3.2.11 compmirror
Format: compmirror <position>
position: Requested mirror position ("in" or "out")
Example: compmirror out
Comments: This moves the comparison mirror to the required position. With this mirror out, light from stars is allowed to enter the instrument below the A&G box, otherwise light from the comparison lamps is passed. When the comparison mirror is "in" the TV shield will be put into place to minimise the risk of damage to the TV. When the comparison mirror is moved "out" this shield will also be moved out.
3.2.12 compnd
Format: compnd <NDrequired>
NDrequired: Required amount of neutral density
Example: compnd 2.5
Comments: This moves the comparison lamp filters A and B to positions that provide an amount as close as possible to that requested. Requesting zero ND, will move both filters to position 0
3.2.13 flipmirror
Format: flipmirror <position>
position: Requested mirror position ("in" or "out")
Example: flipmirror out
Comments: This moves the flip mirror to the desired position. With the flip mirror in, the TV
will view the slit, with it out it will view the start field directly. When the flipmirror in, light will not pass through the A&G box to the instrument below.
3.2.14 tvfilt
Format: tvfilt <position>
position: Requested filter position (0 to 3)
Example: tvfilt 3
Comments: This moves the TV filter to the position requested. The command change_agb can be used to see the names of the filters currently mounted.
3.2.15 tvcentre
Format: tvcentre
Comments: This moves the TV XY probe to the central position of (500000,500000).
3.2.16 tvpark
Format: tvpark
Comments: This moves the TV XY probe to the park position of (405000,405000).
3.2.17 tvxy
Format: tvxy <x-position> <y-position>
x-position: TV X probe position (405000 to 595000)
y-position: TV Y probe position (405000 to 595000)
Example: tvxy 453346 402980
Comments: This moves the TV probe to the required position. The central position is (500000,500000). It is worth remembering that this probe can vignette the beam through to the instrument below the A&G box. If the probe is vignetting, this will be indicated on the mimic display.
Appendix A. Engineering interfaces
Mechanisms can be moved directly by sending commands straight to the server. This is not recommended as it misses out some of the safety features built into the user commands. More details of this interface can be found in reference [3]. Below is a list of a few useful ones:
ditscmd AGB AGB_AFARC <n>
ditscmd AGB AGB_ASND <n>
ditscmd AGB AGB_ASCF <n>
ditscmd AGB AGB_GDXY <n> <n>
Where <n> represents the required position of the mechanism.
A simple engineering interface can be started by running "agbEng.tcl". Again this short circuits any safety features of the user commands and should be avoided.
The command "agb" is used to run the AGB server, and so should always be present when the observing system has started. This can be verified using the following command:
ps -elf | grep agb
The server logs into DRAMA with the name AGB. If the server has logged in and is responding correctly, the following command will return without comment:
ditscmd AGB PING
The server produces a log file indicating all the actions that have taken place since the server started up. This can be found in the same directory as the other system log files, ie that defined by the LOGS environment variable, and is called AGB_nnnn.log, where "nnnn" is the date as defined in the LOGDATE environment variable. The file already exists, it will be appended to.
Appendix B. Document History
Issue 0.1 06/08/96 First draft release for review
Issue 0.2 13/10/96 Second draft release with change command
Issue 1.0 19/02/97 Formally released as INT-AGB-4 with corrected references.