| Below follows the overview users
manual. It is important for INGRID users to read the manual before
coming to the ING in order to become acquainted with the optimal use of
INGRID. This manual may at some stage be replaced with a full
users manual. The first version was written by Chris Packham,
updated by JKnapen. A somewhat
more extensive manual, but focussing on the software side of operating
INGRID, is also available: the Software
Operations Manual.
Starting INGRID Firstly confirm that the light from the
WHT is directed to INGRID. On the ICL computer (your support astronomer
can show you the ICL computer), type the following at the user prompt:-
The light will now be directed to INGRID and this will be reflected on the ICL mimic. On the screen next to the ICL computer
in the WHT control room is a Sun workstation called taurus which is only
used as an x-term for INGRID use. To log on, you have to open a Remote
Login session on it:
login in as
You then get an openwindows session. One pink xterm is made for you, and as it says, type obssys to start it. Start a new xterm window and in this new
xterm type the following
In the pink observing system window, type
obssys
As an example, a now obsolete option (number 2 at the time) looked like this: 2: Test Release........... ISP:V1.15 + RTD:V1.8 + SDSU:V2.3.1 + SCRIPTS:V1.6 You are next asked which disk the observational data is to be stored on. The disk with the greatest available space should be selected and typed into the pink observing system xterm. Next type the days date written backwards in Y2K format (or accept the default if that is correct). Now type startobssys to start the observing
system. Type
This will start up the system and create
some new windows. The important things it does are:-
The new windows it makes are:-
If there are any problems with the starting of INGRID, this will be reported to the display at the end of the startup. Watch for errors when the prompt is returned. If none is seen continue, if errors are present shutdown and re-start the observing system. You need to get one more window which displays
the positions of the mechanisms. Do this by typing in the pink window:-
This one looks like this: In this window, you may if you really want
click on the drop down File menu and select
Finally, create the observing log by typing: obslog Each window is considered in detail below.
Log This automatically updates each time a
new file is written to disk. To put comments on the file click once
with the mouse on the file and a box appears which you can type short comments
into. Print the log from the file menu, where you can also change
the night to be displayed.
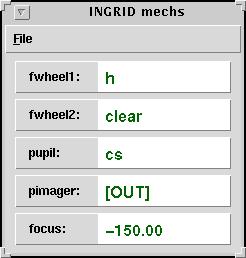
Ingrid Mechs This is a small display window which shows
the position of each of the INGRID mechanisms. No control of the
mechanisms is possible from this window (click on the File drop down menu
and select Control to get the movement window).
Ingrid Mechs Control Panel This window both shows and allows movement of the pupil stop, two filter wheels, the array focus and the pupil imager. To move any of the three from the graphical user interface (GUI) wheel mechanisms NOT RECOMMENDED, click on the filter/pupil stop you want in the beam. The position selected is coloured green. Whilst the wheel is in motion it is coloured blue, when the wheel is red it is in an undefined position, which may occur when the wheel loses its position. The wheel ishould be green after datum'ing, if it is red datum again. If it is red after a move, the wheel should be datum'd and then moved again. To select an array focus simply type the required focus into the focus box and hit return. To datum the wheel or focus simply click
on the datum button.
Ximtool This is a typical ximtool with the normal
functions plus one notable addition. When any pixel moves into the
non-linear regime (in EITHER) the pre-read or post-read the
pixel will be coloured red. Thus, a quick and simple non-linearity
check is possible with ximtool. This ximtool should be used only
for the display of incoming data and not to display archived data - lupus
in the control room should be used for quick look data reduction.
RTD Control Tool This allows control of the real time display tool (RTD). The first panel shows the observation data loaded, the second the reference data loaded and the third shows the status, typically this will be "scanning" if the data detection box is selected to be on. If the data detection box is selected to be off, the status changes to "data detection off". New images are automatically loaded into the RTD if data detection is turned on which are automatically displayed on the ximtool. It is possible to refresh the display on the ximtool with the refresh button and to quit the RTD with the quit button. Observation data can be manually loaded by typing the file name into the obs data box and then hitting the load Obs data. Reference data may also be loaded in a similar way - using this option can allow for quick and easy sky subtraction. Alternatively, use the ``OBS -> REF'' button to load the current frame as reference frame. Finally there are several options for displaying
the data. These are explained in the table below:-
Ingrid Operation After the windows have been made and the
pink observing system is ready for observations, the prompt will show the
time in 24 hour format. You are now ready to start operating Ingrid!
Datum'ing the mechanisms The day-time engineering staff will
usually have performed a datum (or
initialize) of the pupil stop
wheel, the two filter wheels and the array focus when you come to the
telescope in the afternoon. To do it yourself, maybe just to be
sure that it has been done. Do this on the
command line by typing:-
Should you wish to datum each mechanism
separately, type:-
Alternatively the mechanisms can be datum'd
by using the datum button on the GUI. The wheels will turn red to
show that they are out of position and require to be moved to a defined
position. If you datum in this way from the GUI (why would you when you
can just type the 'datum all' command...) be sure to datum each
mechanism separately as otherwise incorrect positioning
will occur.
Moving the mechanisms To select a filter, it is recommended to
use the command line. Type one
It can be seen from the above table that all filter movements are 'tied' to other filter movements and/or pupil stop movements. Hence it is recommended that filter movements are made using the command line interface and not the GUI. Also, any motion of two wheels simultaneously can result in losing wheel accuracy and hence IS NOT RECOMMENDED. The focus value may be selected using the command:-
The
internal focus of INGRID is around -50. The range of focus is
+1000 to -1000 (units are microns). Focussing Ingrid Select the H band filter (the H band filter seems to give the most
accurate focus results) and select a star of ~11th mag to focus
on, move to that star. Next type:-
10 images will then be returned of the equivalent of 30 seconds (10s coaveraged to give 30s). 15s is the minimum recommended exposure time suggested for the focus images as seeing effects will be averaged over this time or longer. Steps of 0.1 (mm) are adequate, use 0.05 if the seeing is very good. The focus images are saved as 'scratch' files (see below). On the data reduction sparc (lupus) the images can be analyzed using the ingrid quick look software (ingrid_ql), programme ``istarfocus': see section on Ingrid_ql below. Once you have determined the correct focus, set it by a command like
STEP 2: focussing INGRID itself. INGRID's internal focus is -50 but you may wish to check whether this
needs adjustment. Remember that using large adjustments (hundreds of
microns but not characterised - ask if worried) can introduce image
quality degradation. Focus INGRID only after you've focussed the WHT
itself (see above). The procedure is very similar to the telescope focus: The analysis is identical to that described above for whtfocus. -100 is a good starting offset value and an increment of 10 is suggested, possibly more (20 or even more) to get a rougher idea where the focus is. Keep in mind that the units by which the INGRID focus moves are very small (microns) and that an observer can lose a lot of time with over-enthousiastic focussing! Once you have determined the correct focus, set it by a command like
Observing with Ingrid There are various ways to take an exposure with INGRID. The one to choose for your observations depends on a number of factors, dependent on how you want to store the data and if you want to move the telescope during an observation sequence. In all observations, the semantics are as follows:- command <operand> <operand> (title)
Remember: if you just type 'command' the system returns the semantics needed to run it. Scratch Issuing the scratch command takes an exposure of x seconds with n coaverages and names the file sname. The file is overwritten should another file of a similar name be given. The semantics are:- scratch <file_number> <exposure time> <no. of coaverages> [<title>]
Glance Issuing the glance command takes a exposure of x seconds with n coaverages. The file is overwritten when a new glance is taken. Note no name is possible for a file like this. The semantics are:- glance <exposure time> <no. of coaverages> i.e. glance 20 2 produces one file of 2 coaverages each of 20 seconds
and calls this file glance.fit
Run Issuing the run command takes an exposure of x seconds with n coaverages and gives a fits title of t. This run allocates a unique file number conforming to the ING file naming regime. The semantics are:- run <exposure time> <no. of coaverages> "(fits title)" i.e. run 30 4 "ngc4151" produces one file of 4 coaverages each of 30
seconds, calls this r12345.fit with a fits title of ngc4151.
Mult-run Issuing the multrun command takes y exposures of x seconds with n coaverages and gives fits title of t. The runs are allocated unique file numbers conforming to the ING file naming regime. The semantics are:- multrun <no. of runs> <exposure time> <no. of coaverages> "(fits title)" i.e. multrun 5 30 4 "ngc4151" produces 5 files each of 4 coaverages of 30 seconds, and calls these r12345.fit... r12349.fit with fits titles of ngc4151. Dither family The dither family of commands has a number of members which all have the same semantics. They live in /ingrid/scripts. There is e.g. a dither2, dither3, dither4, dither5, dither8 and dither9. Two are explained below. You are free to edit them to your own needs, and if you really think you ought to do this copy them to /home/ingrid/scripts and give them some name that you and others will be able to identify with you. Dither5 Issuing the dither5 command takes five exposures of x seconds with n coaverages and gives a fits title of t. Most importantly, the WHT is moved between the five exposures by the amount entered on the command line (in arcseconds). The runs are allocated unique file numbers conforming to the ING file naming regime. The semantics are:- dither5 <exposure time> <no. of coaverages> <x_dither_offset> <y_dither_offset> [<fits_title>] i.e. dither5 30 4 20 20 "ngc4151" produces 5 files each of 4 coaverages
of 30 seconds, and calls these r12345.fit...r12349.fit with fits titles
of D-?/5: ngc4151 where ? counts up to five signifying each dither position
each dithered by 20 arcseconds in a five point dither. Note that
there is no requirement for the dither pattern to be 'square'.
Dither9 Issuing the dither9 command takes nine exposures of x seconds with n coaverages and gives a fits title of t. Most importantly, the WHT is moved between the nine exposures by the amount entered on the command line (in arcseconds). The runs are allocated unique file numbers conforming to the ING file naming regime. The semantics are:- dither9 <exposure time> <no. of coaverages> <x_dither_offset> <y_dither_offset> [<fits_title>] i.e. dither9 30 4 10 10 "ngc4151" produces 9 files each of 4 coaverages of 30 seconds, and calls these r12345.fit...r12354.fit with fits titles of D-?/9: ngc4151 where ? counts up to nine signifying each dither position each dithered by 20 arcseconds in a nine point dither. numreads Distinct from optical CCDs, near-IR arrays can be read out nondestructively. This means that it is possible to sample the counts several times. This results in a n^^0.5 reduction in read noise. INGRID using broad band filters is sky noise limited and hence the number of reads (the default for INGRID) should be set to 1. For narrow band observations the number of reads can be set to up to 16 to reduce the read noise. The array is read n time and the pre-read formed, the exposure is made and then the array is read n times to form the post-read. The semantics are:- numreads <number_of_reads> i.e. numread 4 reads each subsequent file four times. numread
1 defaults back to correlated double sampling.
Scripting Observations As INGRID is a UNIX based instrument, tcshrc scripts may be used to
operate INGRID, combining any of the above commands in any way that the
user wishes. Look in ~/scripts for some example scripts.
INGRID Quick Look Reduction There is a sparc dedicated to INGRID quick look reduction. This
is called lupus and your support astronomer will show you how to login.
Once logged on, create an xgterm and whilst in the home directory type:-
The exact directory you cd to should be either the same as the place that the data is stored, defined at start-up, or can be in a scratch directory. If it is the former, one must be very careful not to overwrite the data as at this point there is no other backup of the data. If it is the later, which is of course much safer, one will need to copy the data files across to this scratch directory manually. When starting up the ingrid_ql IRAF package, a list of the available
commands is given to you. Explained below are some of the most useful
commands.
iframediff Issuing the iframediff command subtracts the pre-read from the post-read image and writes it to a file. The semantics are:- iframediff <input_file_name> <output_file_name> i.e. iframediff r12345 hello takes the pre read of r12345 from
the post read of r12345 and writes to a file called hello.
idispframe Issuing the idispframe command subtracts the pre-read from the post-read image and displays this in an ximtool. This file is then ready for an imexam examination. Some image statistics are also reported on the command line which give an estimate of the sky background saturation time in order to aid optimal observation time estimation. The semantics are:- idispframe <input_file_name> <frame_buffer> i.e. idispframe r24680 1 takes the pre read of r24680 from the post
read of r24680 and writes it to the 1st frame buffer of ximtool.
istarfocus Issuing the istarfocus command takes the images produced when focussing INGRID using the focusrun command (as described above) and produces a plot to show the FWHM and ellipticity versus focus position. It takes a list of files, subtracts the post-pre for each file and then estimates the FWHM and ellipticity, finally plotting the result on an xgterm. The first file is displayed to the ximtool and the user asked to identify stars to be focussed on with the 'm' key. More than one star may be used for focussing, 3-5 is optimal and these should be close to the center of the field of view. The semantics are:- istarfocus <input_file_name1, input_file_name2, ..., input_file_nameX> i.e. istarfocus s1,s2,s3,s4,s5 takes the post-pre reads from each frame, and then uses the stars identified by the user to plot the FWHM and ellipticity versus focus. istarfocus can be used for both telescope and instrument focus determination, when using it for telescope focus use the command istarfocus focus=TELFOCUS on the iraf command line. Just istarfocus
invokes the version to calculate the instrument focus.
idedither Issuing the idedither command allows the user to either interactively or automatically remove the dither pattern from dithered data. This can handle data taken from dither5, dither9 or any user generate scripts or command line dither patterns. The semantics are:- idedither <input_file_name1, input_file_name2, ..., input_file_nameX> (match=auto or manual) <output_file_name> i.e. idedither cp1,cp2,cp3,cp4,cp5 chris match=manual takes the post-pre
from each frame, displays each frame in turn on an ximtool and asks the
user to identify one star to be used in each frame for the alignment process
and finally writes a file called chris.fit. If match =auto or is
left blank, idedither will fit use the header information to un-dither
the images.
isubtract Issuing the isubtract command subtracts the post-pre of one file from the post-pre of a second file and writes it to a new file. The semantics are:- isubtract <input_file_name1> <input_file_name2> <output_file_name> i.e. isubtract r12345 r12346 ngc5728 takes the post-pre of r123456 from
the post-pre of r12345 and writes a new file called ngc5728.
ifinddark If one wishes to take dark frames of a similar exposure time to the
'science' frames taken that night, issuing the ifinddark command produces
a file listing the exposure lengths needed. This may then be incorporated
into an observing script and then executed on the command line of the INGRID
observing system.
Shutting Down INGRID It is advised at the end of the night to shut down the observing system. At the very least, it is essential to put blanks into the light path in order to protect the array from day time lights (whilst day time lights will not damage the array, 'heavy' saturation of the array results in remenance which can last for a long time). Shutting down the system leaves it in a 'tidy' state and also puts blanks into the beam. Also if there are any problems, shutting down INGRID can help to clear them. To shutdown INGRID, on the pink observing system window, type:-
And answer yes to the "are you sure?" questions.
Writing The Data The data is written to DAT tape in the standard ING fashion. To
do this, get a DDS3 tape from the telescope operator or support astronomer.
Open an xterm and change directory to the directory containing the data
you want to be written to DAT tape. Attached to the lupus sparc is
a DDS3 tape drive, the DAT tape should be put in there and prepared for
data by typing:-
Follow the on-screen questions, in consultation with your telescope operator or support astronomer if needed. Next the data should be written by typing:-
Again, follow the on-screen questions, in consultation with your telescope
operator or support astronomer if needed.
Hints & Tips
|
||||||||||||||||