 Using
readout windows
Using
readout windows
This page is part of the ING document
INS-DAS-29:
Operations
manual for UltraDAS..
This revision applies to the software in observing-system s9; it does
not apply to system s8.
A readout window, also known as a region of interest, defines a sub-set
of the detector pixels to be read out. By reading out one window or a set
of windows instead of the full frame of the detector, the speed of readout
is increased and the volume of data is reduced.
Quick summary of windowing commands
window [<camera>] <n> <image-section>
window [<camera>] <n> enable
window [<camera>] <n> disable
Capabilities and limitations
UltraDAS uses four user-defined windows on each camera, numbered 1..4.
Limitations in the firmware for particular cameras (usually due to lack
of memory) may restrict that camera to fewer than four windows, but no
camera is allowed more than four windows.
Each window is a rectangular raster of pixels. Windows of other shapes
(e.g. circular windows for aperture photometry) are an interesting idea
but are not supported.
A window may be set anywhere in the cameras "detector" co-ordinate-space,
as discussed in detail below. This means that the window may be placed
anywhere on the detector surface; it may overlap the edge of the detector;
and it may span the areas read out through different readout amplifiers.
Windows may not overlap.
Each of the windows may be enabled or disabled individually; when the
system starts up, and when the camera is reset (e.g. by the dasreset command),
all the windows are disabled. When all windows are disabled, the system
reads out the full frame of the detector. If any window is enabled, the
system reads out only the enabled windows. It is not possible to enable
or disable all the windows with one command.
There is also a subtle limitation on combinations of windows, which
is discussed in detail further down on this page.
Setting a window from the command line
To set a window, specify its size and position to the window command in
IRAF's image-section format. E.g.:
window 1 "[1251:1750,1:4200]"
to set window number 1 to cover pixels 1251..1750 inclusive in x and 1..4200
inclusive in y. (The square brackets are a part of the image-section notation
and the quotes are there to protect the brackets from the Unix shell.)
The window is defined in the camera's detector co-ordinate-space, or
d-space for short. To get the window in the right space, you need to know
how d-space is defined for the particular camera, which is discussed in
more detail in the co-ordinate section of the manual.
Setting the windows size and position enables that window.
Setting a window graphically
There is a graphical tool that you can use to set windows: it appears in
response to the geometry command and
looks like this:
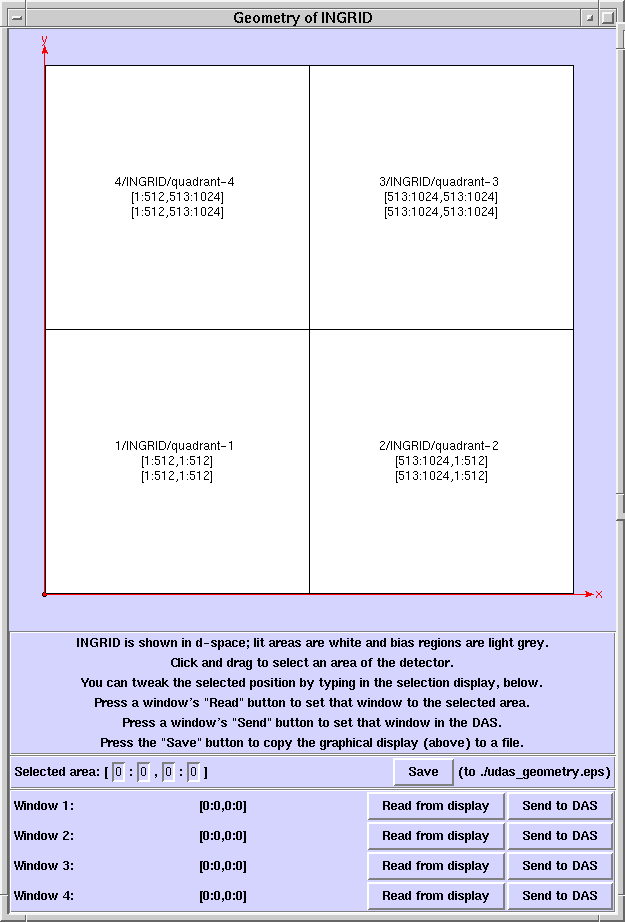
To set a window, follow this sequence:
-
Draw the window on the picture of the detector surface by clicking and
dragging with the mouse.
-
Check the extent of the selected area on the textual display. If you are
not satisfied with the area, either click and drag again, or adjust the
limits by typing new numbers into the text-entry boxes of the display.
-
Decide which window number you will use (in the range 1..4).
-
For the selected window, press the "read from display" button. The tool
notes that the window should be the same size and shape as the selected
area. If you later change the selected area, the window does not change
unless you press the "read from display" button again.
-
At this stage, the DAS has not been informed of the window setting. Press
the "send to DAS" button to apply the new window to observations.
Enabling and disabling a window
To enable or disable a window, use the window command. E.g.
window 1 enable
or
window 1 disable
Enabling and disabling do not change the record of the windows size and
position.
Subtle limits on multiple windows: how the limits arise and how to defeat
them
In general, you can use up to four windows at once; i.e the system lets
you define windows 1..4 inclusive and you can have then all enabled at
the same time if they do not overlap. However, you may sometimes find that
the system won't accept certain patterns of these windows, saying "The
proposed window pattern is too complex to pass to the camera (i.e. more
than x blocks).", where the limit x may vary between cameras.
What could this possibly mean? Is it a bug?
This behaviour is not a bug; it is, sadly, a fundamental limitation
on the system imposed by the hardware in the detector controllers. The
technical reasons for this follow.
The operations needed to read out a pattern of windows are calculated
in the DAS and passed into the detector controller as a table that the
controller holds in memory. The controller has very little memory, so the
size of the table is limited.
The controller has to parse the window-definition table in real time,
during each readout; there is too little memory to parse the table when
it is load and to retain a compiled version. This means that the table
format has to be extremely simple. The table describes blocks of rows of
readout in which each line can be treated identically, and the number of
such blocks is limited, typically to 10. It is the mapping from windows
to blocks that can rule out a format.
-
If there is only one window, the table contains only one block.
-
If there are multiple windows, if the windows are all contained in the
section read out from one detector output and if none of the windows overlap
in y, then there is one block per window and all four windows can be enabled
at once.
-
If the windows overlap in y but are not exactly the same height in y, then
there will be more than one block per window. In fact, n windows
generate n2 - n blocks in
the worst case.
-
The system breaks windows into sub-windows where they cross the boundaries
of readout sections. The n in
-
the n2 - n value is the number
of sub-windows, so it may be larger than the number of windows for a multi-outout
camera.
Here are ways to work round the problem if the system objects to your format:
-
One window always fits. Disable all but one of your windows.
-
Where there is only a small gap between windows, merge them into one window.
Remember that the limit is on the number of blocks of pixels, not the number
of pixels in the blocks.
-
Trim your windows so that they are each contained within the part of the
detector that is read from one output.
-
Try not to overlap your windows in the y direction. (It's the y
direction in r-space (q.v.) that matters, not the y-direction in
d-space or i-space).
-
If you need to overlap in y, try making all your windows the same
height in y. For example, run every window the full height of the
readout frame: this needs only one block in the table.
I recommend that you try out your window pattern well before observing,
so as to have enough time to tweak it if necessary.
What results
Each window you set produces a raster of the specified size and shape in
the output (FITS) file. This is because:
-
windows are reconstructed from image-fragments where they cross the borders
between detector chips or sections of detector chips;
-
where a window overlaps the edge of a detector chip, the window is padded
with zeros instead of being truncated.
Each windows is stored as one image-extension in the file. This means that
it has its own FITS-header and can have its own co-ordinate information.
If you have multiple windows, they will all come out in the same orientation
in the output file. Usually, the filed images have their axes pointing
the same way as the d-space axes, but a camera may be configured to reorient
all its images before output.