UltraDAS is driven from the system
computer in the telescope control-room. There is a command-line interface,
which also serves for running observing scripts, and various graphical
displays; these controls are all described below. Some instruments (e.g.
the INT wide-field camera) provide graphical user interfaces which include
UltraDAS functions; these GUIs are described in the separate manuals for
specific instruments.
If the system has been started for you - typically it is started by
the duty engineer in the early afternoon - then the observing account is
already logged in. You then need only to find the screen with the
SYS> command-line, as described below.
With this window you can command, the instrument, the detectors and the telescope.
The SYS> terminal window runs a Unix shell - tcsh - and the shell is
the command language of the system.
When you ignore the DAS> window, it may well quietly log itself out
and disappear. This does not mean that the DAS has crashed; the DAS does
not need the window to be there during observations.
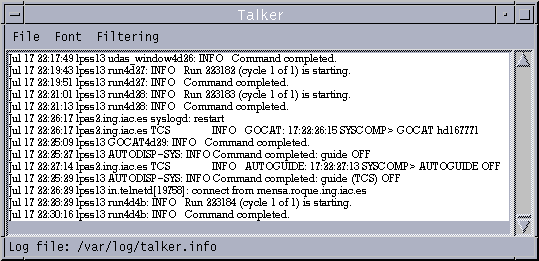
The talker has a companion window for displaying alarms. This window
is normally iconified, but will spring up to the middle of the screen if
an alarm is raised, beeping and flashing frantically. To stop the noise
while reading the alarm message, press the button marked quiet. To make
the alarm box go away, press "acknowledge" (the text of the message remains
available in the main window of the talker).
The mimic looks like this:
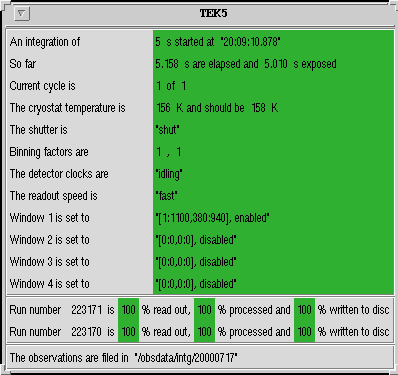
Most of the data are self-explanatory, but these details may be of
interest.
The backgrounds of the data fields change colour to express the state of parts of UltraDAS. Green means the value is stable in a good state; blue indicates an intended change of state; orange indicates an unusual or transient state; red indicates an error.
Elapsed time and exposed time are shown separately; see the integration section for the definitions and the distinction.
The states of the detector clocks are idling (i.e. clearing continuously between observations), clearing (clearing once at the start of an observation), integrating (i.e. accumulating charge on the detector), reading, and (very occasionally) aborted.
The four readout windows are expressed as image-sections in detector co-ordinates (see the geometry section for an explanation of this). Each of the windows is either enabled or disabled; if it is disabled, it is not applied in readout, and if all windows are disabled, then the full area of the detector is read out.
Progress counters for two runs are shown. The upper line of counters
is for the most recent run, and the lower line for the second most recent.
Normally, all the activity is in the upper line, but the multiple-exposure
commands (multrun et al.) cause the two most recent
runs of a series to be progressed in parallel.