 geometry
command
geometry
command
This page is part of the ING document
INS-DAS-29:
Operations
manual for UltraDAS
Function:
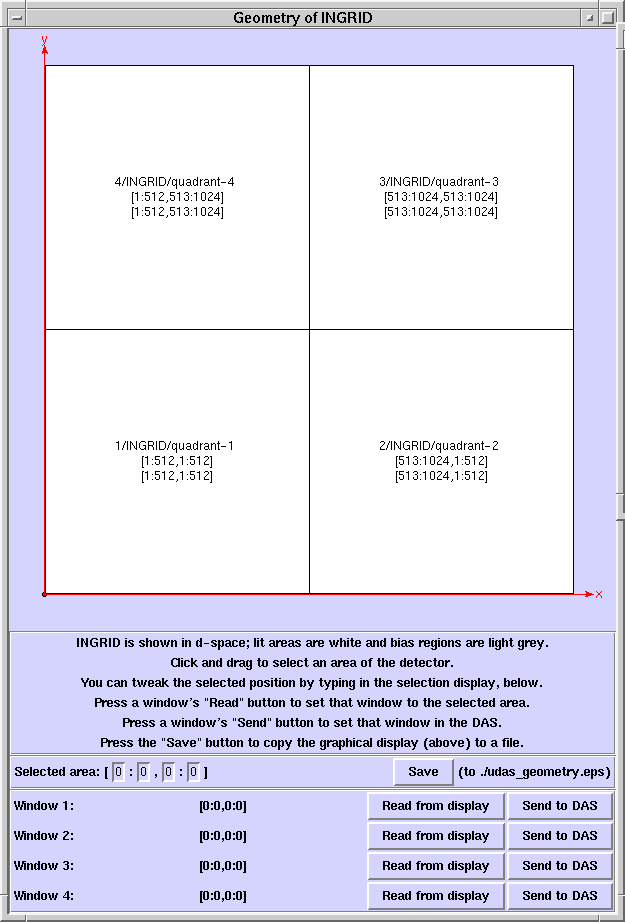
The geometry command runs the programme udas_geometry, which
is a GUI for working with camera geometry. This programme is mainly used
to place readout windows.
The GUI displays the readout sections and the bias regions of the camera
and shows how these are arranged in the "detector" coordinates-space ("d-space"),
which is the coordinate system used to place the readout windows. The geometry
is read from the same same configuration files that the DAS uses to drive
the camera so it includes the observing system's most accurate knowledge
of the camera.
With the camera displayed, you can:
-
select a region of d-space using the mouse and view its coordinates;
-
adjust the selected region using the keyboard;
-
define a window to cover the selected area;
-
set up the selected window in the DAS;
-
record the window pattern (or just the unwindowed geometry of the detector)
as a picture in a PostScript file.
This is what the display looks like:
Usage:
geometry [<camera>] &
or
udas_geometry <telescope> <instrument> <camera> &
In the first form, the system will try to deduce the telescope, instrument
and camera names from the observing context; in the second form you have
to tell it everything. The two commands run the same GUI.
Areas are drawn on the display by pressing mouse-button 1, dragging
the mouse with the button held down and releasing the button. One corner
of the area is then deemed to be where the button was pressed and the other
where it was released. It does not matter which way you drag.
Text-entry boxes in selected-area display:
type in here to adjust the selected area. You may need to click on the
text-box first.
Save button:
press this to write the pictorial display to the file udas_geometry.eps.
The file is created in the directory that was current when you gave the
command to start the GUI. Each press of the button over-writes any previous
copy of the file.
Read from display buttons (one button each for windows 1..4):
press one of these to set the associated window to the selected area. The
window will be set to the area shown in the textual selected area display,
not the area defined on the pictorial display. That is, if you select an
area with the mouse, then adjust it from the keyboard, then use it to define
a window, the window gets set to the adjusted area.
Send to DAS buttons (one button each for windows 1..4):
press one of these buttons to set up the associated window in the DAS.
Check the talker to be sure that the DAS accepted the window. If the window
is accepted, the DAS will use it until further notice.
Note and caveats:
If you draw an area with the mouse and find it's gone in the wrong place,
just draw it again. Each time you click and drag, the selection gets replaced.
This GUI is not a mimic for the DAS. If you change a window in
the DAS, the GUI will not detect the change and will not update itself
to match.
If you define a window using a Read from Display button, the
DAS does not know about it unless you also press the matching Send to
DAS button.
Not all the window patterns you can set on this GUI are valid for processing
in the DAS. In particular, the GUI allowed windows to overlap but the DAS
doesn't. Always check in the Talker after sending a window to the DAS to
see if it was accepted.