Papers for the
NAOMI
Opto-Mechanical Chassis

Critical Design Review
wht-naomi-94
Internal document number: AOW/OCH/JMDS/1.0/10/97/OMC CDR Text
Date: 28/10/97
Papers for the
NAOMI
Opto-Mechanical Chassis
Critical Design Review
wht-naomi-94
Internal document number: AOW/OCH/JMDS/1.0/10/97/OMC CDR Text
Date: 28/10/97
C O N T E N T S
List of Included Drawings...................................................................................................... 3
Mechanical Design................................................................................................................. 4
Introduction....................................................................................................................... 4
Environment...................................................................................................................... 4
Vibration:.......................................................................................................................... 4
Components of the OMC.................................................................................................. 5
Assembly, test and alignment of the OMC............................................................................ 12
Co-ordinate systems........................................................................................................ 12
Initial (mechanical)
alignment............................................................................................ 12
Alignment of individual components.................................................................................. 13
Accuracies of
alignment by metrology............................................................................... 15
Stability of alignment........................................................................................................ 15
Optical alignment
methodology......................................................................................... 15
Targets (Drawing
number 00AO5I)................................................................................. 16
Note on the alignment
of the OAP's................................................................................. 16
Priors and equipment
required.......................................................................................... 17
OMC (re-)assembly and
optical alignment procedures...................................................... 18
Changes to the OMC optics since PDR............................................................................... 22
Introduction of a
double pass fold mirror in the NAOMI common path optics................... 22
Optical effects..................................................................................................................... 22
DM monitor........................................................................................................................ 23
Non common path and
non-correctable WF errors.......................................................... 31
Annexes:
Project Summary............................................................................................................ 32
Project Gantt Chart......................................................................................................... 33
|
Drawing Number |
Drawing Title |
|
|
Naomi system block diagram |
|
00A051 |
Alignment targets |
|
00A06A |
Optical layout |
|
00A10I |
Initial chassis alignment at GHRIL |
|
01A02A |
OMC block diagram |
|
01A03I1 |
OMC |
|
01A03I2 |
OMC |
|
01A03I3 |
System layout and cable routing |
|
01A04A |
Chassis assembly |
|
01A11M |
Chassis plate |
|
01A22M |
Excentric |
|
01A20M |
Bench clamp |
|
02A03I1 |
Nasmyth focal plane unit |
|
02A03I2 |
Nasmyth focal plane unit |
|
02A38A |
Calibration mask (nasmyth focus) |
|
03A00I1 |
Fast steering mirror |
|
03A00I2 |
Fast steering mirror unit |
|
03A03I |
OAP1 mounting and tip-tilt plate |
|
03A10M |
First OAP mount flexures |
|
03A11M |
Second OAP mounting ring |
|
03a39a |
Off-axis parabolic mirror |
|
04A00A |
Deformable mirror assembly NAOMI setup |
|
05A03X |
Fold mirror exploded view |
|
05A03I |
Fold mirror |
|
05A03I3 |
Mounting of OAP2 and fold on flexures |
|
05A19A |
Mounting pad to mirror bond positions |
|
06A03I1 |
Second OAP exploded view |
|
06A03I2 |
Second OAP assembly |
|
06a01a |
Off-axis paraboloid OAP2 |
|
07A03I1 |
Dichroic unit |
|
07A03I2 |
Dichroic unit |
|
07A04A |
Dichroic unit assembly |
|
08A061 |
Setting of eccentrics during preliminary alignment |
|
08A07I |
Chassis co-ordinate system and datum points |
|
08A10M |
Pivot bar |
|
08A11M |
Pivot pin |
|
08A16M |
Chassis plate target |
|
15A04A |
Calibration Unit |
The OMC is to be mounted on the Optical bench at GHRIL. The Nasmyth focal plane calibration mask and all components of the optical train, with the exception of the DM are mounted on a stainless steel chassis plate which is pre-aligned to the telescope axis. All components have a semi-kinematic type of location, with the exception of the DM.
The layout for the OMC on the optical bench and the position of the camera and WFS are illustrated in diagrams 01A03I1-3, the last of which shows the proposed rooting of cables, at floor level for the DM power lines and along overhead conduits for the control lines, to the control room.
Materials: All steel components will be manufactured from stainless steels, BS 410S21 for sheet and plate, BS 316S31 for all other components. All aluminium components are to be manufactured from BS 6082. Invar components are of Invar 36 (c.t.e. 1.26 E-6 /K). Powered mirrors will be of Zerodur and the fold mirror of Pyrex.
A
temperature specification of -10° to +25°C has been set for the instrument.
All mirror mountings have been designed to accommodate the relative expansions
of the mirrors and mounts.
Note: As a
result of the 35°C working temperature range and the
length of the OMC there has to be a very close match between the thermal
expansion of the chassis plate and the optical bench. It is not known from
which steel the bench has been manufactured, but it is either a ferritic or
martensitic stainless steel. Consequently BS 410S21 has been specified for the
chassis plate. This still leaves the possibility of a mismatch in thermal
expansion leading to a relative expansion of 0.126mm over 35°C which
will be accommodated by slippage of the plate under its clamps. The main
concern is that the chassis will, over the course of time, drift out of
alignment both with the telescope and those parts of the instrument fitted
directly to the bench: the DM, WFS and INGRID.
There will be three main sources of vibration
1. The closed cycle cooler in INGRID or
other IR camera, dominant frequencies at 1, 50 and 100Hz.
2. The FSM, noise driven at up to 250Hz.
3. The telescope. No data available.
The
approximate compliance data for the optical bench, a custom Photon Control GR
8-4-8 series, gives a maximum defection of 5E-7mN-1 for frequencies
above 30Hz.
The approach
to the problem of vibration will be one of build and test to look for
resonances in the system, then experiment to eliminate the problem. It may well
be found that the problem can be eliminated by such simple means as moving the
position of clamps, but problems that are not inherent to a particular
component (e.g. within a mirror mount) are likely to be specific to the optical
bench that the instrument is being used on.
The chassis plate (drawing no. 01A04A) serves as a reference surface with fixed location stops onto which the components of the OMC are mounted. In use it will be positioned on the GHRIL optical bench, aligned to the optic axis and clamped down. It will not be flat, but will conform to the bench.
The chassis is comprised of the
following:
•
Chassis
plate (drawing no. 01A11M)
•
A
Newport X26 series optical rail mounted on four aluminium supports fixed to the
chassis plate by four M5 cap screws. (The rail will be used as the defining
axis of the chassis with respect to which all angles are measured.)
•
Eccentric
position stops for each mirror and the dichroic unit (drawing no. 01A22M). Each
eccentric is locked by an M6 cap screw.
•
Two
Kipp 6921-20001 series aluminium carrying handles.
•
Fixed
position stop for location of the fold mirror. The location and angle of this
component is non-critical.
•
Kinematic
mount base at the Nasmyth focus (drawing no 02A03I2). It is located by two 6mm
shoulder screws.
The chassis
plate is to be machined from 10mm BS410S21 stainless steel finished to B3 or B4 on 2A (BS1449). Manufacturing
tolerances are mostly low. The profiling and piercing of the plate would suit
water sawing to ±1 mm followed by finishing. Bored
holes should be positioned to ±0.1mm except for the two holes
locating the kinematic base which need to be within ±0.05.
Drilled, tapped or counter bored holes should be to within ±0.2mm.
Distortion of the plate should be kept to a minimum, hence the preference for
water sawing over laser or flame cutting.
Over 35°C the chassis plate will expand by 0.7mm in length. The first and second OAP’s focus will move by 0.24mm and 0.36mm respectively.
The focal plane (drawings 02A03I1 and 02A03I2) unit supports the calibration mask at the Nasmyth focus. It is mounted on the kinematic base described above and has been designed so that an identical mount may be made to hold the conjugation lens, allowing for the swift interchange of components..
The mask is of 100mm copper shim with a 25mm black nickel coating on one face, manufactured by Graticules Ltd.(drawing no. 02A38A). It is mounted in a recess in the end of an aluminium barrel with three alignment pins and retaining ring. The pins are spaced at 120º intervals and the whole is designed so that the mask is free to expand and contract with temperature whilst maintaining the position of the central pinhole and orientation of the grid.
The
positions of the holes in the calibration mask will be measured with a
travelling microscope and recorded for reference during instrument calibration.
The unit has ball end feet fitting the cone and groove of the kinematic mount and one slightly domed foot resting on the pad, all three being threaded to give adjustment in height and tilt and fitted with lock nuts. The components of the kinematic mount are of steel; all other components are aluminium.
For the purposes of calibration the position and tilt of the mask is not critical, but it must be replaced repeatably and easily. Height of the central pinhole above the optical bench will be checked with a travelling microscope.
The unit is clamped to the base by an M6 threaded thumb wheel integral to the base.
The effect of temperature change is to alter the separation between pinholes in the grid. There is also slight bowing of the mask, but over this temperature range the bowing is insignificant. Over 35K these effects are as follows:
Change
in grid spacing: <3.9mm (0.016 arcsec.)
Change
in grid diameter: <25.0mm (0.1 arcsec.)
This change in calibration grid
diameter represents 1/1740th of the field of view.
The
deformable mirror is to be shared by NAOMI and ELECTRA. The design of the
mounting and cable support for the mirror has been the work of David Robinson
at Durham and is common to both instruments (drawing no. 04A00A). Each
instrument will have a base section peculiar to it from which the mirror, its
electronics and casing can be quickly removed and refitted. In the case of
NAOMI the base comprises a frame to support the DM casing and a pair of
motorised translation stages arranged to allow the mirror to be moved in its
plane to bring the mirror segments into alignment with the WFS lenslets.
Note that in
drawing 04A00A the horizontal stage is placed on top of the vertical stage. In
practice this arrangement would be reversed so that the load remains centred
over the vertical stage.
Manufactured
by Aerotech and Newport, these will provide a resolution of better than ten
times the required ±0.1mm with travel of ±2.5mm
vertically and ±12.5mm horizontally. The load
carrying capacity of the assembly will be 45kg. The approximate weight of the
DM will be 10-12kg.
Of concern
is combined non-repeatable pitch, yaw and roll of the stages. No specification
for non-repeatable errors are available from the manufacturer, however
non-repeatable errors should be smaller than repeatable errors. Figures for repeatable pitch etc. are as follows:
Vertical stage: Aerotech
AVS105, centred load capacity 45kg.
125mrad roll
100mrad pitch
125mrad yaw
Horizontal
stage: Newport 436, centred load capacity 57kg.
125mrad roll
125mrad pitch
125mrad yaw
In-plane
(pitch) error has no effect on performance. Assuming that errors add as the
root sum square, this gives a repeatable error of
±250mrad
mirror tilt at the pupil over the full range of motion.
The
requirement for the DM to be mounted on translation stages prevents the use of
damping or stiffening measures to protect the mirror from vibration. It should
be stressed that the effects of vibration, both as a result of mirror segment
motion and external sources, will not be known until the instrument has been
built and tested.
Preliminary
testing will be performed with a mass mounted on the translation stages to
simulate the behaviour of the system with the DM in place. The response of the
system to vibrations at the dominant closed cycle cooler frequencies will be
measured.
Although it
will not be possible to damp the system, the load carrying capacity of the
stages would allow for the attachment of extra mass to the assembly allowing
for the lowering of the centre of gravity and the retuning of the system. This
will give some, albeit limited, scope for raising the natural frequency. The
stiffness of the assembly would be slightly increased by using an all stainless
steel horizontal stage such as the Newport UMR 12.40.
The Xenetics
mirror: there is a requirement that the ELECTRA DM be replaced with a Xenetics
mirror. This mirror is far more compact and light weight than the ELECTRA
mirror and will be mounted on an ‘L’ bracket overhanging the translation
stages.
The first
OAP will be mounted in a fast steering drive unit, probably to be produced by
ThermoTrex. The mirror is of Zerodur
bonded into an Invar ring on three double flexures which are attached to the
mount’s aluminium tip tilt plate by three pairs of cap screws. This arrangement
provides an athermal mounting for the mirror combined with sufficient stiffness
to isolate it from the risks of vibration over the drive frequency band.
(Estimates of the fundamental frequencies of the assembly are given below).
The unit is
mounted on an aluminium block which has three threaded feet giving adjustment
for height, rotation and tilt (drawing nos. 03A00I1/2). Each foot is locked by
a lock nut. Three steel inserts function as location surfaces to contact the
eccentrics and three reference pads are provided for the measurement of the
height. The whole assembly is clamped to the chassis plate with three Kipp
4370-10A hook clamps.
The
ThermoTrex unit will be fixed to the base with cap screws. The pattern of
mounting holes will be dictated by ThermoTrex, so is not shown in the diagrams.
The design
of a suitable dust cover over the mirror will be the responsibility of the FSM
supplier.
approximately
10 kg.
(of mirror
and mount) 0.725kg.
Details of the FSM housing were not available at time of
writing.
See drawings no. 03A10M, 03A11M and 03A03I.
Flexures are to be of
Invar brazed under vacuum to the Invar ring. The assembly is attached to the tip/tilt plate with six M4 cap screws;
two per flexure.
The mirror
will be bonded into the ring using a structural epoxy such as Devcon 2-Ton or
Loctite 3295. Devcon 2-Ton has a bond strength of 15.5N/mm2 in shear
and high chemical and water resistance. The bond area is 7225mm2.
The choice of adhesive will be subject to checks on the tolerance to dilute
mineral acid used in the removal of reflective coating prior to recoating.
Estimates for the fundamental frequency of vibration for the mirror/flexure assembly, based on the formulas of Vukobratovich, are given below. Prior to bonding the mirror into the mounting ring, tests on the performance and vibration of the FSM unit will be made using an aluminium dummy mirror mounted in the Invar cell.
Drive frequency of FSM (maximum)
wd= 1.57 E3 rad.s-1
= 2.50 E2 Hz
Estimates of the first fundamental frequency of vibration of the flexure mounted OAP:
E
= 1.47 E11 Pa, a = 1 E-3 m, b = 5 E-3 m, l
= 1.1 E-2 m, m = 0.725 kg.
Parallel to the surface normal
(z-axis)
wz=(3Eab/ml)1/2 rad.s-1
=2.352 E4 rad.s-1
=3.74 E3 Hz
.In the plane of the mirror
wx,y= 1/2 .(6Eab(a2+ b2)/m
l3)1/2
rad.s-1
= 5.45 E3 rad.s-1
= 8.67 E2 Hz
.About normal to mirror
wzz = (3Eab3)/m l3)1/2 rad.s-1
= 1.069 E4 rad.s-1
= 1.701 E3 Hz
The flexure
mounting is sufficiently stiff for the mirror to be considered isolated from
vibration under the criterion wk=Öwd .
Since the drive signal to the FSM is noise, any vibration found in the mirror mount during trials would have to be controlled by the introduction of damping into the mount. This could be done with an annulus of nitrile rubber between the Invar mounting ring and the tip-tilt plate.
The
difference in coefficients of thermal expansion of the Zerodur mirror housing
and aluminium tip-tilt plate results in a maximum relative radial contraction
of 52mm over 35C. Without details of the ThermoTrex tip/tilt
plate detailed calculations of the stresses induced in the mirror are not
possible. However, an upper limit on the forces deforming the mirror can be
found under the simplifying assumptions that the tip/tilt plate is perfectly
rigid and ignoring the stiffness of the mounting ring and the thickness of the
adhesive.
Under these
assumptions each flexure exerts a radial force of 57N through the centre of gravity of the mirror. The results of
an FEA of the mirror deformation due to the application of a point force
of 57N gives a surface deformation of
less than 1nm P-V. This level of deformation will not degrade performance.
The diameter
and thickness of these two mirrors are the same, so they share a common design
of mirror housing and method of mounting. Both mirrors have three Invar pads
bonded to their edges at angular separations chosen for minimum surface
deformation (drawing no. 05A19A). The mirror housing has three tangent bar
flexures machined integral to it and the mirror is secured into its housing by
six M3x8 mm cap screws passing through the flexures and into the Invar pads
(drawing no. 05A03I3). Access to the mirrors is gained by removing the back
cover and then the bezel.
Dust covers
will be sleeve type perspex covers fitting over the mirror housing.
Both mirrors are positioned semi-kinematically, the second OAP having six degrees of freedom and the fold mirror one.
Refer to
drawings 05A03X and 06A03I1 for illustrations of the complete assemblies.
Remark: The
fold mirror is considerably oversized for the optics in the current layout.
This has been done for two reasons:
1.
So that
the mirror may be used in conjunction with a Xenetics deformable mirror in
place of the Electra mirror and with conjugation.
2.
There
may be a requirement for the use of white light interferometry to monitor the
DM segments. If so, the fold will also have to be used in the optical path of
the interferometer.
Approximately
8.8kg.
Zerodur for
OAP2 and Pyrex for the fold.
66N compression (on the two lower flexures).
Loading 0.11N/mm2.
To within error the following
estimates apply to both mirrors.
E = 7 E10 Pa, a = 1 E-3 m, b = 2 E-2 m, l = 2 E-2
m, m = 2.06 kg.
Parallel to plane of mirror:
wz>(3Eab3/ml3)1/2 rad.s-1 =1 E4 rad.s-1 =1.59 E3 Hz
In the plane of the mirror:
wx,y>3/2(Eab/ml)1/2 rad.s-1 =2.76 E4 rad.s-1 =4.4 E3 Hz
About the normal to the centre:
wzz>(6Eab/ml)1/2 rad.s-1 =8.74 E3 rad.s-1 =1.39 E3 Hz
The mirrors
may be considered isolated from the dominant frequencies of vibration (1Hz,
50Hz and 100Hz).
The dichroic unit houses the dichroic wedge and field lens in an aluminium block on a three point, adjustable mount locating against three eccentrics giving a semi-kinematic mount adjustable in all six degrees of freedom. (Drawing nos. 07A031, 07A032 and 07A04A.)
The field lens and dichroic are retained by bezels with three-point contact on the glass.
Protection from dust will be by a sleeve type cover fitting over the unit.
The changes to the
layout of the OMC since PDR have forced the repackaging of the calibration unit
so that it will fit into a much smaller area of the bench whilst housing
enlarged mirrors for calibration with the conjugation optics.
The optical layout of the calibration unit remains essentially unchanged since PDR, but the fold mirror has been removed so that the integrating sphere can be positioned on top of the unit.
From the mechanical point of view the unit has undergone fairly extensive revision and the design is not yet complete. The revised form of the layout is shown in drawing no. 15A04A. The principal mechanical changes since PDR are the following:
1. Integrating sphere assembly, including the lamp and filter wheel, will be a separate unit located on top of the calibration unit which lifts off to be replaced by the alignment laser. The mount will be kinematic.
2. The laser unit locates on the same kinematic mount as the integrating sphere assembly. With the laser in this position, it can be fitted with the singlet lens focusing the beam to a point at the conjugate to the Nasmyth focus, the beam divergence being the required f/10.
3. A second laser, identical to the first but without the lens could be provided to give a pencil beam entering the OMC optical train at the Nasmyth focus for the purposes of alignment. This has been requested by RGO.
4. The beam splitter now moves horizontally out of the beam rather than vertically down towards the mirror surface. (Translation stage not shown on the drawing.) The need for precision motion is thereby removed.
The unit will be mounted on a shelf extending the GHRIL optical bench as before, but the shelf can now be made sufficiently small to bolt directly to the bench top. The shelf surface will be flush with the bench top.
In this section there are two co-ordinate systems used. (See drawing 00A051)
A global system (xg, yg, zg).
The origin of this system is defined by an on-axis aperture (T1) in a focal plane mask which is mounted kinematically on the OMC baseplate. The +ve zg axis is the line from T1 to a target T2 fixed permanently to the OMC baseplate next to OAP2. The +ve yg axis vertical from T1, and the xg axis horizontal to the left from T1 when looking towards OAP1. Angles in this frame are qg in the zgxg plane anti-clockwise from the zg axis and fg in elevation, positive above the zgxg negative below.
A local system (xl,yl,zl) which follows the main optical path. zl is the local direction of the principle ray, yl is vertical as before and xl is horizontal.
The basic approach to
the alignment of the instrument is to use metrology to position components on
the chassis plate and then, in the laboratory, to perform a series of optical
tests to ensure that performance is to specification. Each component is located
semi-kinematically to allow disassembly and subsequent reassembly without the
need for realignment.
The axis of the chassis
is defined to run parallel to the optical rail (to within a tolerance of ±0.1 milliradians). All angles are measured with
respect to the rail. An origin is defined to lie at the centre of the Nasmyth
focus pivot hole. Thus a co-ordinate system is defined with respect to which
the positions of all components can specified and measured using the
co-ordinate measuring machine.
Prior to assembly of the
instrument the nominal position of each optical surface will be found by ray
tracing using the measured powers, thickness, off-axis distances etc. of each
component.
Each component will go
through some or all of the following stages in mechanical alignment:
1. Assembly.
2. Measurement and recording of the position and orientation of the surface
relative to the datum surfaces on the component base.
3. Set the eccentrics on the chassis plate to give the required position and orientation of the mirror (see drawing no. 08A06I ). Record the settings of each eccentric.
4. Set the elevation, height and rotation of the surface about the pole using the adjustable feet.
5. Clamp the component to the baseplate
Measurements of the position of surfaces and components will be done using the Mitotoyo co-ordinate measuring machine which has a resolution of 5mm. Measurements made with micrometers will be assumed to be accurate to ±10mm. For the purposes of the procedures outlined below it is assumed that all errors add.
NB: In clamping components to the chassis it is important the clamps are not over tightened leading to distortion of the chassis plate. If over tight, the clamps may also pull the component away from the stops, so leading to misalignment. Only sufficient torque should be applied to the clamp screws to keep the component in position.
The focal plane unit is
to be positioned at a height of 150mm above the bench on the axis defined by
the focal plane pivot. Alignment is done with the unit on the kinematic base
with the chassis plate clamped to an optical bench.
Following assembly (see
diagrams 02A03I1/2) the unit is place on the kinematic mount base and the
height of the calibration mask, and rotation about the z-axis are measured
using a travelling microscope. Elevation is non-critical and could be checked
with a square. Adjustment is made with the three threaded feet and which are
then locked with lock nuts. The unit is clamped to the base with the thumb
wheel before a final check that the position of the mask is correct.
Preliminary set-up and alignment of the FSM is done using the co-ordinate measuring machine and a travelling microscope.
Mount the mirror support and measure its position relative to the housing and the six datum surfaces on the base (co-ordinate machine, error ±10mm). From this data and the measured thickness of the mirror the position of the pole of the mounted mirror relative to the datum surfaces can be found. A record of the position of the mirror in the FSM unit should be kept so that, following removal of the mirror for re-coating, it can be replaced and its position checked. The replacement errors will be translation in the plane of the mirror and rotation about the normal. To this end there will be reference marks on the mounting ring of the mirror whose position relative to the housing and base can be measured with a travelling microscope.
Using the calculated
optimal position for OAP1 and the measured position of the mirror cell in the
FSM drive unit, calculate the required position and angle for the FSM. Put the
chassis on the co-ordinate measuring machine and, using the set-up illustrated
in drawing 08A06I, adjust the eccentrics, setting the
distance of the mirror from the focus, the off-axis distance and y-rotation.
Adjust the
height, elevation and rotation about the polar normal of the surface with the
three feet. A full turn gives 1.0mm, 0.32º and 0.41º of motion respectively so
that resolutions of 50mm, 0.28 mrad and 0.36 mrad should be
easily attainable. Lock the position of the feet.
Following optical
tests and any fine tuning found necessary, record the settings on the three
eccentrics. Remove the FSM from the chassis, place it on the optical bench or
surface table and measure the height of the three reference surfaces. For this a step micrometer and gauge block
will suffice and may be provided at the telescope.
The fold mirror is only adjustable in tilt. Clamp the chassis to the optical bench. Place the mirror against the fixed stop on the chassis and set an alignment telescope on the bench to view the mirror face on. Adjust the tilt of the mirror until it retro-reflects. Clamp the mirror to the chassis and re-check alignment.
In the initial laboratory set-up a plane mirror will be used in place of the ELECTRA DM.
Using the same process as for the FSM adjust the eccentrics until the angle and offset are nominally correct. The mirror is placed against the eccentrics and the fixed stop on the chassis plate. View the mirror with the telescope and adjust the tilt to retroreflect. Due to constraints in height, adjustment in tilt will be by shimming of the base. Fine adjustment of its position is done optically using the laser in the final stages of alignment.
The mirror is mounted in the housing and its position within the housing measured by reading the step between the back of the mirror and its housing with a step micrometer at each of the three flexures. This data is for reference when re-assembling the mirror after recoating.
With the co-ordinate measuring machine measure the separation from the back of the mirror to the reference surfaces on the mount. This data and that for the thickness, off axis distance and focal length of the mirror supplied by the manufacturer will be sufficient to specify the required orientation of the mirror unit. (The position of the pole and angle of the mirror are fixed at the design stage.)
Set the chassis plate on the co-ordinate measuring machine and adjust the eccentrics as above. Set the height, tilt and rotation about the pole of the mirror. Height and rotation about the normal can be measured with a travelling microscope. Tilt need be only approximate at this stage and is set accurately during the final optical alignment; it is measured with the co-ordinate machine.
The final adjustment of the mirror is done optically to align the pupil at the DM to the WFS.
Set the eccentrics in the usual way to define the angle and position of the dichroic relative to the local optic axis. Record the settings on the eccentrics. Clamp the dichroic unit in position on the chassis and set the height of the unit.
At the optical bench, clamp the chassis down and place the dichroic unit against the eccentrics. Set an alignment telescope on the bench and view the dichroic face on. Adjust the tilt of the unit so that the dichroic retro-reflects. Measure and record the height at each corner of the unit.
The alignment of components by metrology gives lateral positions accurate to ±100 mm and angular accuracies of ±1 milliradian. For the overall alignment of the OMC this lateral position tolerance is acceptable in terms of focus, position of images and, for the powered surfaces, the resulting angular mis-alignments - these are 0.15 and 0.10 milliradians for OAP1 and OAP2 respectively. The angular accuracy however needs to be improved by optical alignment - a ±1 milliradian error on each of the 5 reflecting surfaces in the OMC can combine to give a field offset at the output ports of 8.7 mm and an offset of 0.52 mm (»1/2 sub-aperture) of the DM image at the lenslets.
The components are placed on the OMC chassis using semi-kinematic locations and the OMC chassis clamped to the table at fixed locations. This should result in the lateral and angular accuracies, after re-assembly of the OMC on the GHRIL table, of ±10mm and ±0.1 milliradian respectively. Measures, such as ensuring the table is clear of particles which might distort the baseplate and tightening the clamping screws to a constant torque, should obviously be taken to ensure these accuracies are achieved. The resulting shifts in field position and DM-lenslet alignment after re-assembly should be <1/10 of those in the previous section - i.e. <0.87 mm and <1/20 sub-aperture. Errors of this magnitude can be accommodated by offsets of the WFS pickoff and DM; the offsets will be calibrated each time NAOMI is installed at GHRIL.
Given a mechanically aligned system the optical procedures are designed to improve the angular alignment of the OMC optical components to bring the OMC optical input and output within the tolerances specified in the relevant ICD's. For an AO system such as NAOMI both field and pupil alignments are critical to the correct operation of the system the alignment procedure ensures both are achieved to sufficient accuracy.
The measurements are made by eye, using a test alignment telescope, and graticule + CCD. Most of the measurements can be carried out in the GHRIL; the most obvious exception is that it is not possible to place an alignment telescope in front of the OMC when it is located next to the de-rotator.
The optical alignment and testing of the OMC falls naturally into two halves - before and after the DM.
Alignment before the DM is to ensure that
a) the focus of OAP1 is co-incident with the on-axis input focus as defined by the focal plane mask, T1
b) the WHT pupil is aligned with the centre of the DM.
Alignment after the DM is to ensure that
a) the exit pupil (an image of the DM) of the OMC at the WFS pickoff lies on a defined axis to which the WFS can be aligned
b) the on-axis image of an object at the Nasmyth focus/OMC input focus lies within a specified error box at the WFS pickoff
The aim for the optical alignment is to improve the angular accuracies for each component to ±0.1 milliradian i.e. approximately the same as the repeatability after re-assembly. As stated in the section on alignment stability the final alignment is achieved by offsets of the WFS pickoff and DM.
Alignment of the OMC is carried out with respect to 2 axes each defined by 2 targets and by the use of a flat mirror, mounted on the optical rail between the fold mirror and OAP2, used as a retro-reflector of the collimated beam between the OAP's.
The input targets are as described above with
T1 (the input focal plane mask) at xg= yg= zg= 0 and
T2 at xg= yg= 0 zg=1700 mm
Components are internally aligned with respect to this T1T2 axis which is then used to align the OMC to the telescope.
The output targets are
T4 at xg=-96.60 yg= 0 zg= 1537.53 and
T3 at xg= 100.86 yg= 0 zg=1030.47.
fg(T4T3)=158.723o.
Note that the axis T4T3 is used to define the axis on which the image of the DM formed by OAP2 lies. This will be close to but not necessarily the same as the principle axis of on-axis light from the telescope. Also the dichroic substrate has a small wedge angle and this will deviate the light by an angle of 0.107o (at 633nm) so that
fg(output) = 158.615o.
Ray tracing has been carried out for both OAP's using parameters which are at the end of the range of manufacturing tolerances. These are ±0.5% in radius of curvature and ±5mm in off-axis distance. It is possible within these tolerances to have fixed off-axis angles for OAP1 and OAP2 of 14o and 21.277o respectively, and maintain high Strehl ratios (>97%) within the science field.
Accordingly the centre of the clear aperture of the OAP1 will be placed at a fixed position in xg and yg and an allowance made of ±3mm in its position along the input optical axis (zg) to place its focus at T1. The azimuthal angle of OAP1 will then be calculated to give an angle of 14o between the reflected principle ray an zg given its as manufactured ROC and off-axis distance. The FSM eccentrics are adjusted to give place OAP1 at this angle.
OAP2 is placed at a fixed position in xg, yg and zg and as for OAP1 its azimuthal angle adjusted to give an angle of 21.277o between input and output light paths.
The accuracy of alignment by metrology is ±1 milliradian. The optical alignment procedures will adjust the mirror positions by »1 milliradian from their nominal positions. As shown in the PDR document (page 17) tilting the OAP's by 0.1o (1.75mrad) reduces the Strehl by <1% indicating that the proposed alignment method will deliver images with small/negligible wavefront errors generated in the OMC.
Resulting from these alignments of the OAP's are the following
a) The position of the pupil at the DM will move by up to ±0.73mm in xl as OAP1 is moved along zg to accommodate for a radius of curvature away from the nominal value.
b) The position of the pupil image will move up to ±1mm along the optical axis. This shift is small enough to be ignored and the DM can be placed at a fixed location.
c) The size of the pupil image at the DM will be 56 ±0.28 mm
d) The position of the output focus in both the WFS and science arms will be ±5mm along the respective output axes.
e) The output f/ratio will change by up to ±0.5%. The focal length of the WFS collimator will be altered to match the as manufactured OAP's.
· Test alignment telescope (TAT) capable of focussing from infinity to about 500mm. It also needs to be capable of angular alignment of components by retro-reflection to ±0.1 milliradian (=20 arcsec)
· The NCU has co-aligned f/10.94 and collimated pencil laser beams
· An optical flat (OF) to be used as a retro-reflector between Fold2 and OAP2
· Graticule and CCD camera to observe it.
· Accurately relocatable mount at WFS pick-off focus for graticule and CCD.
· Optical components have located by metrology. (See section….) The principle means for alignment is by metrology of optical components, their positions with respect to reference surfaces on their mounts and the positions of locating eccentrics on the OMC baseplate
· Laboratory set up same as at GHRIL except
a)
TAT can be positioned at the input of the OMC
This is also possible at GHRIL with the OMC positioned away from the derotator
b) Image quality can be assessed using an interferometer and/or a WFS
c) The dummy mirror will be used for testing of the OMC at ROE and for initial stages of integration with other parts of NAOMI
· Input and output axes of the OMC defined by two sets of targets (see section…)
· A target (T5) mounted on the optical rail
|
|
|
Comments |
|
1. |
Clamp OMC baseplate to optical table |
The baseplate does not have to be placed at the position it occupies on the GHRIL table. The base of the NCU is now flush with the table and it can therefore be placed on the table. Space is needed for the TAT to be placed at both the input and output of the OMC optical train, along the axis of the optical rail and on a normal to the Fold mirror. |
|
2. |
Align axis of TAT to be parallel (in azimuth) with the optical rail by using T5 in different positions along the rail. |
TAT axis should also be set parallel to table. |
|
3. |
Place OF on rail and align perpendicular to the table and optical rail using TAT |
By making the OF perpendicular to the optical rail it will also be perpendicular to the input axis |
|
4. |
Place TAT at input and align its axis to T1 and T2. |
|
|
5. |
Locate dummy DM mirror against OMC and clamp. |
The DM is the next component to be placed on the table for ease of handling. It is much larger than other components and its location means that it would be difficult to manoeuvre if the Fold or FSM were in position |
|
6. |
Move DM to mid-point of movements in xl and yl |
|
|
7. |
Locate Fold mirror on baseplate and clamp. |
Adjust perpendicular to table using TAT |
|
8. |
Locate FSM on baseplate and clamp |
|
|
9. |
Set FSM to mid range in tip and tilt |
|
|
10. |
Place centre of DM on the axis of the TAT using mechanical adjustments of the FSM |
TAT is aligned to axis defined by T1 and T2 so this step |
|
11. |
Place Nasmyth focal plane mask on the baseplate and illuminate the on-axis pinhole |
Illumination can be NCU f/11 laser beam if it is available or an interferometer to measure image quality. Otherwise a laser and tissue paper diffuser should suffice. |
|
12. |
Align dummy DM mirror to retro-reflect image of the pinhole back on itself |
Requires OF on the optical rail with reflecting surface towards fold mirror. DM is adjust in azimuth by eccentrics and in elevation by shimming. |
|
13. |
Align TAT axis to T3-T4 |
|
|
14. |
Locate dichroic/field lens unit on OMC baseplate and clamp |
|
|
15. |
Measure offsets (xl, yl) of T3 and T4 from TAT axis |
The dichroic introduces a lateral displacement of 1.60 mm and a deviation of f=0.107o in the output. An de-centred field lens can also deviate the beam. |
|
16. |
Locate OAP2 on OMC baseplate and clamp |
|
|
17. |
Re-align TAT to T4-T3 as seen through the dichroic/field lens |
TAT now aligned to output axis at the WFS pickoff |
|
18. |
Adjust OAP2 to bring image of the DM onto TAT axis |
|
|
19. |
Place graticule/CCD mount on table and position to give best image on the graticule. Fix mount w.r.t. baseplate |
For measurements at GHRIL the graticule will be the reference, to check on image alignment, which is replaced at the same position relative to the OMC. |
|
20. |
Measure image quality |
Record CCD image for comparison with similar images taken in the GHRIL |
|
21. |
Measure offset (xl, yl) of pinhole image from TAT axis |
This offset should be small because, by placing the centre of the DM on the input axis, the principle ray for field imaging should be coincident with the principle ray for DM to exit pupil imaging |
Alignment of mirrors to 0.1 milliradian using an alignment telescope with retro-reflector is easily achievable.
Alignment of the DM to the input optical axis will be to better that 0.1mm, this residual offset can be removed using its xy stage and error signals derived from the WFS.
Adjustment of the DM by retro-reflecting a point source at Nasmyth focus will give an error of »0.15milliradian for 0.1mm offset between object and reflected image.
Combining these errors means that the final image offset at the science port and WFS pickoff will be ±1mm (3 arcsec) and the DM image offset at the lenslets will be ±0.1 mm.
The above will be the initial procedure for aligning the OMC but it can equally be carried out at GHRIL, except that will not be possible to view the input optics using the TAT with the OMC in its operational position. Alternatives to this are
a) Use the NCU pencil beam (See section …) to align the DM to the input optical axis
b) Align OMC away from the Nasmyth focus
c) Set up a mirror in front of the Nasmyth focus to allow the TAT to be used
The recommended method is a) because b) requires the detailed effects on the alignment of the non-flatness of the GHRIL table be fully evaluated which is not possible with the information available* and c) would require the design of a suitable mirror mount off the end of the table.
The procedure below is carried out when installing the system at GHRIL prior to the installation of individual components as described above.
Refer to drawing 00A10I.
1.
Slide the pivot block (08A10M), with the pivot target
in place, into position at the Nasmyth focus. Accuracy required:±0.1mm
as viewed through the alignment telescope. Bolt the block to the optical bench.
2.
Remove the target.
3.
Slide the chassis plate (01A11M) under the pivot block
and insert the pivot pin (08A11M) through the block and into the chassis plate
pivot hole.
4.
Fix the chassis plate target (08A16M) in place and,
viewing the target through the GHRIL alignment telescope, swing the chassis
into alignment. The accuracy required is modest, 1mm misalignment of the target
represents a 0.65 milliradian error in the alignment of the chassis plate with
the telescope axis.
5.
Clamp the chassis plate to the optical bench using
clamps 01A20M.
The chassis plate is now ready for the positioning of the optical components, the procedure for which is the same as in the lab set-up, except that only minor adjustment should be needed to accommodate misalignment due to surface flatness differences between the test and GHRIL optical benches
If, following the complete assembly of the OMC it is found that the chassis is not internally aligned follow the following steps.
1. Check that the chassis plate is firmly clamped to the bench around every point of contact between an optical component and the chassis plate.
2. Inspect each component on the chassis to ensure that it is in firm contact with its eccentric stops and clamped down.
A preliminary survey of the table by Tom Gregory shows that there is a »150mm roll down of the surface on the 50mm around the edge of the table and that elsewhere p-v deviations are »100mm over distances of 300mm. i.e local tilts can be »0.3 milliradians which would give a possible maximum image offset at the science port/WFS pickoff of 3mm and an DM image offset at the lenslets of 0.15mm. However the effects of non-flatness will be repeatable and therefore the expected alignment for the system at GHRIL will be in the operating position using the NCU.
The two sections below are documents which were produced to describe the introduction of a double pass fold mirror in front of the DM and the changes in the dichroic/field lens.
A new section estimates the non-common path errors for the whole of the OMC optics.
Internal document number: AOW/OPT/MW/02/08/97/Introduction of fold mirror
Version Date: July 22, 2003
This document quantifies three effects the introduction of a fold mirror (see response to the OMC PDR report) has on the optical/scientific performance of NAOMI. The effects are all small (<10%) and for the first two it is unlikely that they will have a measurable effect on the quality of observations made with NAOMI. Given that the introduction of the fold mirror is the only way of producing a mechanically feasible design, the losses described here are all scientifically acceptable.
There is a decrease in throughput to the WFS of 3% which will have a direct effect on the sky coverage, reducing it by the same amount. To be balanced against this is difficulty of putting the DM on a rigid enough mount to ensure that the overall performance is not degraded to a greater extent by vibrations than by lack of photons. Other reasons for positioning the DM away from the crowded focus do not directly affect the optical/scientific performance of NAOMI.
As would be the case for any layout, all easily implemented means (e.g. improving AR coatings, enhanced Ag coatings) of increasing the throughput are being pursued.
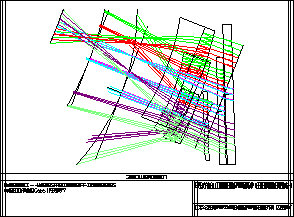
Figure 1 is a sketch of the position of the fold mirror, DM and NCU. It also shows the position of mirrors which could be added to allow the DM surface to be monitored by an interferometer.
The fold mirror will have three effects on the performance NAOMI
a) Non-common path wavefront errors. These can be made negligible by specifying the fold mirror to have a flatness of l/20. See section …
b)
The effect on emissivity of introducing a fold mirror in the
FSM-DM and DM-OAP2 paths is given in Table 1 below. The NAOMI emissivity
increases by 4% and that of the overall system by 3.4%.
Integration times will have to be increased by 7.4% in order to maintain the
S/N of the K-band observations when this increase in emissivity, the decrease
in transmission and the contribution to the background from sky emission are
taken into account.
|
e |
NAOMI |
NAOMI + fold |
NAOMI + telescope |
NAOMI+ telescope + fold |
|
|
|
Aluminium |
0.04 |
0 |
0 |
3 |
3 |
|
|
Silver |
0.025 |
2 |
4 |
5 |
7 |
# surfaces |
|
Dichroic |
0.06 |
1 |
1 |
1 |
1 |
|
|
Electra DM |
0.06 |
1 |
1 |
1 |
1 |
|
|
System transmission |
|
84.0% |
79.8% |
68.9% |
65.5% |
|
|
System emissivity |
|
16.0% |
20.2% |
31.1% |
34.5% |
|
|
System emissivity with central hole
contribution |
|
|
|
36.7% |
39.9% |
|
Table 1
c) Throughput of NAOMI. Table 2 below is table 6 from the OMC PDR document. There are two extra columns - Column 5 gives the NAOMI transmissions with reflectivity for the mirrors of a Balzers coating SILFLEX MKII and the anti-reflection coating being that of the RGO coating ARGO3 - see WFS PDR document. Column 5 also takes into account the removal of the dichroic compensating plate, see AOW/OPT/MW/01/08/97. Column 6 gives the transmissions when the extra double fold is included. The effect of the fold is to reduce the transmission by 3%, but putting in actual AR and mirror reflectivities brings the estimated transmissions to within 1% of the requirements.
|
Mode |
Bandwidth (mm) |
OMC WP requirement |
PDR values |
With new coating transmissions |
With fold |
|
1 |
0.5 to 0.8 |
0.58 |
0.59 |
0.595 |
0.58 |
|
2 |
0.5 to 1.0 |
0.83 |
0.84 |
0.848 |
0.82 |
Table 2
Figure 1
An optical path has been identified for an interferometer beam
to be used in monitoring the DM surface should this be necessary. A sketch of
this is shown in Fig.1. The beam diameter at the DM is 90mm as required for a
Xinetics mirror
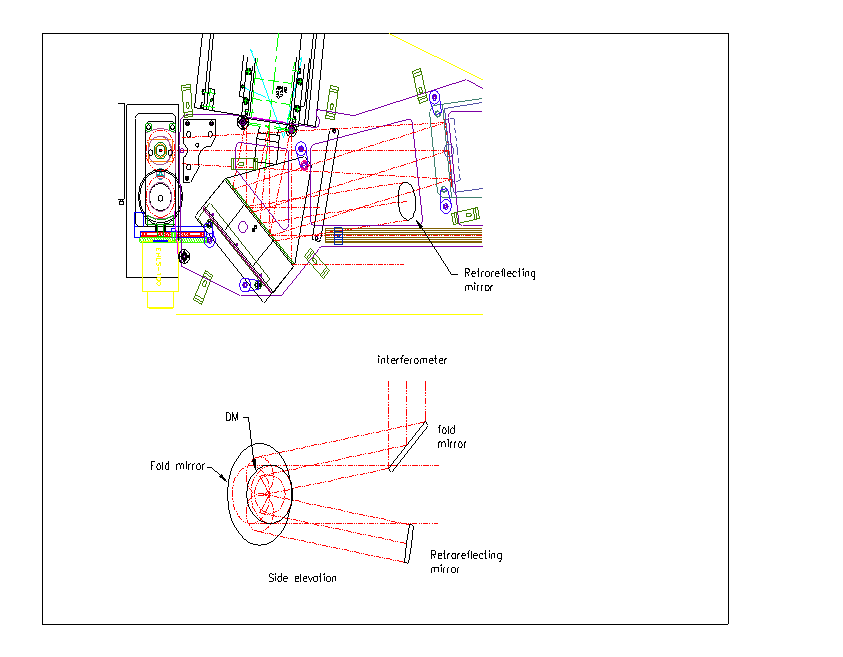
Figure 1
Shows area around the Nasmyth focus and possible location
of mirrors to allow optical monitoring of the DM surface.
New field lens for WFS pickoff/optical port
Internal document number: AOW/OPT/MW/03/08/97/Proposal, Field lens
Version Date: 05/08/97
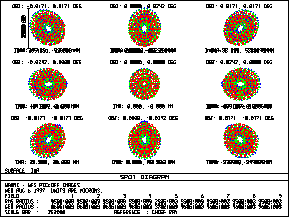
The design as presented at the PDR consisted of the dichroic substrate, a compensating plate and a field lens whose back surface is 20mm from the WFS pick-off focal plane. The spot diagrams at the centre and at 45° intervals around the edge of the 2.9 arcmin fov (Figure 4 of OMC PDR document) are shown here in Figure 1. The three wavelengths used are 0.5, 0.7 and 1.0 mm. Other data relevant to this design are given in Table 3.
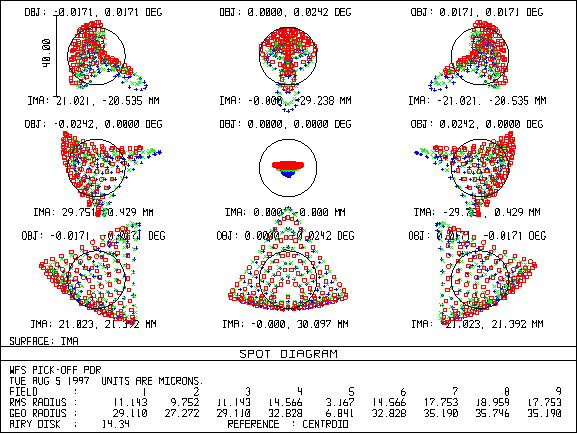
Figure 2
|
Field curvature |
r=208 mm |
|
|
|
Field positions arcmin |
Angle of principle ray to the surface normal at focus m radians |
Angle between principle rays at 0.7 mm and 0.5mm m radians |
Angle between principle rays at 0.7 mm and 1mm m radians |
|
0, 0 1.45, 0 -1.45, 0 0, 1.45 0, -1.45 Range of angles across field |
-78 -140 -140 838 -78 1232 |
-1 -2 -2 41 45 |
1 0.16 0.16 -88 88 |
The non-telecentricity of the system across the field gives a maximum shift of the DM image at the lenslets of »161mm. This is an approximation however and raytracing to the lenslets is required to get an accurate value.
I have investigated various options for the dichroic/field lens and have found that a design with the field lens 20mm from the dichroic rather than 20mm from focus improves most aspects of the performance. I have also found that it is possible to leave out the compensating plate (As I recall this was inserted when we had a larger angle of incidence at the dichroic and lateral colour was a problem) with no significant degradation of image quality and telecentricity of the system.
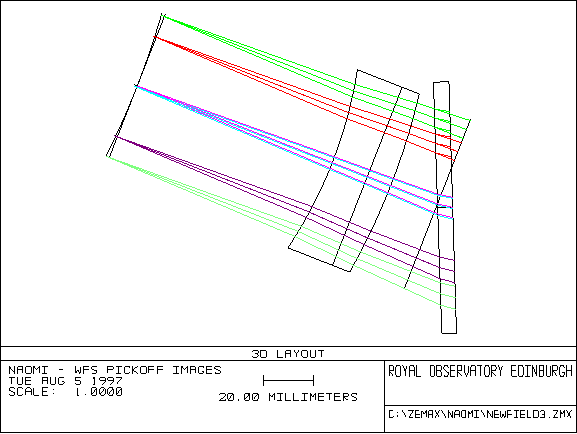
The design parameters for the new dichroic/field lens are given in Table 2 as per the Zemax lens data editor and the layout is shown in Figure 2. The back focal distance of the field lens is >80mm so the space around the WFS pickoff is much less congested.
The spot diagrams for the new design, at same field positions and wavelengths (0.5, 0.7 and 1.0 mm) as used in Figure 1, are shown in Figure 3.
The same data as given in Table 1 for the PDR design are given in Table 3 for this design. Note that the range of angles of the principle rays as the guide star moves across the field is reduced by 35% and that the radius of the field at the pickoff increases by 50%.
The spot diagrams show that there is an improvement in image size of between 30 and 100% with the new design. The Zemax estimated Strehl ratios for these two sets of images are given in Table 4.
There is an increase in the angle between the principle rays at 0.5mm and 1.0mm compared to the 0.7mm principle ray but the resulting, colour dependent, shift of the DM images at the lenslet array is small - »10mm.
|
Component/ surface type |
Radius |
Thickness |
Glass |
y-decentre |
x-axis rotation |
|
Coord break |
|
|
|
|
-23 |
|
Dichroic |
Infinity |
6 |
BK7 |
|
|
|
Coord break |
|
|
|
|
-0.1865 |
|
Dichroic back surface |
Infinity |
0 |
|
|
|
|
Coord break |
|
20 |
|
-1.605 |
23.2962 |
|
Field lens 1 |
270.67 (vex) |
10 |
LLF6 |
|
|
|
Field lens 2 |
Infinity |
15 |
BK7 |
|
|
|
Field lens 3 |
177.15 (cave) |
83.488 |
|
|
|
|
Image |
330.4 |
|
|
|
|
Table 4
Figure 3
|
Field curvature |
r=326mm |
|
|
|
Field positions arcmin |
Angle of principle ray to the surface normal at focus m radians |
Angle between principle rays at 0.7 mm and 0.5mm m radians |
Angle between principle rays at 0.7 mm and 1mm m radians |
|
0, 0 1.45, 0 -1.45, 0 0, 1.45 0, -1.45 Range of angles across field |
-2.9 257 257 788 788 791 |
-16 -15 -15 -79 50 |
-16 -14 -14 -162 134 |
Table 5
|
Field Position x |
-1.02 |
0 |
-1.02 |
-1.45 |
0 |
1.45 |
-1.02 |
0 |
1.02 |
|
Arcmin y |
1.02 |
1.45 |
1.02 |
0 |
0 |
0 |
-1.02 |
-1.45 |
-1.02 |
|
PDR design |
0.67 |
0.80 |
0.67 |
0.42 |
0.97 |
0.42 |
0.22 |
0.20 |
0.23 |
|
New design |
0.90 |
0.91 |
0.90 |
0.87 |
0.99 |
0.87 |
0.87 |
0.90 |
0.88 |
Figure 4
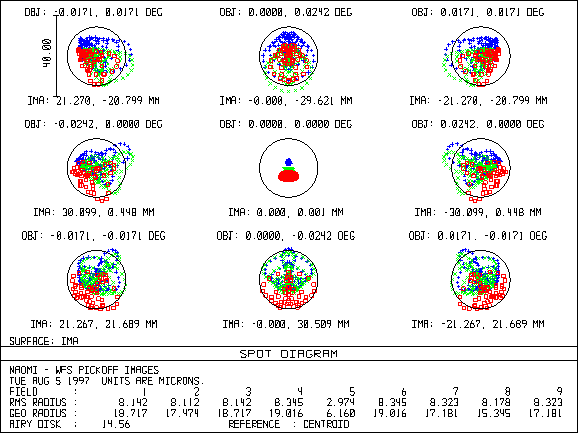
Table 6
Strehl ratios for images at the edge of the field of view
The three possible sets of ghost images arising from 2 reflections within the field lens are shown in Figure 4, with the corresponding spot diagrams. It can be seen that apart from the on-axis case there will be displacement of the ghost image away from the main image. Therefore, assuming that the brightest object in the field is used as the guide star, the worst case is on-axis where the 3 ghost images will appear as an out of focus background. The encircled energy diagrams for the images in Figure 4 show that a good approximation is to assume that the light is uniformly distributed across a disc with a radius given by the 'GEO RADIUS' of the images. For the on-axis case this gives images with diameters of 7.4, 1.5 and 7.2 mm. The proportions of each of these images which passes through the WFS field stop (diam=2mm) are therefore 0.073, 1.0 and 0.077 respectively. As an example of an AR coating Melles Griot HEBBAR/075 has a reflectivity of 2% at 500nm and <1% from 525nm to 900nm. A fixed value of 1% is taken for our wavelength range. The surface between the two lenses will have a reflectivity of »0.5%. The total ghost intensity which reaches the WFS detector will be
0.073
* 0.01 * 0.005 + 1.0 * 0.01 * 0.01 +0.077 * 0.005 * 0.01 = 1.075 x 10⁻⁴
Nearly
all this light arises from the second ghost image all of which passes through
the field stop. At the lenslet array the spot size of this ghost image is 4.8mm
diameter so that the background caused by this ghost image will only occur in
the centre subapertures and will be (8/4.8)2 * 1 x 10-4 of the main
image = 2.8 x 10⁻⁴. This light is spread over a circle d»400
mm or 16 x 16 pixels. i.e.
there will be a background which peaks in the middle of the array of images at
the WFS detector and slowly decreases to the edge. The intensity and structure
of this background mean that it is unlikely to significantly affect the
performance of the WFS. Figure 5
Internal document number: AOW/OPT/MW/22/10/97/Non-common path and non-correctable wavefront errors
Version Date: July 22, 2003
The former are due to the footprints of different parts of the science fov being displaced with respect to each other at the various optical surfaces. Non-common path errors between science and WFS paths are assumed to be taken out by offsets in the WFS. The table below gives, for each component, the specified RMS form error and the offset between beams from the centre and corner of the science fov in mm and as a fraction of the mirror aperture.
|
Component |
Specification on surface |
Beam offset Centre to edge of fov |
Beam offset mirror diameter |
|
FSM |
12 nm RMS |
6.5 mm |
D/11.5 |
|
Fold 1 |
8 nm RMS |
2.2 mm |
D/170 |
|
DM |
10nm RMS/seg |
0.0 mm |
|
|
Fold 2 |
8 nm RMS |
3.0 mm |
D/50 |
|
OAP 2 |
12 nm RMS |
17.54 mm |
D/5 |
|
Dichroic |
12 nm RMS |
11.0 mm |
D/7 |
For the DM and fold mirrors I think we can assume that the non-common path errors are negligible. i.e the spatial extent of the form errors on the fold >>3mm. For the FSM, OAP2 and dichroic I include the whole RMS in the WF variance calculations.
The non-correctable errors are due to errors not taken out by the DM ie they occur on spatial scales of about 1/7.35 of the beamsize and less. Here the whole RMS/segment for the DM needs to be included. For the other components the size of the beam due to one segment is 7.6 mm except for the dichroic where it is 1.12 mm. The fraction of the mirror size these correspond to are
FSM D/10
Fold 1 D/20
Fold 2 D/20
OAP 2 D/12
Dichroic D/70
How much of the above specified RMS errors do we add for non-correctables? I have included the whole RMS allowance for the FSM, OAP2 and dichroic which should make allowance for non-correctable and non-common path errors, while only a small fraction of the fold mirror errors needs to be included- I have take 25% of the RMS for each reflection at the fold.
Adding all these together i.e as per the table above but using 2 nm RMS for the folds gives a total variance of 0.0178 radians2 at 2.2 microns and is within the error allowance of 0.02 radians2
More accurate calculations will be made when the actual form errors on the surfaces are known