Fast Steering Mirror Test Procedure wht-naomi-37
![]()
1. Verification Methods
Visual Inspection
- Visual inspection of mechanical components
- Interfaces meet the specification
Factory Test
- Subassembly test
- Verification of performance of all parameters ( Test protocols)
Acceptance Test
Verification of specific parameters to demonstrate functional
reliability
Lifetime-Test and Environmental Test
not foreseen in the test program
2. Test Specification
|
Parameter |
Requirement |
Acceptance Test |
|
Full stroke |
±500µrad (±102.6 arcsec) beam deflection 0 bis 20 Hz |
Test 1 |
|
Tilt stroke bei 250 Hz |
49.8 µrad (10.2arcsec) beam deflection |
Test 2 |
|
Position of axes |
degrees |
Test 3 |
|
Tilt range |
Ri = -0.41 log(fi) +
1.033 fi - frequency [Hz] |
|
|
Resolution |
1.5µrad (0.3arcsec) |
Test 4 |
|
Repeatability |
4µrad (0.8arcsec) |
|
|
Static jitter |
1µrad RMS (0.2arcsec) |
|
|
Resonance |
>250Hz |
|
|
Reactionless |
<2% bei 250Hz |
Test 5 |
|
Linearity error |
<1% |
|
|
Pivot stability |
±0.05mm |
Test 6 |
|
Response time |
1 ms |
|
Test 1.
1. Scope of the test
Verificaton
of the full stroke 0 to 20 Hz
2. Test Procedure
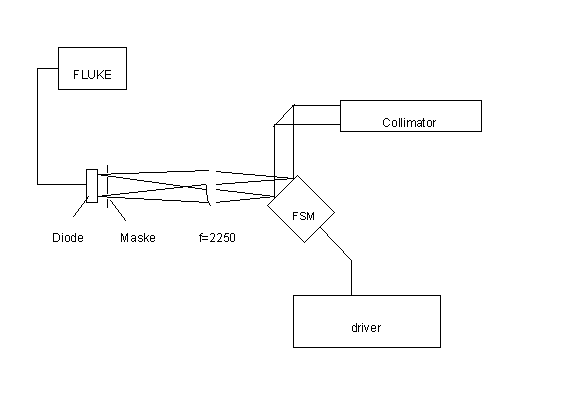
In front of the large-size diode a mask with a double slit will be
placed. The distance of the slits is s = 2*2250*tan(103.1arcsec)=2250 µm. Light
incidence on the diode only takes place, if the FSM generates a beam deviation
of 103.1 arcsec ( = 500 µrad). The signal will be recorded on an oscilloscope
(FLUKE).
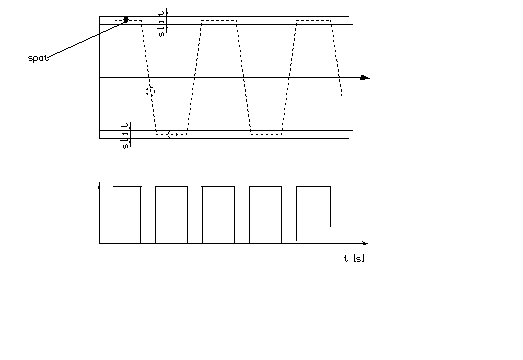
With the driver the frequency of of the square signal will be
variied.from von 0 Hz to 20 Hz . The amplitude of the driver will be adjusted
in that way, that the spot at full-scale deflection (.±) rests exactly on the slit.
The test will be carried out in jx and in jy .
Signal proceeding on FLUKE :
3. Test Results
|
fi [Hz] |
U [V] jx jy |
remark |
|
0 |
|
|
|
5 |
|
|
|
10 |
|
|
|
15 |
|
|
|
20 |
|
|
|
25 |
|
|
|
30 |
|
|
4. Test Equipment
- Collimator f=3000mm with illumination unit
- Objective f=2250mm
- Oszilloscope FLUKE
- PC mit driver card
- receiver with mask
Test 2
1. Scope of the test
Verificaton of the tilt
stroke by 250 Hz
2. Test Procedure
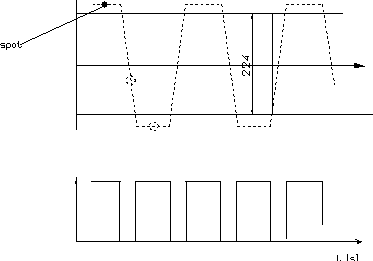
Die Test procedure is analogue to test 1.
The double slit will be replaced by a translucent bar.
Width s= 2*
2250*tan(10.28arcsec)=224 µm
Signal proceeding on FLUKE :
3. Test Results
|
fi [Hz] |
U [V] jx jy |
remark |
|
250 |
|
|
4. Test Equipment
- Collimator f=3000mm with illumination unit
- Objective f=2250mm
- Oszilloscope FLUKE
- PC with driver card
- receiver with mask
Test 3
1. Scope of the test
Verification of the Rectangularity of axes
2. Test Procedure
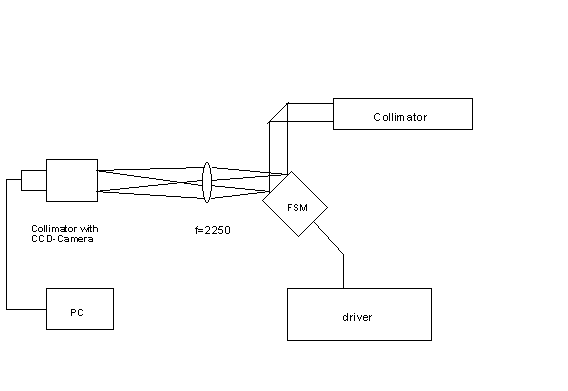
The axes x and y of the FSM will adjusted successively in 10 positions
each.
The spot positions will be measured and recorded with a collimator with
CCD-camerasystem The rectangularity will be calculated from the positional
field by means of an adjustment method.
3. Test Results
x - axes
|
U [V] |
Spot position x
[µm] y [µm] |
|
|
0 |
|
|
|
1 |
|
|
|
2 |
|
|
|
3 |
|
|
|
4 |
|
|
|
5 |
|
|
|
6 |
|
|
|
7 |
|
|
|
8 |
|
|
|
9 |
|
|
|
10 |
|
|
y - axes
|
U [V] |
Spot position x
[µm] y [µm] |
|
|
0 |
|
|
|
1 |
|
|
|
2 |
|
|
|
3 |
|
|
|
4 |
|
|
|
5 |
|
|
|
6 |
|
|
|
7 |
|
|
|
8 |
|
|
|
9 |
|
|
|
10 |
|
|
Deviation from the rectangularity : .............................
4. Test Equipment
- Collimator f=3000mm with illumination unit
- Objective f=2250mm
- PC mit driver card
- collimator with CCD-camera systems
Test 4
1. Scope of the test
Verificaton of the resolution
in the static mode
2. Test Procedure
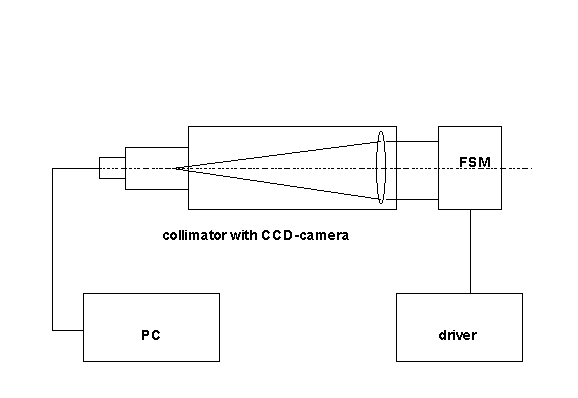
The FSM will be placed in front of a collimator. The collimator has an
illumination unit and a CCD-camera
system. The FSM will be controlled with voltages, which become smaller.
The smallest voltage skip is 0.24mV (10V, 12 bit).
This test will be carried out at different offset voltages.
The collimator has a focal length of 2250mm. Therefore 1µm within the
focal plane corresponds to a beam deviation of
0.09 arcsec.
3. Test Results
|
offset |
DU=i*0.244 [V] i |
Spotposition x [µm] y [µm] |
|
|
Ux = Uy =
0 V |
3 |
|
|
|
|
2 |
|
|
|
|
1 |
|
|
|
Ux = +10V, Uy
= 0 V |
3 |
|
|
|
|
2 |
|
|
|
|
1 |
|
|
|
Ux = -10 , Uy
= 0 V |
3 |
|
|
|
|
2 |
|
|
|
|
1 |
|
|
|
Ux = Uy =
+6 V |
3 |
|
|
|
|
2 |
|
|
|
|
1 |
|
|
Resolution : ...................................
4. Test Equipment
- Autocollimator f=2250mm with illumination unit and CCD-camera
Test 5
1. Scope of the test
Verificaton of the
Reactionless by 250 Hz
2. Test Procedure
In order to avoid significant increase of the housing mass, the FSM
will be supported on foam rubber.
Successively a piezoelectric vibration receiver will be mounted on the
mirror surface and on the interface surface 1.
The vibration parameters will be recorded in dynamic mode and the
attenuation will be calculated.
3. Test Results
|
fi [Hz] |
Mirror |
Interface |
Damping ratio |
|
250 |
|
|
|
|
300 |
|
|
|
4. Test Equipment
- piezoelectric vibration receiver system
Test 6
1. Scope of the test
Verificaton of the Pivot
stability ± 50 µm
2. Test Procedure
The mirror dummy will be provided with a thin centre cross. (
authorization from ROE is
necessary).
The centre cross will be observed with a microscope.
The position of the centre cross will be measured in static mode in in
x,y and z.
3. Test Results
|
Ux [V] Uy
[V] |
Centre cross position x [µm] y [µm] |
||
|
0 |
0 |
|
|
|
0 |
+10 |
|
|
|
0 |
-10 |
|
|
|
+10 |
0 |
|
|
|
-10 |
0 |
|
|
|
+7 |
+7 |
|
|
|
-7 |
+7 |
|
|
|
-7 |
-7 |
|
|
|
+7 |
-7 |
|
|
Max deflection of the centre cross :
..................................
4. Test Equipment
- Microscope