
|
|
Using ODBC to access PostgreSQL databases at INGPSQL-ODBC-1$Revision: 1.4 $ |
Purpose of this document
This document describes how to install and configure the ODBC driver to access the PostgreSQL databases at ING. It assumes that a Postgres Database is installed and functional. It describes how to setup Open Office, Microsoft Word and Star Office to use the ODBC driver.
Obtain either the unixODBC tar file for installation on Sun Machines using the Solaris Operating system or
the rpm file for installing on Linux machines.
The current unixODBC version installed is 2.0.7 and the rpm file is named unixODBC-2.0.7-1.i386.rpm.
For the Linux install use the Red Hat Package manager from the command line or a suitable GUI like tkrpm.
You will require root access to install the libraries and configuration files
 ll /usr/local/etc/
total 20
drwxr-xr-x    2 root     root         4096 Nov 20 15:16 ODBCDataSources
-rw-r--r--    1 root     root         1493 Nov 20 16:06 odbc.ini
-rw-r--r--    1 root     root          317 Nov 20 10:45 odbcinst.ini
-rw-r--r--    1 root     root          431 Nov 20 11:06 template.ini
To install ODBC on Microsoft Windows three components are required to access the PostgreSQL Database server.
Firstly you require the Microsoft Data Access Components (MDAC). This can be downloaded from :-
http://www.microsoft.com/data/download.htm
Here you will find free downloads for all of the MDAC releases. These downloads are redistributable according
to the End User License Agreements posted with each release. Eight releases of MDAC are available here:
MDAC 2.7, two of MDAC 2.6, three of MDAC 2.5, and two of MDAC 2.1. You can also find several release manifests.
Also please look at the information about installing MDAC.
MDAC 2.7 RTM Refresh (2.70.9001.0) is the version which I downloaded from this site. This release contains the
same version of the MDAC components that are installed by Windows XP.
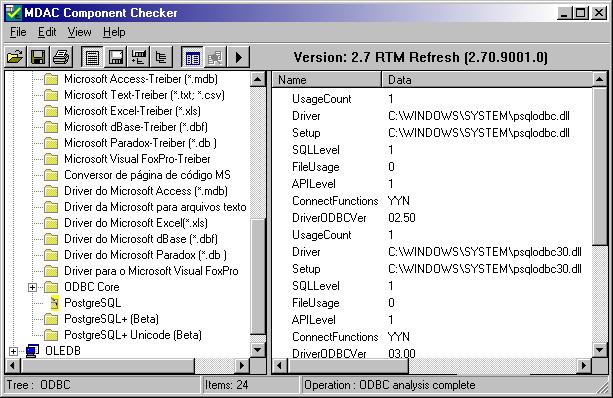
Secondly also download the recently updated Component Checker tool from this page. This release includes updated snapshots for MDAC 2.6 SP2 and MDAC 2.7 Refresh releases (filename cc.exe)
Thirdly go to :-
http://ftp.rge.com/pub/database/postgresql/odbc/versions/full/
Download the latest version of psqlodbc-xx_yy_zzzz.zip where xx and yy are the same as the version of PostgreSQL
in use (version 7.2 xx=07 and yy=02). The number zzzz is the release number of psqlodbc. I have currently
installed from the psqlodbc-07_02_0001.zip file.
Then install all 3 downloaded components by executing the 2 exe files and unzipping the psqlodbc zip file. Check using the component checker (ComCheck.exe) that PostgreSQL is available.
On the Sun or Linux machine edit the odbc.ini file and add the following:-
[ODBC Test Database]
Description = ODBC Test to Postgres
Driver = PostgreSQL
Trace = Yes
TraceFile = sql.log
Database = testodbc
Servername = csgsrv.ing.iac.es
UserName = database
Password = REMEMBER to SET the database password Here!!
Port = 5432
Protocol = 6.4
ReadOnly = No
RowVersioning = No
ShowSystemTables = No
ShowOidColumn = No
FakeOidIndex = No
ConnSettings =
Now edit the odbcinst.ini file ensuring the correct location of the library files :-
[TXT]
Description = Text file driver
Driver = /usr/local/lib/libodbctxt.so
Setup = /usr/local/lib/libodbctxtS.so
FileUsage = 1
[PostgreSQL]
Description = PostgreSQL driver for Linux and Win32
Driver = /usr/local/lib/libodbcpsql.so
Setup = /usr/local/lib/libodbcpsqlS.so
FileUsage = 1
The ODBC configuration should now be complete.
Start up Star Office on the computer this should provide you with the following window:-

Expand the sidebar to allow selection of the database. Click on the Database Icon to select a database.

Select the Type tab to display the Database type and Data source options.
Select ODBC from the drop down list in the Database type selection window.

Click on the Browse button to get a selection for the Data source.

Select ODBC Test Database (PostgreSQL) and click on the OK button to complete the selection.
You should see the window as shown below:-

You should now select the ODBC tab to input the User name and Password. Click on the OK button to complete the user input.

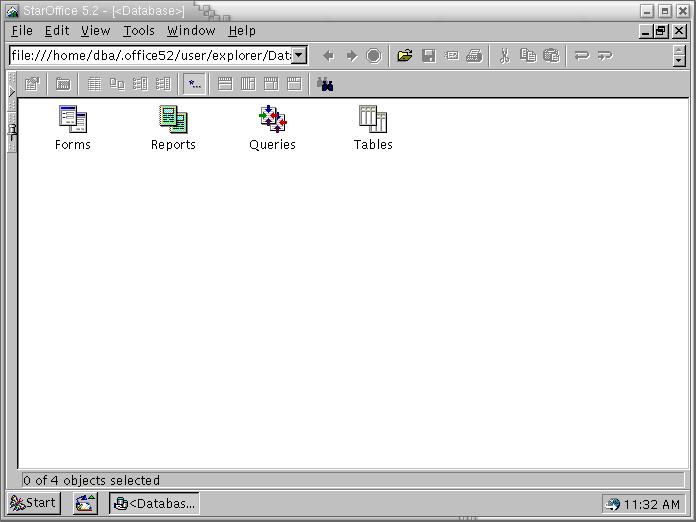
This will show a selection of icons for Forms, Reports, Queries and Tables. Select the icon named Tables:-
You should now see the available tables in this database.

If you click on the testtable icon you should then see the information contained in this table

If you have reached this point then your installation was sucessful.
Start up Open Office on the computer this should provide you with the following window:-

From the menu bar select the Tools->Data Sources option. This will open the Data Source Administration Window:-

Select the New Data Source button.
Select ODBC from the dropdown list in the Database type selection window.
Set the Name option (default is Data source 1) to CSGSRV.
Click on the ... button in the Data Source URL field to pop up the list of databases to select:-

Select ODBC Test Database and click on the OK button to complete the selection.
You should see the window as shown below:-

Click on the Apply button to save the new Data Source.
You should now select the ODBC tab to input the User name and select the Password Required box. Click on the Apply button to complete the user input.

To connect to the database select the Tables tab in the Data Source Administration Window. This will pop up a window in which to input the password for the "database" user:-

Fill in the password and select OK. You should now see the available tables in this database.

If you click on the Queries Tab this will allow you to create a query for the selected tables:-

If you select the first icon (New Query Design) this will pop up 2 windows (Add tables and Query:Query1) to start designing a new query. Select mytest in the Add Tables window and click on the Add button:-

This should now be displayed in the Query:Query1 window:-

To create the query click on the first empty field in the Table row and select "mytest" from the drop-down menu.
Click on the first empty field on the Field row and select "data" from the drop-down menu.
Run the command by clicking on the first icon (Run) above the mytest table display. If you were successful you should see the data from the table shown as follows:-

If you have reached this point then your installation was successful.
Start Microsoft Word and show the database toolbar by selecting the option View -> Toolbars ->Database. An extra toolbar should appear if this option is not already selected.
To setup Word to insert data select the 7th icon from the left on this row (Insert Database) and the Database screen should pop up.

Click on the "Get Data..." button this opens the Open Data Source window

Select the "MS Query..." button which pops up the Choose Data Source window

With the "New Data Source" option selected in the Databases tab click on the OK button. This will pop up the Create New Data Source window

Type into line1 "Test Database" and press return. Line 2 will allow you to select a driver from the drop down selector on the right. Select the PostgreSQL option.

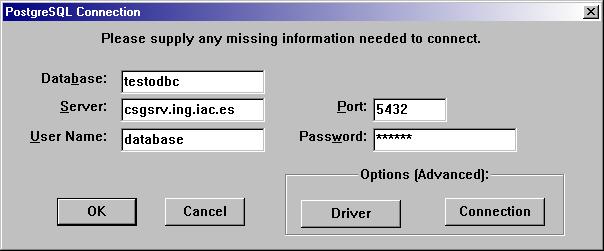
Click on the Connect button (line 3) to obtain the following window:-

Insert the following Information (with the correct Password of course):-
Click on the OK button to bring you back to the Create New Data Source Window Line 4 will allow you to select a default table from the drop down menu. Select the mytest table and click on the Save my user ID and password option box. The Create New Data Source window should now look like this :-

Click on the OK button this will bring you back to the Choose Data Source window, This window now should have the option for Test Database available, highlight this and click on the OK button.

The PostgreSQL database table will now be accessed to obtain the data fields in this table. The query on this table can now be defined.
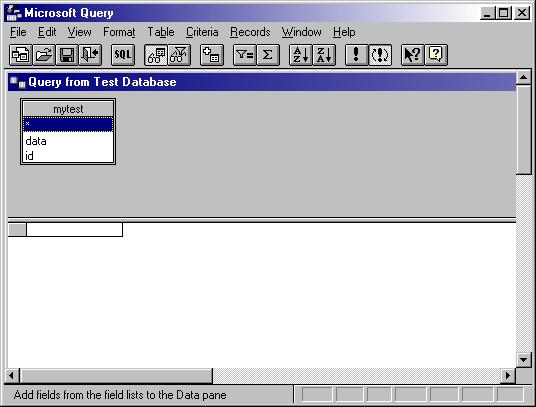
Select the "data" and "id" fields in the mytest window by double clicking the mouse this will show the data returned from the SQL database.

To return this data select File-> Return data to Word option on the query menu. This Menu option returns you to the Database Window.

Select the "Insert Data..." button which pops up the Insert Data window

Click on the OK button to insert the data into the Word document.

You have now inserted data from the PostgresSQL database into your Word document.