The standard procedure is summarized in Fig.10.
- Select the required position angle
The first thing to do is to select the position angle that you require
which should obviously be the same as you specified when designing the
mask. The Telescope Operator will use the TCS command ROT/SKY to set
this up. If the TCS has been setup correctly for LDSS-2, it will put the
telescope rotator at the angle which puts the LDSS-2 slits at the
position angle requested.
- Local calibration of the pointing model with a fiducial star
The acquisition procedure requires the telescope to point to an
accuracy that is a small fraction of the size of the reference
star holes in the mask.
Since there may be an offset between the coordinate system of the
telescope (FK5) and that of the target positions, it is very wise to
refine the pointing model by moving the telescope to a
star near (or in) the target field which has astrometry from the same
solution as your target objects - the pointing recalibration star
defined in Section 2.2.
This star should be loaded into the TCS catalogue and acquired
using GOCAT, and then moved using the handset onto the acquisition
reference position marked on the TV display.
- Blind offset to the target field
The TCS command BLIND_OFFSET target will move the telescope to the
position of target on the assumption that the position of the
original star is perfectly known. In other words it locally refines the
pointing mode. In all likelihood the telescope will move to target
with sub-arcsecond accuracy, provided that the local reference star was
very close to the target field. Usually this reference star will be one of
the reference stars in the target field.
- Acquisition of the guide star
Now that you are on the target, it is time to find a guide star.
The simplest way is to use the GSS software on LPVS3 which will
provide a list of suitable stars with the required guide
probe positions.
Once a star is found, don't start guiding yet but repeat the blind
offset sequence (i.e. GOCAT to your positional reference star, centre
up and do the BLIND_OFFSET again) to make sure that telescope has not
wandered while you were finding the guide star.
Start guiding immediately you have done the blind offset, and as soon
as you are sure that the autoguider is tracking the star, ask the
Telescope Operator to make the telescope use the autoguider output for
tracking corrections.
- Direct exposure through mask
Now take a direct image of the sky through the mask with no grism (a
broad band filter is desirable but not essential).
The image should show the reference stars in the appropriate holes in
the masks, in general offset from the centres of the holes.
If no stars can be seen: check the acquisition procedure so far -
are you still autoguiding? --- is the mask correct?
An image of the target field without the mask will verify the field
identification if in doubt.
Measurements of the positions of the reference stars can be compared
with the location of the holes in the masks to check for errors.
- Determination of the telescope offset required
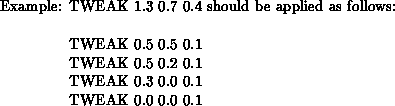
The image can now be analyzed using LEXT procedure FIND_TWEAK
 where
where  is the number of fiducial holes.
This works out how much the telescope should be moved to place the
fiducial stars bang in the middle of the fiducial holes.
Read the comments as you go along for information about the things
that happen.
The main stages are:
is the number of fiducial holes.
This works out how much the telescope should be moved to place the
fiducial stars bang in the middle of the fiducial holes.
Read the comments as you go along for information about the things
that happen.
The main stages are:
- Application of the telescope offset
Give the offsets to the Telescope Operator who should use the TCS command:
to move the telescope while the autoguider is still locked on and
the telescope continues to receive guiding signals.
During the set up procedures the Telescope Operator should have used
the TCS command INSTRUMENT LDSS to enter the correct orientation for
the offsets.
This is because the autoguider may lose lock if the telescope moves by
amounts larger than this.
The procedure is to break down the TWEAK into increments of this size
and apply each one, waiting a few seconds to allow the autoguider to
catch up.
It would be wise to watch the autoguider display carefully to try and
see if it loses lock.
If it does, you could try (a) reducing the increment size and/or (b)
selecting a brighter guide star.
You should also take care that the guide star is not so near the edge
of the autoguider field that it moves outside the area in which the
autoguider can track it when the TWEAK is applied.
Doing the TWEAK with the autoguider in closed-loop should ensure that no
positional errors occurs during the offset. If you need to apply a large
TWEAK that cannot be done in closed-loop (for example, because the guide star
would move outside the autoguider detector area), you can use TWEAK with the
autoguider off ( open-loop). However you would then need to take
another direct exposure after restarting autoguiding to check the position
of the targets before doing a smaller closed-loop TWEAK.
- Acquisition check
In general, this procedure will be sufficient to acquire the target field
to an accuracy of around 0.1 arcsec but it must be checked. After
performing the TWEAK, take another direct image through the mask. Before
analyzing it, it is usually safe to put the grism in and start a spectroscopic
exposure while the second direct exposure is analyzed. If there is a
residual TWEAK to be done, this can be applied during the spectroscopic
exposure (in closed-loop). If there is a large error in position, the
exposure can be aborted and the whole procedure repeated. If this happens,
you should first try and work out what has gone wrong.
From time to time, during a long sequence of spectroscopic observations on
the same field, you may wish to check the acquisition. To do this, simply
take a direct image of the sky through the mask and use FIND_TWEAK
to check that the stars are still centred in the holes.
Any fine adjustments can be made during the spectroscopic exposures.


 shift,
  shift and rotation
(
shift and rotation
( ,
, ,
, ) in units of (arcsec, arcsec, degrees)
required to move the stars to the centres of the holes. Note these
numbers down. (Usually they will be less than 5 arcsec in
) in units of (arcsec, arcsec, degrees)
required to move the stars to the centres of the holes. Note these
numbers down. (Usually they will be less than 5 arcsec in  in rotation.)