INS-SDSUAUTO-3
Software User Manual for the
SDSU-based Autoguider/TV System
R Bassom
Issue 0.2; 17-Jun-2004
![]()
Isaac Newton Group,
Apartado
321, 38700 S/C La Palma,
Tenerife,
Canary Islands
Telephone +34 922 425400
Fax +34 922 425401
![]() Internet rab@ing.iac.es
Internet rab@ing.iac.es
Contents:
1. INTRODUCTION 3
1.1 Purpose 3
1.2 Scope 3
1.3 Definitions, acronyms and abbreviations 3
1.4 References 3
2. Getting Started 4
2.1 Setting up the System 4
2.2 Starting the System 4
2.3 Restarting the System in the Event of Problems 4
3. Graphical User
Interface 5
3.1 Autoguider GUI 5
3.2 Typical Usage 6
3.2.1 Guide on the Brightest Star 6
3.2.2 Guide on a Specific Pixel 6
3.2.3 Guide on a Selected Object 6
4. User Commands 10
4.1 Overview 10
4.2 Command Summary 10
5. Document history 12
1. INTRODUCTION
1.1 Purpose
This
document describes the user interface to the SDSU autoguider. It provides
details of the available command set and also information on setting up and
using the autoguider itself. Also described is the autoguider graphical user
interface (GUI). This document should be read by all those wishing to use the
SDSU autoguider.
1.2
Scope
This
document describes the software of the SDSU based autoguider system.
1.3
Definitions,
acronyms and abbreviations
WHT The William Herschel
Telescope
SDSU San Diego State
University camera controller
UltraDAS The Sun
Ultra based Data Acquisition System
TCS Telescope
Control System
1.4
References
2.
Getting
Started with the SDSU
Autoguider
2.1
Setting up the
System
Use the ‘obssys’ or ‘obssys
dev’ command to set up the system. Select the required autoguider camera to be
used for TV/autoguiding. If the autoguider is to be run on the DAS machine used
for the autoguider camera, then the UltraDAS camera server should be started
with the ‘startobssys’ command.
If the autoguider is to be
run on a different machine from the DAS computer, then ensure that the
autoguider camera is running on the remote DAS machine.
2.2
Starting the
System
Start the autoguider using
the ‘startsdsuag <autoguider_name>’ script provided. For example to start
the ag2 autoguider, then type:
startsdsuag ag2
This script will start up
the following items:
SDSUAutoguider – This is the
SDSU autoguider server. The message “The autoguider is starting up” should
appear in the talker window.
SDSUAutoguiderGUI – This is
the SDSU autoguider control GUI.
ds9 – This is the display
tool used by the autoguider for displaying TV/autoguider images.
talker – This provides log,
informational and alarm information on the autoguider.
2.3
Restarting the
System in the Event of Problems
Shutdown the camera server
on the DAS machine on which the camera is running by typing ‘shutdownobssys’,
and then type ‘cleanup’ to clean up DRAMA. Restart the camera server by typing
‘startobssys’ on the DAS machine.
On the autoguider machine,
type ‘startsdsuag <autoguider_name>‘ to restart the autoguider tasks. For
example to restart the ag2 autoguider, then type:
startsdsuag ag2
2.4
Reverting to
the original UltraDAS Autoguider
Close down the
SDSUAutoguider by typing ‘murder SDSUAutoguider’. Start up the UltraDAS
Autoguider with the command ‘startag <camera>’. For example:
startag ag2
3.
Graphical User
Interface
3.1
Autoguider GUI
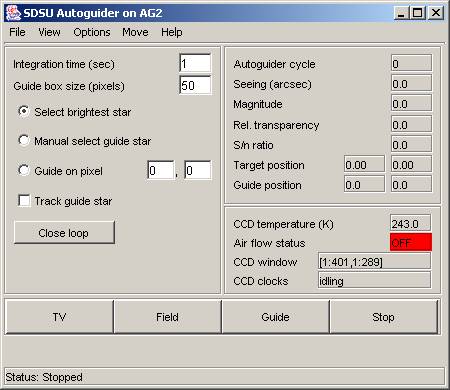
Figure 1 SDSU Autoguider GUI
The graphical user interface
can be run on any Solaris workstation that is part of the observing system. It
provides controls to set the autoguider guiding on an object or a specified
pixel, displaying TV images, and to provide a field images showing suitable
guide objects. “Tooltip” help for all GUI controls is available by hovering the
mouse pointer over the control.
Images are fed from the
autoguider GUI control to a ds9 display tool using the Client Display Library
(CDL), with various overlays marking the usable guide objects. The ds9 display
tool can also used to manually select guide objects. The GUI displays
statistical information about the guide object, and provides status information
on the autoguider camera.
A plot of the telescope x
and y guiding errors is updated in real time.
3.2
Typical Usage
Typical usage sequences are:
3.2.1
Guide on the
Brightest Star
- The TO selects a suitable guide object from the
catalogue, and moves the probe to the guide object.
- Field: The TO presses the “Field” button to
identify the guide object.
- TV: If the object is not immediately visible,
the TO may press the “TV” button to have the display continually updating.
The integration time may need to be changed in order to acquire the guide
object, This can be done by typing new values into the “Integration time”
control, and pressing enter.
- Guide: When the guide object has been
identified, the TO may press the “Guide” button to set the autoguider
guiding on the brightest object in the field. This will close the guide
loop with the TCS, and the autoguider will start sending guide data to the
TCS.
- Stop: When the TO is ready to move to the next
field, they may press the “Stop” button to open the guide loop with the
TCS, and to stop the autoguider sending guide data to the TCS.
3.2.2
Guide on a
Specific Pixel
·
The TO selects a
suitable guide object from the catalogue, and moves the probe to the guide
object.
·
Field: The TO presses
the “Field” button to identify the guide object.
·
TV: If the object is
not immediately visible, the TO may press the “TV” button to have the display
continually updating. The integration time may need to be changed in order to
acquire the guide object, This can be done by typing new values into the
“Integration time” control, and pressing enter.
·
Guide on pixel: The TO
may now select the “Guide on pixel” radio button, and type in the co-ordinates
of the pixel required for guiding.
·
Guide: The TO can start
guiding on the pixel by pressing the “Guide” button.
·
Stop: When the TO is
ready to move to the next field, they may press the “Stop” button to open the
guide loop with the TCS, and to stop the autoguider sending guide data to the
TCS.
3.2.3
Guide on a
Selected Object
·
The TO selects a
suitable guide object from the catalogue, and moves the probe to the guide
object.
·
Field: The TO presses
the “Field” button to identify the guide object.
·
TV: If the object is
not immediately visible, the TO may press the “TV” button to have the display
continually updating. The integration time may need to be changed in order to
acquire the guide object, This can be done by typing new values into the
“Integration time” control, and pressing enter.
·
Guide on object: The TO
may now select the “Guide on object” radio button to manually select an object
in the display. This may be because the brightest object is not suitable for
guiding.
·
Guide: The TO presses
the “Guide” button to start guiding. A dialog box will pop up asking the TO to
select the required object on the display. The TO closes this dialog box,
selects the display tool window, and moves the cursor to the required object.
When the cursor is over the required object, the TO presses any key on the
keyboard, and the autoguider starts to guide on the selected object.
·
Stop: When the TO is
ready to move to the next field, they may press the “Stop” button to open the
guide loop with the TCS, and to stop the autoguider sending guide data to the
TCS.
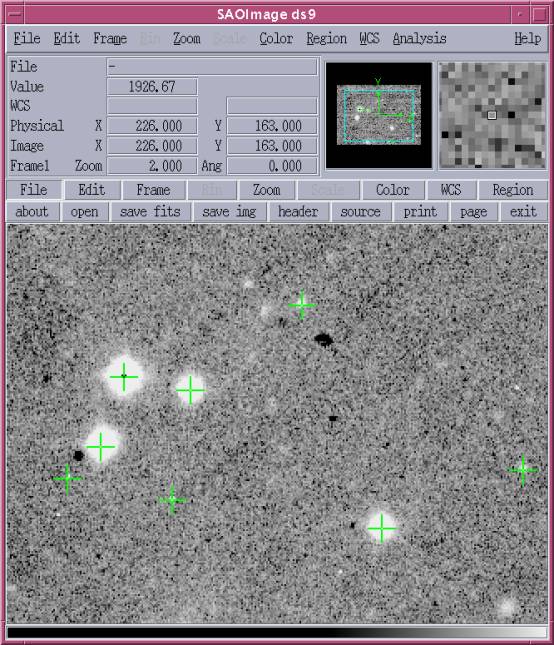
Figure 2 Display tool - ds9
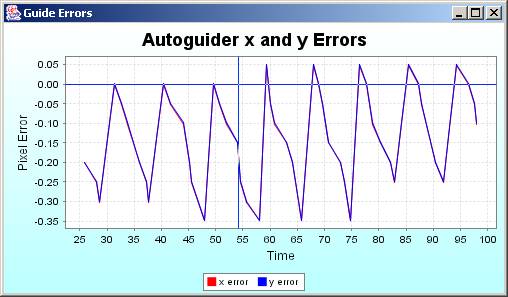
Figure 3 Autoguider Error Plot
4.
User Commands
4.1
Overview
The autoguider user commands
are written as programs accessible from the UNIX shell. This means that
sequences of user commands can be combined into scripts using standard shell
scripts. For example a function could be written which sets the autoguider to
set the acquisition window and guide on the brightest object. Alternatively, an
automated pointing test could be written as a script using the autoguider
commands.
A single command line client
is provided which takes the name of the autoguider and the autoguider command
as its parameters. The general format of an autoguider command is:
ag <autoguider_name> <command>
<command_parameters>
For example to start guiding
on the brightest star in the field on autoguider ag2:
ag ag2 guide
By making the autoguider commands
accessible in this way, the use of C-shell scripts, Perl scripts, and Tcl/Tk
user interfaces, for example, can all be used to combine the commands in order
to provide higher-level control. For example, the following script sets a
window [300:800,300:800] on autoguider camera AG2, then guides on the brightest
object in the field.
#!/bin/csh
#
ag ag2 set acqwin 300 300
800 800
ag ag2 guide
#end
4.2
Command
Summary
|
Command |
Description |
|
ag <autoguider_name>
guide |
Set the autoguider guiding
on the brightest star in the image |
|
ag <autoguider_name>
guideonpixel x y |
Set the autoguider guiding
on the pixel at co-ordinates x,y |
|
ag <autoguider_name>
guideonobject at_x at_y |
Set the autoguider guiding
on the object at co-ordinates x,y |
|
ag <autoguider_name>
field |
Perform a field to
identify potential guide objects |
|
ag <autoguider_name>
tv |
Set the autoguider
displaying TV images |
|
ag <autoguider_name>
stop |
Stop the autoguider
guiding or displaying TV images |
|
ag <autoguider_name>
open loop |
Open the guide loop with
the TCS |
|
ag <autoguider_name>
close loop |
Close the guide loop with
the TCS |
|
ag <autoguider_name>
set guiwin x y |
Set the position of the
guide window to x,y |
|
ag <autoguider_name>
set guiwinsize size |
Set the size of the guide
window box in pixels |
|
ag <autoguider_name>
offset guiwin xoffset yoffset |
Offset the guide window by
xoffset, yoffset |
|
ag <autoguider_name>
set acqwin x1 y1 x2 y2 |
Set the autoguider camera
acquisition window from x1, y1 to x2, y2 |
|
ag <autoguider_name>
set inttime integration_time |
Set the autoguider’s
integration time in seconds |
|
ag <autoguider_name>
set snr SNR_threshold |
Set the signal to noise
ratio threshold |
|
ag <autoguider_name>
set tracking on |
Set guide star tracking on |
|
ag <autoguider_name>
set tracking off |
Set guide star tracking
off |
|
ag <autoguider_name>
reset reference |
Reset the guide star
reference values |
|
ag <autoguider_name>
get state |
Get the current state of
the autoguider |
|
ag <autoguider_name>
get guidestar |
Get the details of the
current guide star |
|
ag <autoguider_name>
get inttime |
Get the autoguider’s
current integration time |
|
ag <autoguider_name>
get guidetarget |
Get the position of the
guide star target |
|
ag <autoguider_name>
get guideerror |
Get the current guide
error |
5.
Document
history
V0.1 27th May, 2004 - First draft produced